background image

YMGI: Your Modern Green Idea 


YMGI, Engineered Comfort Products for A Sustainable and Efficient Green World! 


37 


Routine Maintenance 

Only qualified service persons should perform maintenance. 
Before accessing to terminal devices, all power supply circuits should be disconnected. 
Do not expose to water, or air that is 122°F (50°C) or warmer for cleaning air filters or outside panels. 
 

Notes: 

1.  Do not operate the air conditioner with the filter uninstalled, otherwise dust would come into the unit. 
2.  Do not remove the air filter except for cleaning. Unnecessary handling may damage the filter. 
3.  Do not clean the unit with anything than contains: acetone, gasoline, benzene, thinner, polishing powder or liquid 

insecticide. These can discolor and warp the unit. 

4.  Do not get components of the indoor unit wet. This can cause electric shock or fire hazard. 
5.  Increase the frequency of cleaning if the unit is installed in a room where the air is excessively dusty. (As a 

general rule, we recommend cleaning the filters once every six months. 

6.  If dirt becomes impossible to clean, replace the air filter. 


How to clean the air filter 

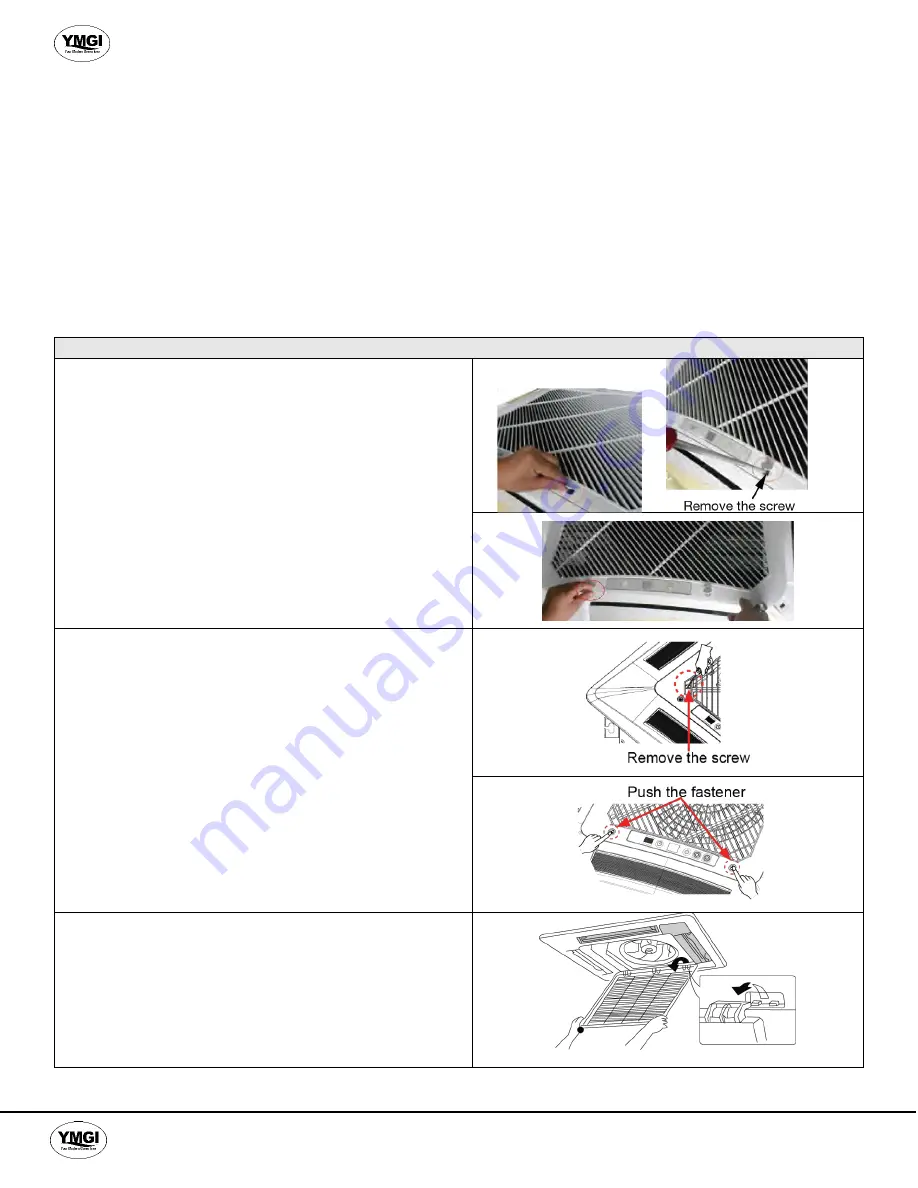
1. Open the air inlet grille 
 

How to open the panel grille of the  
24k cassette type unit 
 

a.  Push the buckle as shown in the figure. 
b.  Remove the screws under buckles using a 

screwdriver. 

c.  Push the fastener and open the panel grille


How to open the panel grille of the  
12k / 18k cassette type unit 
 

a.  Remove the screws using a screwdriver as shown 

in the illustration. 

b.  Push the two fasteners to open the panel grille.


2.  Disassemble the air inlet grille 

a.  Open the air inlet grille at 45° angle, lift the pegs to 

remove the grille. 


Summary of Contents for VRFI-07EC4-D2B(55)5

Page 1: ...ng and heating equipment such as NEC State or Local Codes and all related documents manuals provided by YMGI Failure to follow and adhere to all codes and documentation can cause damage to equipment p...

Page 2: ...Hiring an HVAC Contractor 11 System Diagram 13 Accessories 14 Ceiling Cassette Specification Sheet 15 Recommended Tools for Installation 17 Installation Site Selection 18 Connection Pipe Requirements...

Page 3: ...rements for handling reclaiming recovering and recycling of certain refrigerants the equipment and tools necessary to perform these service procedures In addition some states or municipalities may hav...

Page 4: ...stem installer or HVAC professional as soon as possible and provide the following information Data on the unit model number serial number and owner s name A detailed description of the unit s problem...

Page 5: ...etc which the manufacturer may not require certified and licensed personnel to install Reading and following YMGI Group recommendations and requirements contained in the following pages and other doc...

Page 6: ...ling the piping through any structures at time of installation 2 Not installing an oil P trap in the copper suction line where the indoor unit is located 18 feet or more below the outdoor unit 3 Cross...

Page 7: ...D or any other identifying marks on each pair of copper lines and wiring cable sets to keep from cross piping or cross wiring in multiple zone installations or where pipes for different single zone s...

Page 8: ...ation or 90 days as of original shipping date from YMGI Group whichever comes first This is a standard limited liability warranty and DOES NOT cover the following Any damage or repairs to properties o...

Page 9: ...st will be charged accordingly 3 YMGI will ground ship out the parts ASAP Expedited shipping is available at the customer s expense 4 Replacement parts that have an approved warranty registration are...

Page 10: ...YMGI Your Modern Green Idea YMGI Engineered Comfort Products for A Sustainable and Efficient Green World 10...

Page 11: ...time and it will be easier for you to determine if they are reputable Use only a reputable licensed certified HVAC installation professional to prevent any unexpected charges because of unethical busi...

Page 12: ...ifference between indoor and outdoor unit within 41 5 YMGI Group recommends that only properly trained and authorized personnel be allowed to repair or service the unit Improper repairs or servicing c...

Page 13: ...ngineered Comfort Products for A Sustainable and Efficient Green World 13 SAMPLE DIAGRAM OF INSTALLED SYSTEM The refrigerant pipe drain pipe and electrical wiring for this unit should be installed by...

Page 14: ...er with the hanger bolt for installing the unit 4 Installation Template 1 Used for ceiling drilling 5 Template Mounting Board 4 Prevents gasket from falling off 6 Remote Controller and Batteries 1 Rem...

Page 15: ...0 625 0 625 0 625 0 625 MOP Amp 15 15 15 15 15 Condensate Pump Lift from base of unit in 19 11 16 19 11 16 19 11 16 19 11 16 19 11 16 Sound Pressure Level H M L dB A 36 34 31 37 35 32 37 35 32 37 35...

Page 16: ...15 15 15 15 Condensate Pump Lift from base of unit in 19 11 16 19 11 16 19 11 16 19 11 16 19 11 16 Sound Pressure Level H M L dB A 38 36 33 40 38 35 41 38 36 43 41 38 43 41 38 Refrigerant R410A R410A...

Page 17: ...Individual wrench Set Use Two at One Time Flare Nut Tool Set Not Shown Hex Head Allen Wrench Sets Metric and Imperial Brazing Rods and Brazing Torch Outfit for AC Application Not Shown Brazing Flux N...

Page 18: ...e the installation complies with the installation minimum dimensions and meets the minimum and maximum connecting piping length and maximum change in elevation Air inlet and outlet should be clear of...

Page 19: ...0 MPa The longer the connecting pipe the lower the cooling and heating performance Electrical Requirements Electric Wire Size and Fuse Capacity Indoor Units Power Supply Fuse Capacity Min Power Supply...

Page 20: ...the units 12 18k For the unit 24k Model A B C D E F G VRFI 12EC4 D2B 55 5 26 378 670 mm 26 2 666 mm 23 6 600 mm 19 53 496 mm 5 7 145 mm 9 45 240 mm 23 46 596 mm VRFI 18EC4 D2B 55 5 26 378 670 mm 26 2...

Page 21: ...the unit is installed level horizontally in all four directions If not the water pump and the float switch will function improperly and can even lead to water leakage 5 Remove the gasket anchor board...

Page 22: ...the connection pipe After that flare the connection pipe with a flaring tool 4 Check if the flared line is spread evenly and there are no cracks Bending Pipes 1 Shape the pipes with your hands Be car...

Page 23: ...remove the flare nut until the pipe is connected to prevent debris from getting into the piping system When connecting or removing it the refrigerant pipes to the unit it is recommended that both a w...

Page 24: ...Side Unit Tighten the flare nut of the connection pipe at the outdoor unit valve connector The tightening method is the same as that as at the indoor side Checking the Pipe Connections for Leaking Gas...

Page 25: ...ve The gas and liquid valves should be kept closed in case of refrigerant leak 3 Connect the hose used for evacuation to the vacuum pump 4 Open the switch at the lower pressure side of the manifold va...

Page 26: ...o the two service ports to quicken the evacuating speed Installation of the Drain Hose Installation of Drain Piping 1 Keep piping as short as possible and slope it downwards at a gradient of at least...

Page 27: ...1 Metal clamp 2 Drain hose accessory 3 Grey tape accessory Insulate the pipe clamp and the drain hose using heat insulation sponge 1 Metal clamp accessory 2 Insulation sponge accessory 3 Grey tape ac...

Page 28: ...NO 2 Attach the drain elbow as shown in the second illustration 2 NO 3 Attach the horizontal pipe as shown in illustration 3 Precautions When Doing Riser Piping Work 1 Make sure that heat insulation w...

Page 29: ...in 75 mm or less so that the drain outlet does not have to withstand additional force Testing of Drain Piping Add approximately 1liter of water slowly into the drain pan and check drainage flow while...

Page 30: ...Green World 30 2 Improper tightening of the screws may cause air leakage or condensate leakage as shown below 3 If a gap still exists between ceiling and fascia panel after tightening the screws read...

Page 31: ...h the hooks beside and opposite of the swing louver motor 2 Latch other two hooks 3 Tighten four hexagonal screws under the latches approximately 5 8 in 15mm 4 Adjust the panel along the direction ind...

Page 32: ...and electric company standards 1 The power source capacity must be the sum of the air conditioner current and the current of other electrical appliance When the current contracted capacity is insuffi...

Page 33: ...th those of the indoor unit side 3 Improper wiring can cause burning or damage to the electric components 4 Connect the wires firmly to the terminal block Improperly securing the wiring can cause a fi...

Page 34: ...ror Code Error 1 E1 Compressor high pressure protection 2 E2 Indoor anti freeze protection 3 E3 Compressor low pressure protection refrigerant lack protection and refrigerant collecting mode 4 E4 Comp...

Page 35: ...the Indoor Unit will display the room temperature for 3s and then resume to display the set temperature If there is error the error code will be displayed If there are multiple errors the error codes...

Page 36: ...perature is above 118 F 48 C Poor cooling performance 1 Air filter is dirty or obstructed 2 There is heat source or too many people in the room 3 A door or window is open 4 There is obstacle at the ai...

Page 37: ...n discolor and warp the unit 4 Do not get components of the indoor unit wet This can cause electric shock or fire hazard 5 Increase the frequency of cleaning if the unit is installed in a room where t...

Page 38: ...creen a Clean the filter screen using a vacuum cleaner b If oil stains on the filter cannot be removed or cleaned with a vacuum wash the filter using warm water and a mild detergent c Do not dry filte...

Page 39: ...function 3 MODE Set operating Mode 4 Set up down Swing status 5 I FEEL Set I FEEL function 6 TEMP Switch Temperature displaying type on the unit s display 7 Set Health function and Air function 8 LIGH...

Page 40: ...is in powered ON status press button to increase set temperature and press button to decrease set temperature The range of temperature is from 60 8 F 86 F 16 C 30 C NOTE Under AUTO MODE the system is...

Page 41: ...n Press again to turn the display back on Viewing Ambient Temperature In unit on status the receiver light board or wired controller is defaulted to display the setting temperature Press TEMP button t...

Page 42: ...interrupted communication with the Indoor Unit In unit ON status press I FEEL button to turn on or turn off I FEEL function When icon is displayed I FEEL function is on When icon is not displayed I FE...

Page 43: ...Energy Saving Function is on 3 When does not appear on the remote control display Energy Saving Function is off 4 To turn off the energy saving function press CLOCK and TEMP buttons simultaneously and...

Page 44: ...vity of main unit When the remote controller is transmitting a signal the icon will be blinking for 1 second When the main unit receives a valid command from the remote control it will beep If the rem...

Page 45: ...e and Efficient Green World 45 USER NOTES AND INSTALLATION SERVICE MAINTENANCE NOTES INSTALLATION NOTES Put down whatever questions you have or problems you have seen as a unit history Date Notes Aske...

Page 46: ...Sustainable and Efficient Green World 46 USER NOTES Put down whatever questions you have or problems you have seen as a unit history Date Installation Company Name Phone Technician Name HVAC License J...

Page 47: ...Modern Green Idea YMGI Engineered Comfort Products for A Sustainable and Efficient Green World 47 SERVICE MAINTENANCE NOTES Date Contents of Service Maintenance Company Name Phone Technician Name HVA...

Page 48: ...SEER 09 24K Btu h 58 2 Single Zone 16 22 SEER 09 36K Btu h 58 4 78 1 Single Zone 18 23 SEER 09 36K Btu h Symphony CHOIR DC Inverter 59 2 DC Inverter Multiple Zone 16 SEER 2x09K to 5x12K Btu h 59 2S DC...

Reviews: