3
Be careful when carrying or moving this product. Do not drop. The internal
mechanism is likely to be damaged by severe shock.
4. Maintain sufficient ventilation.
Do not block any ventilation openings.
5. Do not operate or store near any heat source.
Keep this product away from heat sources like radiators, heat registers,
stoves, or any other apparatus that produce heat. Remove any batteries
before storage. Avoid storing in places under extreme temperature, severe
vibration, strong magnetic fields, direct sunlight, damp areas and heat
sources.
Recommended operation temperature for YI HALO:
- Operating range: 0
℃
~35
℃
, 32
°F
~95
°F
6. Handle the battery carefully.
●
Only use batteries approved for use in this product.
●
Do not disassemble the battery. Do not expose the battery to flame or
excessive heat.
●
Do not use near or expose the battery to any chemicals.
●
Keep the battery dry.
●
Do not handle the battery if it is damaged or leaking. Battery disposal
must be in accordance with local environmental regulations.
●
Do not charge the YI internal battery with anything except the included
AC Adapter.
●
Storing the battery fully charged or in very high or cold temperature
conditions may reduce the battery life.
7. It is recommended to be used at least 20cm/8 inches away from the user.
1.
Introduction
1.1 Overview
Thank you for using YI HALO - the newest Google Jump stereoscopic 360 VR
Camera, built by YI. This manual is intended to help you get the most of this
camera. Please read it thoroughly and keep it for further use.
1.2 Getting to Know the Camera
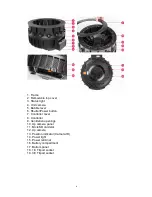
YI HALO consists of 17 hardware clock synchronized unit cameras (including
1 up view camera) and 1 controller.
Controller
refers to the camera on the side
of YI HALO that is used to control all cameras for these functions:
●
Displays all unit cameras’ status
●
Connects to the mobile phone or the Bluetooth remote so that all cameras
can be controlled remotely
●
Synchronizes the settings among all cameras
Summary of Contents for YI Halo
Page 1: ......
Page 20: ...19 2 Disconnect the controller from the USB cable then remove the controller and set it aside ...
Page 42: ...41 Up view for the up camera ...
Page 65: ......


