13
O R I G I N A L I N S T R U C T I O N S
GB
- always shut off air supply, drain hose of air pressure and disconnect tool from air supply when not in
use, before changing accessories or when making repairs;
- never direct air at yourself or anyone else.
Whipping hoses can cause severe injury. Always check for damaged or loose hoses and fittings. Whenever universal twist cou-
plings (claw couplings) are used, lock pins shall be installed and whipcheck safety cables shall be used to safeguard against
possible hose-to-tool or hose-to-hose connection failure. Do not exceed the maximum air pressure stated on the tool. Never carry
an air tool by the hose.
CONDITIONS OF USE
Make sure the source of compressed air permits to generate adequate operating pressure and guarantees the required airflow. In
case of an excessive air pressure, it is required to use a reducer with a safety valve. The pneumatic tool must be powered through
the filter and lubricator system. This will guarantee that the air will be clean and lubricated with oil. The conditions of the filter and
the lubricator must be revised before each use. If necessary the filter must be cleaned and the lubricator filled with oil. This will
guarantee a proper operation of the tool and prolong its life.
Do not use grinding belts whose dimensions are different from those indicated in the technical specification.
Before using the tool check the endless band. If any damage or wear is detected, use a new band.
Make sure the arrow on the band coincides with the arrow on the grinder.
Place the band parallel to the rollers of the grinder, so that it does not fall from the rollers during operation.
During work wear protective goggles and anti-dust masks. It is also recommended to wear gloves and protective clothes.
While processing certain materials toxic or inflammable powder or vapours may be generated. Work must be realised in well-
ventilated rooms and it is required to use individual protective means.
USING THE TOOL
Before each use of the tool make sure no element of the pneumatic system is damaged. In case any damage is observed replace
immediately the damaged elements of the system.
Before each use of the pneumatic system, dry the humidity condensed inside the tool, the compressor and the conduits.
Connecting the tool to the pneumatic system
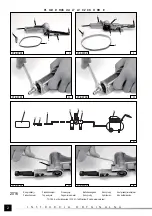
The drawing indicated the recommended manner of connecting the tool to the pneumatic system. The indicated connection will
ensure the most effective operation of the tool, and prolong its life.
Place a couple of drops of an SAE 10 oil in the air inlet.
Connect safely and tightly to the air inlet thread an adequate tip, which permits to connect an air supply hose. (II)
Place the grinder in a position which ensures the safest and most ergonomic operation, in accordance with the procedure de-
scribed below.
Place the band on the rollers in accordance with the procedure described below.
Connect the tool to the pneumatic system, using a hose whose internal diameter is 10 mm / 3/8”. Make sure the minimum resist-
ance of the hose is 1.38MPa. (III)
Start the tool for a couple of seconds, and make sure it does not emit any suspicious sounds or vibrations.
Positioning the grinder in the working position (IV)
Loosen the rotation lock bolt and then turn the power transmission section of the grinder, so that safe and efficient operation is
ensured. Tighten the locking bolt so that it does not turn during operation. During operation check whether the bolt is tight from
time to time.
Attention! Make sure the set position does not imply any contact between the rotating parts with the body or the clothes of the
operator.
Installation of the grinding band
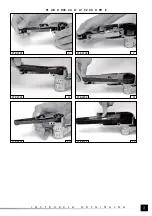
Make sure the arrow on the band coincides with the arrow on the grinder. (V)
Press the tightening roller until the lock is activated. (VI)
Install the band starting at the power transmission roller and passing to the tightening roller. (VII)
Release the lock of the tightening roller, which will permit to tighten the band. (VIII)
Turn the band several times, and make sure it rotates freely and does not tend to fall from the rollers during operation. If necessary
repeat the tasks until the band is properly installed.
Work with the grinder
Start the grinder and wait until the band has reached the full rotational speed. It is only allowed to place a rotating band at the
processed material.
Exert only such pressure on the tool which is required to process the material. Do not press the tightening roller too long and at
Summary of Contents for YT-09741
Page 21: ...21 RUS...
Page 22: ...22 RUS...
Page 23: ...23 RUS SAE 10 II 10 3 8 1 38 III IV V VI VII WD 40 30 SAE 10 SAE 10 WD 40...
Page 24: ...24 RUS 6 100 WD 40 30 0 3...
Page 26: ...26 UA...
Page 27: ...27 UA SAE 10 II 10 3 8...
Page 28: ...28 UA 1 38 III IV V VI VII WD 40 30 SAE 10 SAE 10 WD 40 6 100...
Page 29: ...29 UA WD 40 30 0 3...


