14
O R I G I N A L I N S T R U C T I O N S
GB
“Set Valve Type: ASD2 / ASD4 / ASU2” - a factory setting that should not be changed.
“Set Type: Timer / Volume” - a factory setting that should not be changed.
“Set Resin Vol... 08L”- the size of deposit. The value is provided for demonstration purposes. The real value will be displayed on
the screen. A factory setting that should not be changed.
“Set Regen Day: 30 Day” - the number of days between successive regenerations. A factory setting that should not be changed.
“Set BackWash: 02 Min” - the duration of backward fl ushing. A factory setting that should not be changed.
“Set Brine: 30 Min” - the duration of regeneration. A factory setting that should not be changed.
“Set Refi ll: 05 Min” - the duration of tank fi lling. A factory setting that should not be changed.
“Set Fast Rinse: 03 Min” - the duration of quick rinsing of the deposit. A factory setting that should not be changed.
Manual Starting of the Regeneration Cycle
Press the exit button during normal “In Service” operation. The engine starts and the “Motor Running...” message is displayed on
the screen. After a few seconds, it will change into the subsequent regeneration cycle processes. Each process will be accom-
panied with information about its duration. After the regeneration cycle is completed, the controller will automatically switch to the
“In Service” mode.
Do not use the product during the regeneration cycle, regardless whether it was started manually or automatically.
During any regeneration cycle, pressing the exit button will terminate the current process and move on to the next one. Unless
otherwise specifi ed, the regeneration of the deposit shall not be interrupted.
Typical Operating Problems
The following are typical problems you may encounter while using the product. The possible causes and suggested solutions are
also presented. If a suggested solution did not solve the problem, the product should be handed over to an authorised repair shop.
Caution! If the suggested solution to the problem has not been described in the manual, it means that it should be carried out at
an authorised repair shop.
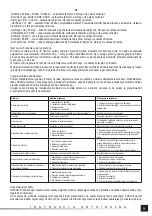
Problem
Possible cause
Suggested solution
The controller does not work
1. Power supply not connected
2. The power supply cable is damaged
3. Power decay
4. Damage to the power supply unit
1. Connect the power supply unit and restore power supply
2. Replace the power cable at an authorised repair shop
Incorrect time of regeneration
Loss of power supply led to a change of the parameter
Set the regeneration time in the menu
Leakage
Loose connections
Tighten the water connections
Noise during operation
Air in the water system
Perform backward fl ushing to eliminate air from the system
Murky, white water
Air in the water system
Unscrew the tap to release the air
Insuffi cient water softening
1. Poor quality of water
2. Regeneration time is too long
3. Unfi t deposit
1. Contact your water supplier
2. Restore the regeneration time to the factory settings
3. Carry out regeneration again or replace the deposit
The product has not used salt
1. Water pressure is too low
2. Brine pipe is clogged
3. Clogged injector
4. Inner leak
1. Pressure of the feed water must be within the range given in
the technical data table
2. Clean the brine pipe
3. Clean the injector and fi lter
4. Check the piston, seals and spacer rings
Overfi lling of the brine tank
There was a problem with the time of fi lling the tank
Contact your water supplier
The level of water hardness
remains the same
1. Failure of the automatic regeneration cycle
2. Insuffi cient brine concentration
3. Clogged injector
1. Check power supply to the controller
2. Check salt level in the tank
3. Clean the injector and fi lter
Insuffi cient or excessive control of
the backward fl ushing cycle
1. Incorrect backward fl ushing controller
2. Foreign bodies disrupt operation of the controller
1. Change the controller to one of the correct size
2. Remove the controller and clean it
Leakage of feed water during
operation
1. Incorrect regeneration
2. Leakage from the bypass valve
3. A defective seal
4. Incorrect setting of water hardness
1. Make sure that the salt level is correct and repeat the
regeneration cycle
2. Replace the seal
3. Replace the seal
4. Change the water hardness setting in the controller
Product Maintenance
CAUTION! Before each cleaning, switch the product off , unplug the power supply unit from the wall socket, wait a moment, and
then proceed with maintenance.
Use only mild kitchen cleaning agents to clean the product. It is not allowed to use abrasive cleaning agents, e.g. cleaning powder
or milk, or agents containing corrosive substances. Do not use any solvents, petrol, or alcohol to clean the product.
Dilute the cleaning agent with water, according to the instructions supplied with the agent. Then, apply it on a soft cloth and clean
the drive housing on the outside.
Remove any residues of the cleaning agent with a soft cloth slightly soaked in clean water. Then, dry all surfaces with a dry soft
cloth.
CAUTION! The drive housing is not designed for water jet cleaning. Do not immerse the drive housing in water.
Rinse the inside of the tank with clean water. If detergents come in contact with the deposit, it may be destroyed.


