background image

CONNECTING THE READY PENDANT

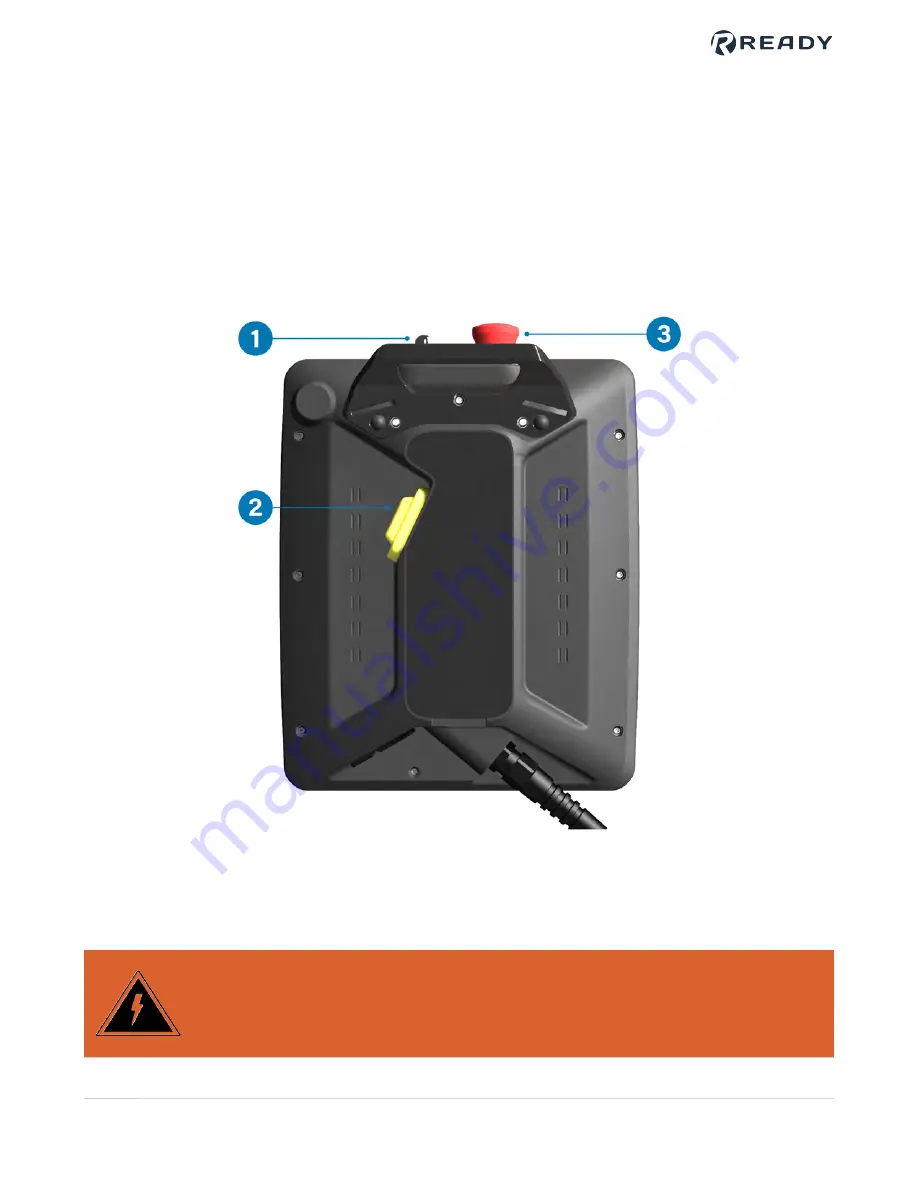
The READY pendant includes these safety outputs:

1. Key Switch (Robot Operation Mode)

2. Three-Position Enabling Switch
3. Emergency Stop Button

The end of the READY pendant cable includes:

1. One RJ45 Ethernet cable for communication with the IPC.

2. 15 Flying leads—2 for power, 12 for safety I/O, and 1 unused lead.

Electric Shock Warning:

Disconnect all components from power sources

before attempting this installation.

VERSION 5.3.0

© 2022 COPYRIGHT READY Robotics ALL RIGHTS RESERVED

17

Summary of Contents for YRC1000

Page 1: ...YaskawaYRC1000StartupGuide...

Page 2: ...by themselves a fully integrated workcell As required in ISO 10218 2 READY Robotics strongly recommends performing a complete risk assessment of the integrated workcell per ISO 12100 You may wish to u...

Page 3: ...e OS 23 Powering On 25 Getting Robot Files from Forge OS 26 Changing Robot Settings to Prepare for Forge OS 30 Transferring Configuration Files 42 Adding your Robot in Device Configuration 58 Appendix...

Page 4: ...wer on your system 4 Start up Forge OS 5 Get robot files from Forge OS 6 Make changes to Yaskawa settings and upload robot configuration files 7 Finish Device Configuration in Forge OS Note This guide...

Page 5: ...cs 112563 YRC1000 Robot Controller Controls the robot in its native software Yaskawa Yaskawa Standard Pendant Required for Forge OS to load and set tools payloads and TCPs Note Forge OS does NOT suppo...

Page 6: ...andard I O 40 IN 40 OUT 2 Safety IN 2 Safety OUT Required to connect the READY pendant safety features and fence Yaskawa 180700 1 Cat5e Shielded Ethernet Cable x2 Connects the robot controller to an I...

Page 7: ...er to turn the Yaskawa controller door lock clockwise Open the door 2 Look for the FSU I O Expansion Board It should have a cable connector labeled CN222 on the board If you don t see the cable header...

Page 8: ...ller door panel Look for this Breakout Board with the connector labeled CN220 4 If you don t have the required hardware contact a Yaskawa Motoman distributor 5 If you have the required hardware move o...

Page 9: ...tware Version YRC1000 YAS4 10 REQUIREDOPTIONS Requirement Part Number Description FSU Software Option non collaborative 179908 1 Required to jog the robot with the READY pendant VERSION 5 3 0 2022 COP...

Page 10: ...ug the Yaskawa controller into a power source Power the controller on and wait for it to boot up 1 On the Yaskawa teach pendant press the MAIN MENU button Then press the black right arrow key until yo...

Page 11: ...elect a The system version information appears on the screen Look for the version number at the top by SYSTEM If your system version is older than the requirement contact your Yaskawa Motoman distribu...

Page 12: ...arrow on the keypad to scroll down until you find IO MODULE For the YRC1000 look for the ASF01 board If you don t see the FSU IO Module for your controller contact your Yaskawa Motoman distributor to...

Page 13: ...N FUNCTION Keep scrolling to look for 046 MotoPlus FUNC and 049 Functional Safety in the list of options If you don t see these options in the list contact your Yaskawa Motoman distributor to upgrade...

Page 14: ...can save backups to either a USB flash drive or SD card Refer to Yaskawa documentation for more information Insert a USB drive into the back of the Yaskawa pendant Note Use an empty USB drive FAT 32...

Page 15: ...In the Main Menu select EX MEMORY then select SAVE 3 Scroll down to highlight SYSTEM BACKUP CMOS BIN then press SELECT 4 VERSION 5 3 0 2022 COPYRIGHT READY Robotics ALL RIGHTS RESERVED 15...

Page 16: ...urn the power off Wait for the backup to finish 6 Power off the robot controller 7 Remove the USB flash drive from the pendant Tip Keep your USB backup drive in a secure location You can save the back...

Page 17: ...cy Stop Button The end of the READY pendant cable includes 1 One RJ45 Ethernet cable for communication with the IPC 2 15 Flying leads 2 for power 12 for safety I O and 1 unused lead Electric Shock War...

Page 18: ...Breakout 8 Emergency Stop Circuit 2 Black Power Supply 0V 0V DC Violet FSU Breakout 25 Key Switch Circuit 1 White Pink FSU Breakout 26 Key Switch Circuit 1 White FSU Breakout 27 Key Switch Circuit 2...

Page 19: ...and set the plate back in place Refer to Yaskawa s YRC1000 Instructions for proper cable sealing and routing 3 Connect your flying leads to the the FSU Expansion Breakout Board destinations on the tab...

Page 20: ...If you are not using external safety fencing Bridge pins 41 and 42 with a jumper wire a Bridge pins 43 and 44 with a jumper wire b 6 VERSION 5 3 0 2022 COPYRIGHT READY Robotics ALL RIGHTS RESERVED 20...

Page 21: ...enough to reach from the IPC to inside the Yaskawa controller 1 Remove another cable covering plate Make a hole on the plate for the Ethernet cable Tip Install a cable gland for strain relief 2 Feed t...

Page 22: ...network switch you connect to the IPC 6 Zip tie the added cables along the base of the robot controller Zip tie the Functional Safety I O Cable along the base of the door Important Make sure the robo...

Page 23: ...he READY pendant detects a Forge OS IPC on the network Forge OS IPC Paired This condition is satisfied when the READY pendant successfully pairs with the IPC If pairing fails it is automatically retri...

Page 24: ...e network interface that the pendant connects to should use IP Address 172 16 255 250 and Subnet mask 255 255 255 0 Tap Admin and sign in The default Admin password is forgeadmin 3 If Forge OS is inac...

Page 25: ...d turn it on 1 Plug your IPC power cable into a power outlet 2 Power on your IPC and other devices 3 If there are issues power off each device disconnect from power supplies and check your wiring 4 VE...

Page 26: ...tion you add the robot in Forge OS and copy configuration files to the robot controller In the Admin role open the Device Configuration app 1 Tap New to open the Device Library 2 VERSION 5 3 0 2022 CO...

Page 27: ...In the Device Library list select Yaskawa Motoman industrial robot Then tap NEXT 3 VERSION 5 3 0 2022 COPYRIGHT READY Robotics ALL RIGHTS RESERVED 27...

Page 28: ...ash drive into the IPC as instructed on the screen Use an empty flash drive with at least 2GB of storage Tip Do not connect the USB flash drive to the READY pendant 5 Tap Start Transfer and wait for i...

Page 29: ...Insert the USB drive into the USB port on the back of the Yaskawa pendant 8 VERSION 5 3 0 2022 COPYRIGHT READY Robotics ALL RIGHTS RESERVED 29...

Page 30: ...ler has been factory reset On the Yaskawa pendant turn the key to TEACH position 1 If there are active alarms on the Yaskawa pendant tap the RESET button at the bottom right corner of the screen to cl...

Page 31: ...nd press the SELECT button on the pendant keypad c Enter the Safety Mode password and press ENTER Tip For non collaborative robots the default Safety Mode password is 5555 5555 5555 5555 d If successf...

Page 32: ...nd select PARAMETER Select the S2C option a To Jump to parameter S2C0701 you can highlight a parameter name in the first column and press the SELECT button on the keypad Then enter the number 0701 and...

Page 33: ...R c Repeat the process above to set the parameter S2C0425 to 1 d Repeat the process above to set the parameter S2C0430 to 4 e Repeat the process above to set the parameter S2C1419 to 1 f Repeat the pr...

Page 34: ...S4C0287 to 511 b Set parameters S4C0288 S4C0295 to 0 c 5 Optional If your controller has the SETUP SPEED OVERRIDE SETTING menu you can check if the parameters were correctly set Verify that Setting M...

Page 35: ...rify that Initial Speed Ratio 100 d Verify that GP Input 511 e Verify that all Speed Ratio parameters 0 f Follow these steps to disable the CRC check function From the MAIN MENU select SETUP then choo...

Page 36: ...ear the teach pendant beep 9 Change the security mode to Safety Mode From the Main Menu select SYSTEM then SECURITY a Tap the field next to MODE or press SELECT b Scroll to SAFETY MODE from the dropdo...

Page 37: ...From the Main Menu select SYSTEM then select SETUP Highlight OPTION FUNCTION and press the SELECT button a 11 VERSION 5 3 0 2022 COPYRIGHT READY Robotics ALL RIGHTS RESERVED 37...

Page 38: ...NG to MANUAL SETTING c Set the IP Address to 192 168 1 20 and set the Subnet Mask to 255 255 255 0 d e Set both the DEFAULT GATEWAY SETTING and DNS SETTING to NOT USED f Press ENTER to save the settin...

Page 39: ...press the SELECT button h At the Modify prompt tap YES i Back in the OPTION FUNCTION menu highlight the field next to MotoPlus FUNC and set it to USED j At the Modify prompt tap YES k At the Initiali...

Page 40: ...next to SAFETY I O BOARD SETTING m Select the ASF02 board n Press the ENTER button on the keypad to apply this choice o At the Modify prompt tap YES p VERSION 5 3 0 2022 COPYRIGHT READY Robotics ALL R...

Page 41: ...ngs to the Safety I O board From the Main Menu tap FILE then tap INITIALIZE Highlight Safety Board FLASH Reset and press the SELECT button a 12 VERSION 5 3 0 2022 COPYRIGHT READY Robotics ALL RIGHTS R...

Page 42: ...p This process takes up to 60 seconds to complete The arrow buttons are disabled until the reset completes b Follow these steps to load the Forge MotoPlus APL From the Main Menu tap MotoPlus APL then...

Page 43: ...mall black star icon appears to the left of the file name and press the ENTER button on the pendant keypad e At the Load prompt tap YES If asked to overwrite an existing file select YES f Power off th...

Page 44: ...to SAFETY MODE If you enter the wrong password you get an Error 1030 message Try again e 5 If you have loaded Forge OS files onto this robot controller before make sure the correct MotoPlus applicatio...

Page 45: ...make sure the correct application is running f From the Main Menu tap EX MEMORY then tap FOLDER to select the folder to load files from Tap the forge os folder to open it then tap to open the yaskawa...

Page 46: ...2040 Defined JOB name you need to delete the existing RR_x jobs on the robot controller While the software is in Safety Mode and the pendant is set to Teach Mode go to Main Menu JOB SELECT JOB Tap th...

Page 47: ...p EX MEMORY then tap LOAD Highlight FILE GENERAL DATA and press the SELECT button a Select TOOL DATA and press the SELECT button on the pendant keypad b 8 VERSION 5 3 0 2022 COPYRIGHT READY Robotics A...

Page 48: ...Verify that the file is marked with a star c Press the ENTER button on the pendant keypad d At the Load prompt tap YES e VERSION 5 3 0 2022 COPYRIGHT READY Robotics ALL RIGHTS RESERVED 48...

Page 49: ...Menu tap EX MEMORY then tap LOAD Highlight FILE GENERAL DATA and press the SELECT button a Highlight the SPEED LIMIT DATA file and press SELECT Make sure the file is marked with a star b Press ENTER...

Page 50: ...From the Main Menu tap SAFETY FUNC then choose SPEED LIMIT Highlight 2 in the File column and press the SELECT button a 10 VERSION 5 3 0 2022 COPYRIGHT READY Robotics ALL RIGHTS RESERVED 50...

Page 51: ...Select the field next to FILE VALID COND and select SIGNAL 2 and press the SELECT button b Tap the READBACK button on the screen c VERSION 5 3 0 2022 COPYRIGHT READY Robotics ALL RIGHTS RESERVED 51...

Page 52: ...te the file prompt tap YES e Repeat all sub steps in the previous step for 3 in the File column READYP OFF The limit and input signal are different for READYP OFF This is normal 11 VERSION 5 3 0 2022...

Page 53: ...press the SELECT button a Highlight and press the SELECT button on C IO PRGM CIOPRG LST and YSF LOGIC FILE YSFLOGIC DAT b Press the ENTER button on the pendant keypad c At the Load prompt tap YES d 1...

Page 54: ...ttom of screen b At the Update the file prompt tap YES c 13 Power off the Yaskawa controller and wait 10 seconds 14 Press and hold the MAIN MENU button while powering up the Yaskawa controller to ente...

Page 55: ...l to SAFETY MODE from the dropdown list and press the SELECT button on the pendant keypad c Enter the Safety Mode password and press ENTER d If successful the visible mode changes to SAFETY MODE If yo...

Page 56: ...ard FLASH Reset and press SELECT a At the Reset prompt tap YES b Wait for the flash reset to complete and the pendant to beep This process takes up to one minute to complete c 17 Power off the Yaskawa...

Page 57: ...Turn the Yaskawa pendant key to REMOTE 19 Power on the Yaskawa robot controller 20 VERSION 5 3 0 2022 COPYRIGHT READY Robotics ALL RIGHTS RESERVED 57...

Page 58: ...ice Configuration app and finish the setup In Forge OS finish entering your device information Give your device a name a For the IP Address enter 192 168 1 20 or the IP address you assigned to the rob...

Page 59: ...he robot controller and IPC Check the network settings on the robot controller Check if the robot controller is on and in the correct operating mode in auto or remote mode Select the correct robot con...

Page 60: ...evice Control Panel check the DCP box next to that signal Note To use these I O signals integrate your I O devices with the robot controller b Tap SAVE Forge OS returns to the Configured Devices list...

Page 61: ...ESET a Tap RESET to try to recover from the errors If you can t RESET an error tap MORE to get more details and instructions b 5 Review the steps in Appendix B Tool Loading Steps Refer back to the Too...

Page 62: ...ere you want to install Forge OS a Plug the Forge OS installation USB flash drive into the IPC Tip If you need more USB ports use a USB 3 0 hub b Restart the IPC While the IPC is powering on press the...

Page 63: ...Select your language Then click Install Forge f Choose a keyboard layout Then click Continue g VERSION 5 3 0 2022 COPYRIGHT READY Robotics ALL RIGHTS RESERVED 63...

Page 64: ...tinue h Select Erase disk and install forgeos Then click Continue Note If Forge OS is already installed the installation wizard will show additional options The goal is to erase the entire disk for a...

Page 65: ...onfirm that you want to erase the entire disk by clicking Continue k Make a note of the pendant instructions If you re using a Forge Ctrl select the checkbox next to This hardware is a Forge CTRL l VE...

Page 66: ...fies the IPC on the network Pick a username and password Then click Continue Note The username and password that you create here are for accessing the IPC desktop They are NOT for signing into Forge O...

Page 67: ...stall Forge OS o Once the installation completes click Restart Now p When prompted remove the installation flash drive Then reboot q Wait for Forge OS to finish booting r VERSION 5 3 0 2022 COPYRIGHT...

Page 68: ...e OS 5 logo Forge OS is ready to run on the READY pendant You don t need to sign in to the desktop Disconnect the monitor keyboard and mouse that you used to install Forge OS s VERSION 5 3 0 2022 COPY...

Page 69: ...ied a spinner around a READY logo appears to the right of the text When a condition becomes satisfied the LED turns green The UI shows the real time state of each step For example if the pendant loses...

Page 70: ...d access to Forge OS until you activate it with a license code See Activating Forge OS with a License Code Tap Admin and sign in The default Admin password is forgeadmin 3 VERSION 5 3 0 2022 COPYRIGHT...

Page 71: ...e License Activation An internet connected Forge OS A valid Forge OS license code A 2GB or larger USB flash drive An internet connected PC A valid Forge OS license code Tip Connect a USB keyboard to t...

Page 72: ...NE LICENSE ACTIVATION 3 If you chose online license activation you re done 4 If you chose offline license activation follow these substeps Insert the USB flash drive into your IPC Tap START WRITING CE...

Page 73: ...r IPC Tap UNLOAD UNLOCK CERTIFICATE FROM USB DRIVE c Wait for the file to finish transferring When the file transfer is complete remove the USB flash drive and tap SAVE d Forge OS returns to the licen...

Page 74: ...to General Settings On the Settings app main screen tap General Settings a Change the Units of Measure Time and Date settings or the Admin login password Note If you later forget your password contac...

Page 75: ...irst interface is for the READY pendant You can t edit the pendant s interface in Forge OS Select another interface and tap Edit to see the network settings b Change the network interface to match the...

Page 76: ...file and saves it to the USB drive on the robot controller Load the tool file onto the robot controller while in Safety mode Reset the safety systems on the robot controller in Maintenance Safety mode...

Page 77: ...Ps and Payloads to tool cnd in the USB drive root directory not in the forge os folder 5 Switch the Yaskawa pendant to TEACH and select Safety Mode Turn the key to TEACH a From the Main Menu navigate...

Page 78: ...From the Main Menu tap EX MEMORY then tap LOAD Select FILE GENERAL DATA a 7 VERSION 5 3 0 2022 COPYRIGHT READY Robotics ALL RIGHTS RESERVED 78...

Page 79: ...n the Yaskawa pendant to boot in Maintenance Mode Continue to hold the button until the pendant beeps 9 On the Yaskawa pendant Make sure the key is still in the TEACH position counterclockwise a From...

Page 80: ...ILE then INITIALIZE Select Safety Board FLASH Reset a When prompted select YES b Wait for the flash reset to complete and the pendant to beep This process takes up to one minute to complete c 11 VERSI...

Page 81: ...controller and wait 10 seconds 13 Power on the robot controller When Forge OS reconnects to the robot controller after the final power cycle you can clear the TOOL MISMATCH warning 14 VERSION 5 3 0 20...

Page 82: ...from the Collaborative Password Agreement If you do not have that on hand call Yaskawa Support with your Warranty ID number and they will provide it to you 1 If you are using a non collaborative robo...

Page 83: ...e The Yaskawa pendant key switch is in TEACH position CRC checks for uploaded files is set to disabled 2 Check if you set the correct active payload correctly in Forge OS Make sure the Device Configur...

Page 84: ...k the Ethernet cable to the Yaskawa controller 1 Check the network settings on the Yaskawa pendant Boot the robot controller in maintenance mode and switch to the Safety security mode 1 Select LAN Int...

Page 85: ...T button 5 Change the output signal to 05110 6 Save the changes by navigating to the EDIT SAVE RUNG OVERWRITE on the right side of the screen 7 Repeat steps 2 7 increasing the signal number by one unt...

Page 86: ...d by READY and our partners Visit our Support site support ready robotics com for robot startup guides FAQs and more Visit our Resources page ready robotics com resources for articles whitepapers and...

Page 87: ...VERSION 5 3 0 2022 COPYRIGHT READY Robotics ALL RIGHTS RESERVED 87...

Reviews: