background image

16

17

GB

GB

Troubleshooting

Robotic Mower cannot dock with docking station

• 

Check that the boundary wire in front and underneath the charger is in a straight line.

• 

Check that the docking station's position is suitable as explained in this manual.

Robotic Mower runs in circles while mowing or while following 
boundary wire back to docking station

• 

Verify that no power cable runs parallel and in close proximity the boundary wire. If necessary, 

reposition the boundary wire.

• 

Check if a front wheel is stuck.

• 

If a neighbor has a similar Robotic Mower, the signals may interfere. Try setting your docking 

station and Robotic Mower are set to the alternative boundary signal S1 to S2.

• 

Driving motor may be damaged, please contact customer support.

The Robotic Mower is noisy

• 

Inspect the blade fixing screws; tighten if necessary.

• 

Inspect the blades for damage; replace if necessary.

• 

Grass may be too high. Try increasing the cutting height, or mow the lawn with an ordinary 

lawnmower first.

• 

Cutting motor failure, please call after sales service.

Mower remains at or returns to docking station when pressing START 
button

• 

Check if the mower has already completed the programmed working time for that day.

• 

Battery is low, the Robotic Mower needs to be charged.

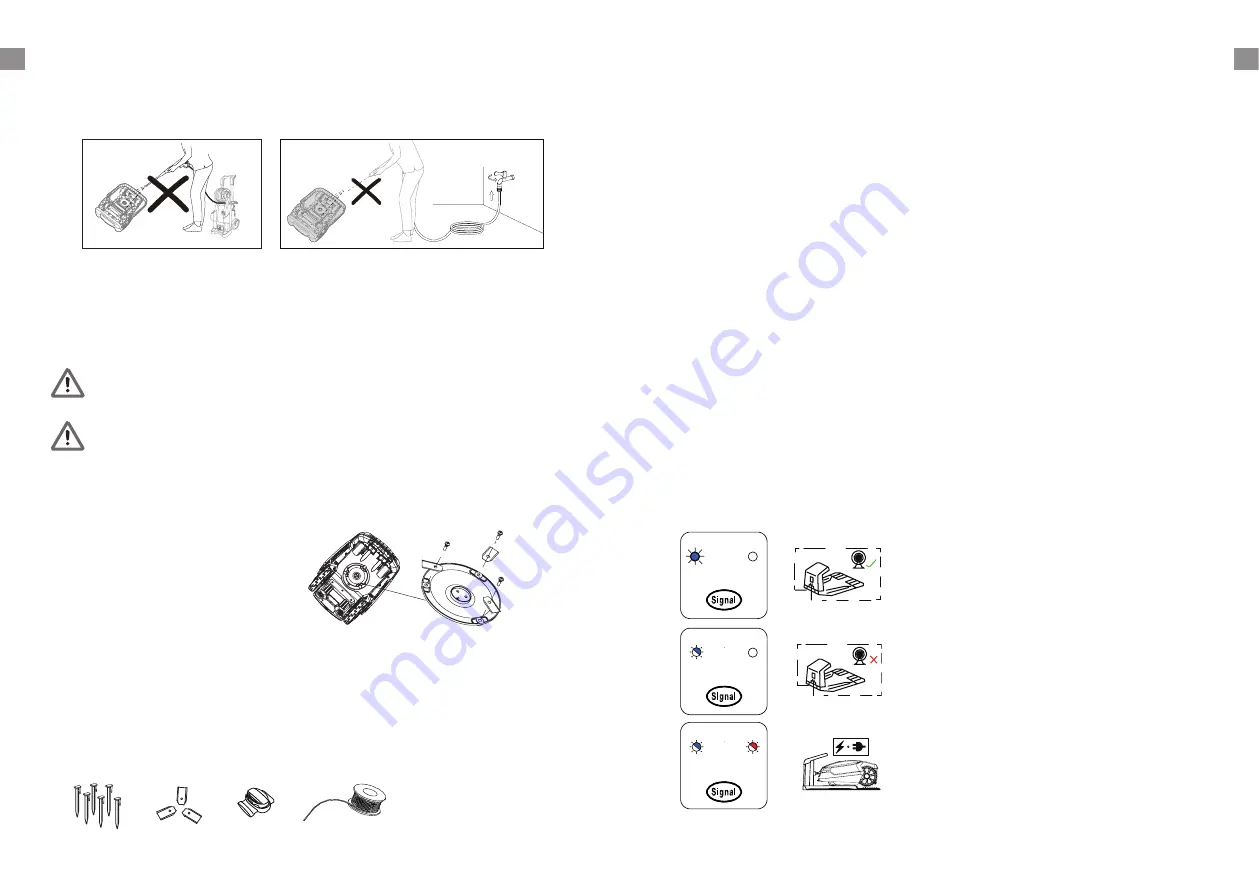
LED signal indicator on docking station

S1/S2 indicator lights on.
Boundary wire signal in good condition.

S1/S2 indicator flashes.

Boundary wire broken, no signal.

S1/S2 indicator flashing alternately.

Mower is charging in the docking station.

S1

S2

S1

S2

S1

S2

Cleaning the underside

Ensure the main power switch is in OFF position. Wearing protective gloves, turn the Robotic 

Mower onto its side to expose its underside. Clean the blade disc and frame using a soft brush or 

damp cloth. Rotate the blade disc to make sure that it can move freely, check that the blades can 

turn on their pivots and that there is no grass is obstructing them.

Clean the contact pins and the charging strips

Using wire wool, metal cleaner or very fine grade emery paper, clean the contact pins and the 

charging strips on your mower and docking station. Remove any debris, leaves, or grass clippings 

around the contact pins and charging strips to ensure efficient charging.

Reversing or replacing the blades

WARNING!

Ensure the Robotic Mower is completely shut off before cleaning, adjusting or 

replacing the blades. Always wear protective gloves.

WARNING!

To ensure maximum cutting efficiency and safety, always use recommended 

replacement blades and blade mounting parts when replacing.

Your Robotic Mower has three blades, fixed to the blades disk.

Unless damaged by hard obstacles, these blades can last for up to five months of everyday use.

Weekly inspection of the blades and the fixing screws is advised. Note that the blades are double-

edged. When the first side becomes blunt, loosen the fixing screw and the blade upside down and 

re-fix. Check that the blade can move freely.

A set of spare blades is included with the Robotic Mower. More blades can be purchased via 

customer support. 

To ensure you get the best performance from your machine, always replace all three blades at the 

same time. Only use spare parts recommended by manufacturer.

NOTE: if blades have been removed/ changed, please ensure that the screw is firmly 

secured in place and that the blade is free to move 

Spare parts list

In case you need spare parts or any support with your device, please call our after sales centre.

OFF

0

1

ON

Summary of Contents for Classic 500

Page 1: ...myRobotcenter The expert for robots in your home With one click to the online shop myRobotcenter eu myRobotcenter co uk ...

Page 2: ...Original Installationsanleitung ROBOSEKACKA Originální instalační průvodce ROBOT TONDEUSE Guide d installation d origine ROBOTMAAIER Originele handleiding ROBOT KOSZĄCY Oryginalna instrukcja GB DE FR NL CZ PL max 8 m min 2 m 30 cm 30 cm 30 cm 30 cm 5 cm A 10 cm 10 cm ...

Page 3: ...t wheel 9 Cutting blade Scope of delivery Original instrcution Warranty Installation guide Robotic Mower Wire pegs Manuals Spare blades Extension cord Docking station Connectors Measurement ruler Boundary wire Switching Power Supply 8 9 1 2 3 4 5 6 7 CONTENT Description of the product 1 Installation 2 Operation 10 Technical data 14 Maintenance and storage 15 Troubleshooting 17 GB ...

Page 4: ...o install the Robotic Mower Please read this completely before you start the installation Introduction We recommend creating a drawing of your lawn including all obstacles and how these should be protected This makes it easier to find a good position for the docking station and how to correctly place the boundary wire around your garden perimeter protecting bushes flower beds etc You will also nee...

Page 5: ... shock Make sure that the hook of the peg and the opening for the cable always face the demarcated 80 cm 80 cm When first planting the pegs do not drive them fully into the ground Use a light hammer to drive them in a little bit Also locate the fixing pegs and lay each one on the lawn at approximately the Uneven lawn surfaces Uneven lawn areas may cause the blades to touch the ground We recommend ...

Page 6: ... correct distance from lawn edges 30 cm and obstacles Flowerbeds Use the boundary wire to exclude any flowerbeds from the cutting area There are two options for the two lengths of boundary wire running between the flowerbed and the outer boundary 1 Keep the distance between the parallel wires above 5 cm This way the Robotic Mower will recognise the boundary wire as an ordinary obstacle When cuttin...

Page 7: ...he boundary wire has not affected the connection and signal shows S1 on the charging satation Then place the Robotic Mower in the working area a few metres beside the docking station Set the main power switch to ON and then check the S1 signal on the panel is light on press 4 times to unlock the panel Press the buttons and a few seconds later the Robotic Mower should automatically return to the do...

Page 8: ...M 14 00 2PM 18 00 6PM 12 00 AM 16 00 4PM 20 00 8PM Operation Control panel Flashing when the Robotic Mower is lifted or climbing an obstacle Flashing when there is no correct signal been detected Flashing when battery is low Flashing when the Robotic Mower charging in the docking station Indicator meaning Working time select button Press the button to select the working time the LED indicator will...

Page 9: ...ing an ordinary lawn mower or trimmer to cut the lawn below 60 mm before using the Robotic Mower This will ensure you get the optimum performance for example if now is 08 25 please press and then you would hear a beep if now is 09 45 please press and then you would hear a beep if now is 14 25 please press and then you would hear a beep if now is 16 45 please press and then you would hear a beep Th...

Page 10: ...sh this will help to achieve the best charging efficiency and avoid any charging interference Cleaning the mower body As your Robotic Mower is battery powered you need take care when cleaning Remove rough dirt with a soft brush Use a manual water spray with mild household detergent for intensive cleaning Wipe off any residue after cleaning with a moist rag Disposal To help the environment please d...

Page 11: ...he Robotic Mower onto its side to expose its underside Clean the blade disc and frame using a soft brush or damp cloth Rotate the blade disc to make sure that it can move freely check that the blades can turn on their pivots and that there is no grass is obstructing them Clean the contact pins and the charging strips Using wire wool metal cleaner or very fine grade emery paper clean the contact pi...

Page 12: ...ot charging Machine not correctly docked in charge base Check machine is fully docked in charge base Check charge base is on flat surface Charger pins corroded Clean the charger pins Mowing trouble shooting Problem Possible cause Corrective action No Power to machine ON OFF key has not been activated Switch ON the machine and try again Robotic Mower has low charge Place machine in the docking stat...

Reviews: