background image

10

11

GB

GB

Before starting – Adjust the time setting 

NOTE: 

the Robotic Mower should be out of the docking station when operating the time setting.

Step 1


- hold  the           button and press the main power switch at same time, the Robotic 

Mower will power ON, hold the           button until all LED lights are ON.

Step 2

 - Day calibration

Choose the related day button, for example if today is Monday, press             , and then you would 
hear a beep. 

After 3 seconds all LED would flash, then the day calibration is successfully completed.

Step 3 

- Hour calibration

The time cannot be exactly fixed, only roughly. To set the time, you need to follow steps below  
when you make the hour calibration, please select the most close time from our time range 
according to your local time.

Rain sensor

: When this sensor been actived while raining, the Robotic 

Mower will returen to the docking station automatically.

NOTE

Rain sensor can be actived/ disactived manually, press and hold "Fri" 

button, then power on the Robotic Mower.

8:00 (AM)

10:00 (AM)

14:00 (2PM) 18:00 (6PM)

12:00 (AM)

16:00 (4PM) 20:00 (8PM)
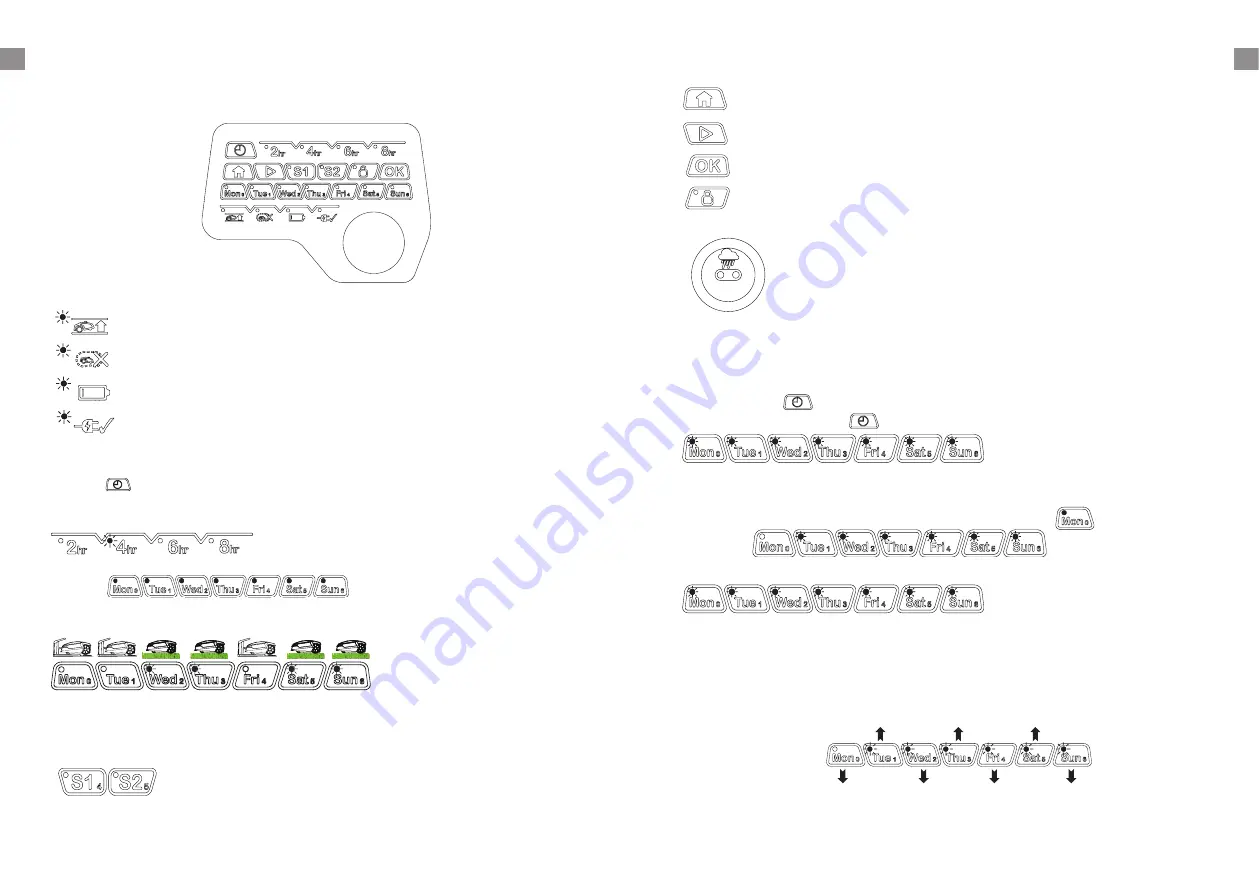
Operation

Control panel

Flashing when the Robotic Mower is lifted or climbing an obstacle. 

Flashing when there is no correct signal been detected.

Flashing when battery is low.

Flashing when the Robotic Mower charging in the docking station.

Indicator meaning

Working time select button:

Press the           button to select the working time, the LED indicator will show under the working 
time button that has been selected. Robotic Mower will go back to docking station when the 
selected time is over.

Signal select button:

Select either S1 or S2.
NOTE

Signal selection must be same as the on the docking station.

Home button

: First press the Home button and the press the OK button, Robotic 

Mower will return to docking station.

Start button:

 First press the Start button and then press the OK button, Robotic 

Mower will start to work.

OK button

Lock/Unlock button

Indicator will show when pressed and will lock the control 

panel.

Operation button:

Press the                                                                           button to select the working date, the LED 
indicator will show under the working date button that has been selected. Robotic Mower will go 
back to docking station when the working date is not selected.

Summary of Contents for Classic 500

Page 1: ...myRobotcenter The expert for robots in your home With one click to the online shop myRobotcenter eu myRobotcenter co uk ...

Page 2: ...Original Installationsanleitung ROBOSEKACKA Originální instalační průvodce ROBOT TONDEUSE Guide d installation d origine ROBOTMAAIER Originele handleiding ROBOT KOSZĄCY Oryginalna instrukcja GB DE FR NL CZ PL max 8 m min 2 m 30 cm 30 cm 30 cm 30 cm 5 cm A 10 cm 10 cm ...

Page 3: ...t wheel 9 Cutting blade Scope of delivery Original instrcution Warranty Installation guide Robotic Mower Wire pegs Manuals Spare blades Extension cord Docking station Connectors Measurement ruler Boundary wire Switching Power Supply 8 9 1 2 3 4 5 6 7 CONTENT Description of the product 1 Installation 2 Operation 10 Technical data 14 Maintenance and storage 15 Troubleshooting 17 GB ...

Page 4: ...o install the Robotic Mower Please read this completely before you start the installation Introduction We recommend creating a drawing of your lawn including all obstacles and how these should be protected This makes it easier to find a good position for the docking station and how to correctly place the boundary wire around your garden perimeter protecting bushes flower beds etc You will also nee...

Page 5: ... shock Make sure that the hook of the peg and the opening for the cable always face the demarcated 80 cm 80 cm When first planting the pegs do not drive them fully into the ground Use a light hammer to drive them in a little bit Also locate the fixing pegs and lay each one on the lawn at approximately the Uneven lawn surfaces Uneven lawn areas may cause the blades to touch the ground We recommend ...

Page 6: ... correct distance from lawn edges 30 cm and obstacles Flowerbeds Use the boundary wire to exclude any flowerbeds from the cutting area There are two options for the two lengths of boundary wire running between the flowerbed and the outer boundary 1 Keep the distance between the parallel wires above 5 cm This way the Robotic Mower will recognise the boundary wire as an ordinary obstacle When cuttin...

Page 7: ...he boundary wire has not affected the connection and signal shows S1 on the charging satation Then place the Robotic Mower in the working area a few metres beside the docking station Set the main power switch to ON and then check the S1 signal on the panel is light on press 4 times to unlock the panel Press the buttons and a few seconds later the Robotic Mower should automatically return to the do...

Page 8: ...M 14 00 2PM 18 00 6PM 12 00 AM 16 00 4PM 20 00 8PM Operation Control panel Flashing when the Robotic Mower is lifted or climbing an obstacle Flashing when there is no correct signal been detected Flashing when battery is low Flashing when the Robotic Mower charging in the docking station Indicator meaning Working time select button Press the button to select the working time the LED indicator will...

Page 9: ...ing an ordinary lawn mower or trimmer to cut the lawn below 60 mm before using the Robotic Mower This will ensure you get the optimum performance for example if now is 08 25 please press and then you would hear a beep if now is 09 45 please press and then you would hear a beep if now is 14 25 please press and then you would hear a beep if now is 16 45 please press and then you would hear a beep Th...

Page 10: ...sh this will help to achieve the best charging efficiency and avoid any charging interference Cleaning the mower body As your Robotic Mower is battery powered you need take care when cleaning Remove rough dirt with a soft brush Use a manual water spray with mild household detergent for intensive cleaning Wipe off any residue after cleaning with a moist rag Disposal To help the environment please d...

Page 11: ...he Robotic Mower onto its side to expose its underside Clean the blade disc and frame using a soft brush or damp cloth Rotate the blade disc to make sure that it can move freely check that the blades can turn on their pivots and that there is no grass is obstructing them Clean the contact pins and the charging strips Using wire wool metal cleaner or very fine grade emery paper clean the contact pi...

Page 12: ...ot charging Machine not correctly docked in charge base Check machine is fully docked in charge base Check charge base is on flat surface Charger pins corroded Clean the charger pins Mowing trouble shooting Problem Possible cause Corrective action No Power to machine ON OFF key has not been activated Switch ON the machine and try again Robotic Mower has low charge Place machine in the docking stat...

Reviews: