background image

Basic Operation

 Reference Manual

9

Basic Operation

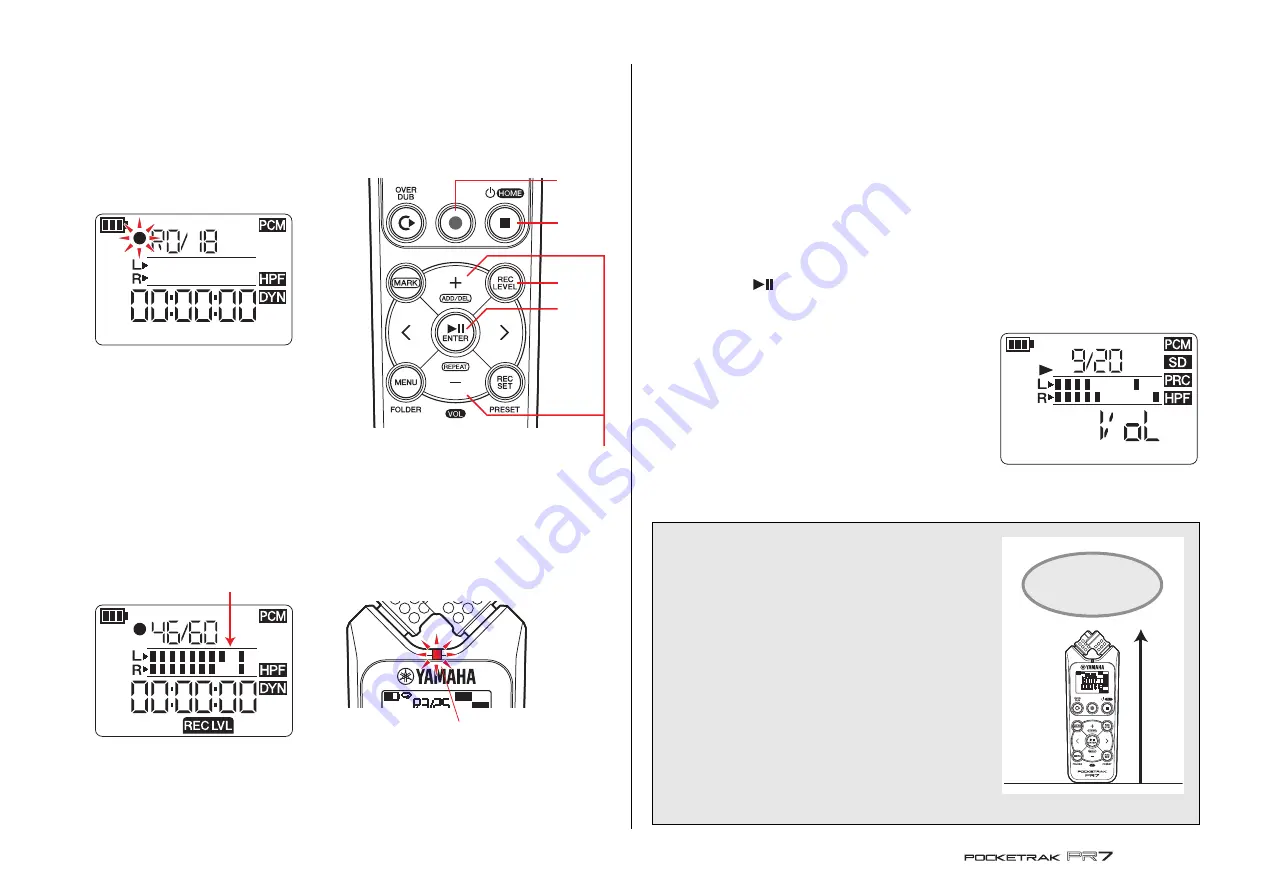
Recording/stopping/playing back/setting the 
recording and playback levels

1.

Press the [

] (Record) button.

The PR7 enters recording standby mode.

2.

To set the recording level, press the 
[REC LEVEL] button.

If you already set the recording level or if 
the ALC HI or ALC LO (Auto Level 
Control) (

page 14

) was activated as 

the dynamics control, proceed to Step 5.

3.

While observing the level meter, press 
the [+] or [–] button to adjust the recording level.

Set the recording level so that the level meter does not deflect all the way to the 
right. The REC LED will flash rapidly if the meter deflects all the way.

NOTE

You can set different recording levels for the built-in microphones, external 
microphone, and external input.
While you are setting these levels, the screen will indicate “MIC” or “LInE”, depending 
on the recording source.

4.

After you finish setting the recording level, press the [REC LEVEL] button again.

The PR7 displays the recording standby screen.

5.

Press the [

] (Record) button again.

The PR7 starts recording.
You can also press the [REC LEVEL] button to adjust the recording level.

6.

After recording is complete, press the [

] (Stop) button.

Recording is complete and an audio file is created.
The playback position will automatically return to the beginning of the recorded 
audio file.

7.

Press the [

] (Play) button.

The audio that was just recorded will play back.

8.

While the audio file is playing, press the [+] or 
[–] button to adjust the playback level.

The PR7 displays the screen shown on the right.

9.

To stop playback, press the [

] (Stop) button.

The playback position will automatically return to the top of the original file.

3, 

8

2, 4

6, 9

1, 5

7

If the level is too high:

Guideline for the 
maximum volume

Flash rapidly

Developer’s column: Tips for recording with the 
built-in microphones

You might wonder how to best orient and position 
the recorder when recording with the built-in 
microphones.
One rule of thumb is to point the device straight 
ahead (from the built-in microphones) to the center 
of the recorded sound stage.
Ideally, you should place the PR7 on a stable surface 
that will not be affected by noise from the floor. If 
you place the PR7 on top of a desk, place a soft cloth 
underneath it so that it will not pick up unnecessary 
noise. You should also take advantage of the PR7’s 
excellent ability to reduce noise (

page 14

) and 

prevent excessive level of input (

page 14

).

Center of the sound

Summary of Contents for POCKETRAK

Page 1: ...key on the computer keyboard The application will search for the term inside the book Viewing the previous or next page If you are using Adobe Reader to display this book you can go back to the previous view forward to the next view or jump back and forth to a pre link page This feature is convenient if you want to return to a page after you jump to a different page via the page link Using the fun...

Page 2: ...ubbing Layered Recordings 20 Overdubbing mode screen 20 Overdubbing 20 Functions Useful for Musical Instrument Practice 24 Using the tuner 24 Using the metronome 25 Adjusting the playback speed 26 Handling Audio Files 27 Folder structure 27 About the limitations of files and folders 27 About the file naming rules 27 About the file format 27 Copying files 28 Dividing a file 29 File names after divi...

Page 3: ...g time indication 8 Main functions Stop 9 Playback 9 Recording 9 Playback level adjustment 9 Fast forward fast reverse 13 File selection 13 Overdubbing 20 Markers Add 17 Move 18 Delete 18 REC LEVEL Recording level Input level adjustment 9 21 Playback level adjustment Overdubbing 21 MENU TUN Tuner 24 MET Metronome 25 SPD Playback speed adjustment 26 FILE Handling files COPY dIV Dividing a file trnS...

Page 4: ...screen is displayed this button enables you to add or delete markers or turn the Repeat function on or off C buttons Enable you to select an audio file or navigate the screen During playback these buttons are used to fast reverse and fast forward respectively 1 Built in microphones The PR7 features XY type microphones 2 REC LED Lights up steadily or flashes during recording or operation 3 LCD scre...

Page 5: ... switch Disables all control buttons on the PR7 to avoid accidental operation during transport or recording If you turn on the Hold function while the unit is stopped the unit will display the clock 4 USB terminal Connect your computer here to transfer audio files to and from the built in memory or the installed microSD card Handling audio files page 27 Connecting the PR7 to a computer page 32 1 2...

Page 6: ...ing playback or repeat playback 4 Meter area This area indicates the playback or recording level by using graphic meters If you are using the tuner or metronome this area will display the appropriate information 5 Time Message display area The HOME screen displays the playback recording time or remaining time in the format of hours minutes seconds Other information or messages may be displayed dep...

Page 7: ...ormats If you plan to use a microSD card choose a 1GB 2GB microSD card or a 4GB 32GB microSDHC card these cards are compatible as of January 2013 However some cards depending on the manufacturer or type of card may not work with the unit For more information about microSD cards please visit the following Yamaha Pro Audio website http www yamahaproaudio com pr7 Turning the power on or off Turning t...

Page 8: ...age 35 HOME screen The HOME screen features four sets of indicators You can select one of these four possible HOME screens using the Stop button NOTE If a folder that contains no files is selected HOME screen options 2 and 3 will be unavailable Option 1 Option 2 Option 3 Option 4 Folder File number Current position in the file File date File recording start time kbps Recording format sound quality...

Page 9: ...rding level 6 After recording is complete press the Stop button Recording is complete and an audio file is created The playback position will automatically return to the beginning of the recorded audio file 7 Press the Play button The audio that was just recorded will play back 8 While the audio file is playing press the or button to adjust the playback level The PR7 displays the screen shown on t...

Page 10: ...e default setting is the internal memory NOTE If you plan to use a microSD card you must first insert a microSD card into the card slot on the unit Preparing the PR7 page 7 Formatting Initializing a microSD card page 36 1 Press the REC SET button 2 Press the or button to select the SD icon in the record setting area then press the Play button 3 Press the or button to select Int built in memory or ...

Page 11: ...hat the folder select screen indicates rEC then press the Play button 3 Press the or button to select the desired REC folder from R0 through R9 4 Press the Play button to confirm the setting The PR7 displays the HOME screen NOTE If you start recording while the MUSIC folder is selected the PR7 will record automatically to the R0 folder If the R0 folder is not available for recording for some reaso...

Page 12: ...e estimated Recording mode Available recording time estimated PCM 24bit 96kHz About 55 minutes MP3 320kbps About 12 hours 45 minutes 88 2kHz About 1 hour 192kbps About 21 hours 48kHz About 1 hour 45 minutes 128kbps About 32 hours 44 1kHz About 1 hour 55 minutes 64kbps About 64 hours 16bit 96kHz About 1 hour 20 minutes 32kbps About 127 hours 88 2kHz About 1 hour 25 minutes 48kHz About 2 hours 40 mi...

Page 13: ...resume playback or recording Selecting the next or previous file While operation is stopped or paused press the button to select the next file Press the button to select the previous file Press and hold down the or button to continue skipping to the previous or next file respectively NOTE To search for a file using the information displayed on screen first press the Stop button repeatedly while th...

Page 14: ... icon in the record setting area then press the Play button 3 Press the or button to select the type of dynamics control from the following options then press the Play button OFF The PR7 will record audio without using the dynamics control LIM The limiter will be activated only if an excessive level of audio is input This option is suitable for recording performances of musical instruments ALC HI ...

Page 15: ...crophone or LINE line in device for the input device setting NOTE Yamaha recommends that you use a microphone with the following specifications as an external condenser microphone Type Electret condenser microphone that features plug in power operation Impedance 2kΩ Power supply Operation guaranteed at 1 3V Plug mini plug 3 5mm 1 Press the REC SET button 2 Press the or button to select the EXT ico...

Page 16: ...t at which the unit was placed in recording standby mode This function is disabled during overdubbing Developer s column Using the PRC feature PRC Pre recording is a feature that enables you to record a few seconds of audio prior to the actual recording start time This might seem amazing as if the irretrievable past had been recovered However how it works is quite simple The PR7 is actually record...

Page 17: ...rker 1 Select an audio file To select an audio file in the current folder use the buttons NOTE To select an audio file from another location refer to the section below Selecting another folder page 11 Selecting a file on a microSD card page 10 Copying an audio file from the computer page 33 2 While the PR7 is in Marker mode press the button at the location where you want to add a marker Add will a...

Page 18: ...nd the marker will be deleted NOTE You can delete markers only while operation is stopped or playback is paused You can delete only the marker at the current location Repeat playback between the markers You can repeatedly play back between adjacent markers This is called Repeat playback Follow the steps below to set up Repeat playback 1 Press the MARK button 2 Press the Playback button to play the...

Page 19: ...nd playback speed adjustment If you practice a song without a score or learn a song by ear you may frequently need to play back the same phrase over and over Back in the day we often used cassette tapes Playing back songs on a tape repeatedly for practice caused the tape to stretch resulting in pitch fluctuation Then CDs arrived bringing with them convenience and no pitch fluctuation However playb...

Page 20: ...will not be recorded again Original audio files that you wish to use for overdubbing must be in an audio format supported by the PR7 except MP3 64kbps 32kbps Supported formats page 11 1 Select an audio file for overdubbing To select an audio file in the current folder use the buttons NOTE To select an audio file from another location refer to the section below Selecting another folder page 11 Sele...

Page 21: ...ayback position will automatically return to the top of the original file and overdubbing will start NOTE While the Overdubbing Standby screen is displayed you can press the OVERDUB button instead of the Record button to start overdubbing 2 After recording is complete and the PR7 plays the original file to the end press the Stop button New audio data will be dubbed over the original file creating ...

Page 22: ...y parts while dubbing the entire song 1 Press the Play button while the PR7 displays the Overdubbing Standby screen The PR7 enters dubbing mode and starts recording only the audio data of the original file but not any external source 2 Press the Record button slightly before the point at which you want to start overdubbing The PR7 starts overdubbing recording the external audio source on top of th...

Page 23: ...veloper s column My first overdub About 30 years ago I used to do one man multiple chorus sessions by myself I had two cassette recorders in front of me I played a song on one of the recorders while singing to the song and recorded to the other recorder I repeated this procedure to layer my vocal and chorus Sometimes our dog barked or my mother knocked on my bedroom door so I had to re record some...

Page 24: ...ENU button Menu items appear on the left side of the screen 3 Press the or button to select TUN then press the Play button The PR7 displays the tuner screen 4 Press the or button to specify the standard pitch then press the Play button The standard pitch can be set in the range of 430Hz to 450Hz 5 Play and tune the musical instrument Tune the instrument so that the segments in the middle of the L ...

Page 25: ...is initially selected on the metronome setting screen 6 Press the or button to edit the tempo value then press the button 7 Press the or button to edit the beat value You can set the tempo in the range of 30 to 250 and the beat in the range of 0 4 to 8 4 If you set the beat to 0 4 the metronome will sound without any accent beats If you set it to 4 4 accent beats will fall on the first of every fo...

Page 26: ...et the playback speed as a rate in relation to the original speed in the range of 50 to 100 in 5 steps 100 original speed or in the range of 100 to 200 in 10 steps PCM With files recorded at sampling rates of 96kHz 88 2kHz you can set the playback speed in the range of 50 to 150 4 After adjusting the playback speed press the Play button to confirm the value 5 After the setting is complete press th...

Page 27: ...The number of files per folder Up to 99 files As soon as you start recording the 100th file an error message will be displayed and you will be unable to record Maximum file size 2GB If recording is extended and its size exceeds 2GB the PR7 will automatically create a new file and continue recording NOTE If you plan to record audio of long duration that may end up larger than 2GB use a microSDHC ca...

Page 28: ...tion below Selecting another folder page 11 Selecting a file on a microSD card page 10 You cannot copy files in the MUSIC folder 2 Press the MENU button Menu items appear on the left side of the screen 3 Press the or button to select FILE then press the Play button The PR7 enters File mode 4 Press the or button to select COPY then press the Play button The PR7 displays the copy destination and ask...

Page 29: ... or fast forward the file to locate a point at which you wish to divide the file NOTE It would be convenient if you first insert a marker to the point at which you wish to divide the file Adding a marker page 17 3 Press the MENU button Menu items appear on the left side of the screen 4 Press the or button to select FILE then press the Play button The PR7 enters File mode 5 Press the or button to s...

Page 30: ...the screen 3 Press the or button to select DEL then press the Play button 4 Press the or button to select whether you want to delete the current file or all files in the folder To delete only the selected file press the Play button while the FILE indicator is flashing To delete all files in the current folder press the Play button while the FOLdEr indicator is flashing 5 Press the or button to sel...

Page 31: ...left side of the screen 3 Press the or button to select FILE then press the Play button 4 Press the or button to select trnS transfer then press the Play button 5 Press the or button to select the destination folder from the R0 R9 folders then press the Play button 6 Press the or button to select y Yes then press Play button If you select no the PR7 will return to the screen displayed in step 5 wi...

Page 32: ...7 to a USB port on your computer When you connect the PR7 to your Windows computer for the first time the driver will automatically be installed on the computer The computer will recognize the PR7 as a USB storage device The computer will display the PR7 built in memory as PR7 and the microSD card as PR7SD if you format the card on the PR7 You can transfer files between the PR7 and the computer th...

Page 33: ...red in any location other than folders M0 M9 in the MUSIC folder In addition the unit will not recognize any folders that you create Copying a file to the computer You can copy audio files that were recorded on the PR7 to a computer In this way you can edit the recordings using music production software or send a copy to your band members 1 Connect the PR7 to the computer 2 Once the PR7 is recogni...

Page 34: ...a number folder inside the MUSIC folder then cut a file that you want to move 4 Paste the file into another folder NOTE Alternatively you can open both the source and destination folders and drag and drop a file Either way is a standard computer operation Downloading software Your PR7 comes with a license code that enables you to download WaveLab LE wave editor software for editing audio files Onc...

Page 35: ... Accessing the system setting menu Follow the steps below to access the system setting menu 1 Power off the PR7 2 While pressing and holding down the REC SET button press and hold down the Stop button to power on the PR7 The PR7 displays the system setting screen 3 Press the or button to select a system setting menu item Setting the calendar 1 While the system setting screen is displayed use the a...

Page 36: ...e initialized If you do not want to initialize the settings select No in the confirmation screen The PR7 returns to the previous screen Press the Stop button to return to the HOME screen Formatting Initializing the built in memory and a microSD card If you want to initialize the contents of the built in memory or a microSD card you must format the memory or card NOTE We recommend that you format a...

Page 37: ...n Switching the REC LED on or off You can program the PR7 so that the REC LED illumination will be on or off If you set the LED illumination off the battery life will be extended 1 While the system setting screen is displayed press the or button to select LEd from the system setting menu items then press the Play button 2 Press the or buttons to select On or OFF then press the Play button NOTE Eve...

Page 38: ... No microSD card no SD Insert a microSD card page 7 File full FILE FULL Select a folder that contains fewer than 99 files page 11 or delete unnecessary files from the folder page 30 Built in memory full Int FULL Delete unnecessary files from the built in memory page 30 copy files to a microSD card page 33 or move files to a computer page 33 microSD card full Sd FULL Delete unnecessary files from t...

Page 39: ...92 kbps Approx 21 hours 128 kbps Approx 32 hours 64 kbps Approx 64 hours 32 kbps Approx 127 hours Recording format MP3 PCM WAV Playback format MP3 MPEG1 LAYER3 MPEG2 LAYER3 WMA PCM Sampling frequency 16 kHz 96 kHz Bit rate playback 16 320 kbps MP3 32 192 kbps WMA Jacks USB mini B Stereo headphone 3 5 mm mini Stereo microphone also for line in 3 5 mm mini microSD card slot Operating temperature 5 C...

Page 40: ...h pass filter 14 I Index Markers 17 Initializing Factory default settings 36 L LCD Screen 6 Limiter 14 Low cut filter High pass filter 14 M MANUAL folder 27 Markers 17 Metronome 25 microSD card 7 Moving a file 31 MUSIC folder 27 O Overdubbing 20 22 P Pitch indication tuner 38 Playback level 9 Playback level overdubbing 20 Playback speed 26 PRC Pre recording 16 Pre recording 16 Preset 15 Punch in o...

Page 41: ...303IP A0 2013 Yamaha Corporation C S G Pro Audio Division Yamaha Manual Library http www yamaha co jp manual Yamaha Pro Audio Global Web Site http www yamahaproaudio com ...

Reviews: