SCENE function
180
PM5D/PM5D-RH V2 / DSP5D Owner’s Manual
Reference section
Note
If the time code source is OFF, the EVENT TRIGGER column
will be “[MANUAL].” If the time code source is TIME CODE,
MIDI, USB, or SLOT 1–4, the offset value has been added to
the rewritten time code value.
M
SCENE INSERT
This button inserts one or more consecutive scenes
from scene memory into the event list. Use the FROM/
TO fields located at right to specify the starting and
ending scene numbers, and click this button; the speci-
fied scenes will be inserted as new events for recall
immediately before the currently selected event. The
EVENT TRIGGER field is set to “[MANUAL]” for all
of the new events.
N
SCENE OVERWRITE
This button overwrites the scene assignments of con-
secutive events in the event list with multiple
consecutive scenes from scene memory. Use the
FROM/TO fields located at right to specify the starting
and ending scene numbers, and click this button; start-
ing at the currently selected line of the event list, the
SCENE TITLE field of the corresponding number of
subsequent events will be rewritten to the scenes you
specified. (The EVENT TRIGGER field will not
change.) If a blank line is selected, this button is
grayed-out.
O
DELETE
This button deletes the event selected in the event list.
If a blank line is selected, this button is grayed-out.
P
UNDO
This button returns the event list to its state prior to the
most recent editing operation. If undo cannot be exe-
cuted, this button is grayed-out.
Q
ALL DELETE
This button deletes all events from the event list. When
you click this button, a confirmation message will
appear.
Note
If you edit the list (
4
–
8
,
K
–
Q
) or change the time code, the
NEXT EVENT button in the constantly-displayed area will
search from the current time code. However if the time code
source is OFF, or if there is no time code setting in the EVENT
TRIGGER field (only for [MANUAL] and [INTERVAL]), the
NEXT EVENT will be the beginning of the list.
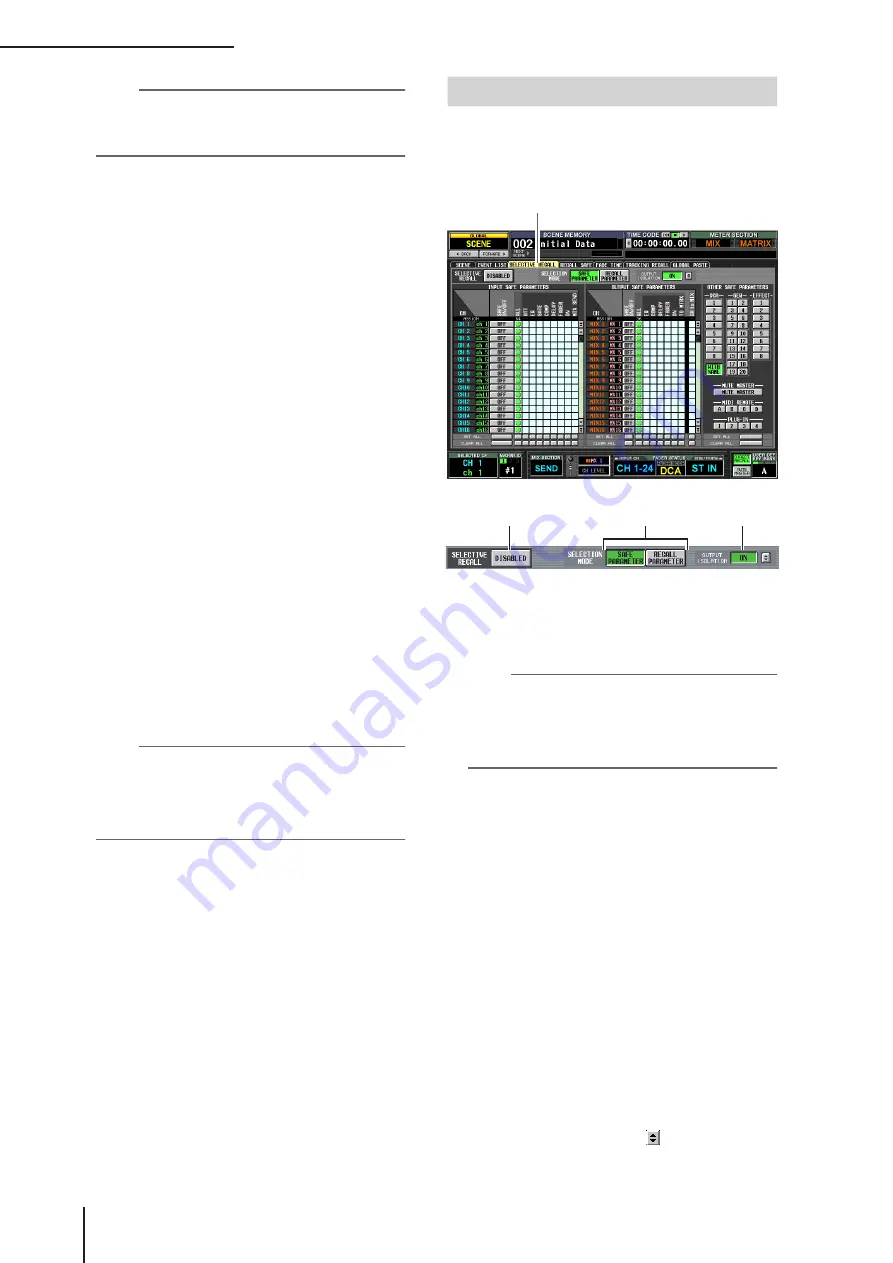
In this screen you can make settings for the Selective Recall
function, which, independently for each scene, lets you
exclude specific parameters/channels from recall, or con-
versely recall only specific parameters/channels.
A
SELECTIVE RECALL ENABLED/DISABLED
Enables/disables Selective Recall for the currently
selected scene. If this button is set to DISABLED, the
Selective Recall function is disabled.
Note
• Unlike the RECALL SAFE screen (
➥
mon to all scenes, the settings in the SELECTIVE RECALL
screen are independent for each scene.
• If you edit the settings of the SELECTIVE RECALL screen,
you must store that scene in order to make your changes
effective.
B
SELECTION MODE
Use the following two buttons to choose how you want
to use the SELECTIVE RECALL screen.
• SAFE PARAMETER button
If this button is on, you can specify the channels/
parameters that will be excluded from recall
operations.
• RECALL PARAMETER button
If this button is on, you can specify the channels/
parameters that will be recalled.
Immediately after you switch buttons, all channels/
parameters will be subject to recall.
C
OUTPUT ISOLATION
If the ON button is on, output channels and parame-
ters to be excluded from recall operations can be
memorized in SETUP memory (not included in mem-
ory card load operations) separately from the Recall
Safe function. To specify the output channels and
parameters that will be excluded from recall, make set-
tings in the OUTPUT ISOLATION SETUP window
that appears when you click the button.
SELECTIVE RECALL screen
SELECTIVE RECALL
1
3
2


