background image

mLAN Driver/mLAN Tools   Installation Guide

24

To uninstall mLAN Driver/mLAN Tools, you must remove the following two software components:

• mLANApplications for Yamaha
• mLAN Tools  2.0

Installed software can be removed from your computer as 
follows.

1

After the downloaded compressed file is prop-
erly extracted, double-click the “setup.exe” 
file.

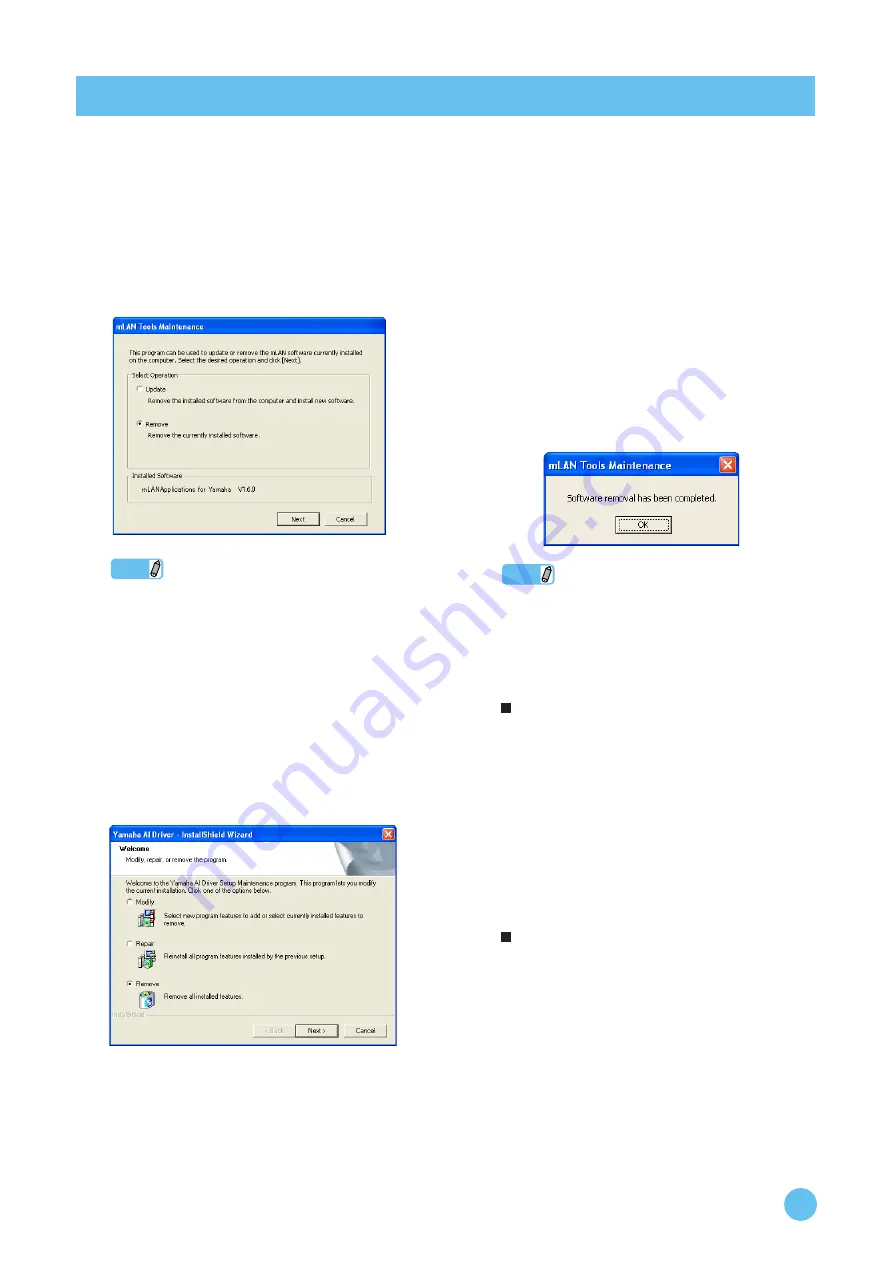
The maintenance window appears. 

NOTE

• When using Windows Vista, click [Continue] if the “User 

Account Control” window appeared. After that, the mainte-
nance window will appear.

• If mLAN Driver/mLAN Tools has not been installed, 

mLAN Driver/mLAN Tools Installer starts.

2

Select the radio button to the left of “Remove,” 
then click [Next].

3

A message “Remove mLAN Applications for 
Yamaha” appears. Click [Next].

4

“Welcome” window appears. Check the radio 
button to the left of “Remove,” then click 
[Next].

5

Confirmation regarding removal of the file 
appears. Click [OK].

The maintenance operation starts.

6

When the maintenance operation is complete, 
a message appears. Click [Finish].

7

The message “Remove mLAN Tools 2.0” 
appears. Click [Next].

8

Confirmation regarding removal of the file 
appears. Click [OK].

The maintenance operation starts.

9

When the maintenance operation is complete, 
a message appears. Click [Finish].

10

A dialog box indicating that “The software has 
been removed” appears. Click [OK].

The uninstallation of mLAN Driver/mLAN Tools is 
complete.

NOTE

You can also uninstall the software by using “Add or Remove 
Programs” / “Programs and Features” in the Windows Con-
trol Panel. Remove the following two software programs in 
the listed order by following the steps below. (Be sure to 
remove software 1, then software 2.)

1) mLAN Applications for Yamaha
2) mLAN Tools 2.0

When using Windows XP

1

From the Start menu, select ([Settings] 

) [Control Panel] 

 [Add or Remove Programs] to display the Add or 

Remove Programs panel.

2

Click “Change or Remove Programs” located in the upper 
left, then select “mLAN Applications for Yamaha” from the 
list in the right pane. 

3

Click [Change/Remove].
A dialog box appears. Follow the instructions to remove the 
software.

4

In the same manner as described above steps #1 - #3, select 
“mLAN Tools 2.0” from the list, then click [Change/
Remove]. 
A dialog box appears. Follow the instructions to remove the 
software.

When using Windows Vista

1

From the Start menu, select ([Settings] 

) [Control Panel] 

 [Programs and Features] to display the “Uninstall or 

change a program” window.

2

Select “mLAN Applications for Yamaha” from the list.

3

Click [Uninstall/Change].
If the “User Account Control” window appears, click [Con-
tinue].
A dialog box appears. Follow the instructions to remove the 
software.

4

In the same manner as described above steps #1 - #3, select 
“mLAN Tools 2.0” from the list, then click [Uninstall/
Change].
A dialog box appears. Follow the instructions to remove the 
software.

Uninstalling the software

Summary of Contents for mLAN Driver

Page 1: ...FTWARE You may not electronically transmit the SOFTWARE from one computer to another or share the SOFTWARE in a net work with other computers You may not use the SOFTWARE to distribute illegal data or data that violates public policy You may not initiate services based on the use of the SOFT WARE without permission by Yamaha Corporation Copyrighted data including but not limited to MIDI data for s...

Page 2: ...erned by Japanese law without reference to principles of conflict of laws Any dispute or procedure shall be heard before the Tokyo District Court in Japan If for any reason a court of competent jurisdiction finds any portion of this Agreement to be unenforce able the remainder of this Agreement shall continue in full force and effect 8 COMPLETE AGREEMENT This Agreement constitutes the entire agree...

Page 3: ...em at the follow ing website http www yamahasynth com download OS Windows XP Professional SP2 or later XP Home Edition SP2 or later Vista 32bit Computer Intel Core Pentium Celeron family processor with an S400 400Mbps IEEE1394 FireWire or i LINK terminal 1 Hard Disk Free disk space of 110 MB or more high speed hard disk Windows XP Professional SP2 or later XP Home Edition SP2 or later Recommended ...

Page 4: ...ended system requirements Connecting a com puter and three mLAN devices Frequency resolution 44 1KHz 24 bit Audio Driver 32 In 32 Out total MIDI Driver 5 In 5 Out total Audio playback tracks 16 Audio recording tracks 1 MIDI playback tracks 18 MIDI Remote Control Automation Send effects plug in 3 Insert effects plug in 9 Plug in software synthesizer 2 Latency about 6 msec Minimum system requirement...

Page 5: ...ming either of these operations make sure to lower the output level of each device mLAN Driver mLAN Tools consists of two software components mLAN Tools 2 0 and mLAN Applications for Yamaha mLAN Tools 2 0 software includes a driver that enables you to connect mLAN devices to a computer mLAN Applications for Yamaha enables audio and MIDI signals to be transferred between a computer and mLAN devices...

Page 6: ... icons will be displayed 6 Go to System Hardware Driver Sign ing Driver Signing Options and select the radio button to the left of Ignore Install the software anyway and don t ask for my approval and click OK NOTE After completing the installation make sure to restore the original setting if necessary 7 Check that no or x marks appear next to IEEE1394 Bus host controllers in System Hardware Device...

Page 7: ... Browse button and select the desired folder drive folder name NOTE In general there is no need to change the destination direc tory 15 Confirm the drive and folder name and click Next to start installation NOTE If a message The software you are installing has not passed Windows Logo testing appears click Continue Anyway You do not need to abort the installation This applies to the entire installa...

Page 8: ... 25 and 26 and Steps 28 and 29 a window appears indicating that you are now making the initial set tings for each driver This window also indicates the num ber of times the Found New Hardware Wizard will be displayed during the procedure Unless you wish to cancel installation do not close this window Example Bus driver initial settings 25 The Found New Hardware Wizard window appears Select the rad...

Page 9: ...ection Manager enables you to make a mLAN connection between the computer and the single mLAN device n8 n12 or mLAN16E2 peer to peer The mLAN connection setup made by Connection Manager can be changed in the mLAN Graphic Patchbay When you want to use multiple mLAN devices use mLAN Graphic Patchbay to make an mLAN connection For details refer to the manual of mLAN Graphic Patchbay Please note that ...

Page 10: ...e software and install the new soft ware For more information on removing the software refer to page 24 11 A confirmation message appears If there are no problems click OK to close the dialog box When preparations for installation are finished the Welcome window appears Installing mLAN Tools 2 0 12 Click Next The first screen in the procedure to install mLAN Tools appears 13 Click Next The Choose ...

Page 11: ...OTE If the Windows Security window appears confirm that the publisher is YAMAHA CORPORATION then click Install mLAN Driver initial settings After you restart the computer complete the mLAN Driver initial settings 21 A dialog box in the upper left corner of the screen prompts you to turn on the power to the device Connect the mLAN device to the computer then turn on the power to the device 22 Click...

Page 12: ... the mLAN Graphic Patchbay When you want to use multiple mLAN devices use mLAN Graphic Patchbay to make an mLAN connection For details refer to the manual of mLAN Graphic Patchbay Please note that mLAN Auto Connector is not available for the mLAN device supported by Connection Manager The flashing driver icon means that Connection Manager is check ing whether an IEEE1394 mLAN device is connected t...

Page 13: ...t the name of the mLAN device and Yamaha mLan Bus are listed NOTE The available mLAN devices are shown as follows Changing settings after installation NOTE If mLAN Driver is being used by an application such as a DAW you cannot change the Sample Rate and Driver Setup settings To change the settings first quit the application If an error message appears indicating that you cannot change a setting r...

Page 14: ...ion error occurs Blue Data is being properly received Yellow Only one type of data audio or MIDI is being received Red Error in reception Gray No reception NOTE If an application such as a DAW is not using the mLAN Driver s audio or MIDI data this field will not display an indication of cor rect status Refer to this field when your application is running and using the mLAN Driver s audio or MIDI d...

Page 15: ...inimum you can minimize the overall latency by setting Required CPU to High Performance and then adjusting the latency once again Latency of mLAN Driver Audio latency Audio latency is determined by the Preferred Buffer Size setting in the ASIO Control Panel The audio latency value is shown in the ASIO Control Panel see the right column on this page MIDI latency For information on the MIDI latency ...

Page 16: ... next section i88X See page 18 mLAN16E See page 19 MY16 mLAN See page 20 When connecting the 01X Setting of mLAN AUTO W CLK 01X 3 To ensure that settings of the mLAN Auto Con nector or mLAN Graphic Patchbay are prop erly received set the mLAN AUTO W CLK wordclock parameter to ENABLE as described in the following instructions These settings can also be made after the mLAN Auto Connector or mLAN Gra...

Page 17: ...ereo monitor input If the sampling frequency is set to 44 1 kHz or 48 kHz ASIO channels 17 and 18 mL17 18 are connected to the 01X stereo monitor input If the sampling frequency is set to 88 2 kHz or 96 kHz ASIO channels 9 and 10 mL9 10 are connected to the 01X stereo monitor input i PC 01X This parameter enables you to specify the number of chan nels of audio data input into the computer from the...

Page 18: ... number of chan nels of audio data routed from the computer s audio output mLAN driver s audio output into the i88X Signals input in the i88X are output from the i88X s OUTPUT 1 8 jacks ana log DIGITAL STEREO COAXIAL or OPTICAL OUT jack digital or ADAT OUT jack ADAT i PC i88X This parameter enables you to specify the number of chan nels for audio data that is input at the i88X s INPUT 1 8 jacks an...

Page 19: ... ES This parameter enables you to specify the number of chan nels of audio data input into the mLAN16E from the com puter s audio output mLAN driver s audio output i PC MOTIF ES This parameter enables you to specify the number of chan nels of audio data input into the computer from the mLAN16E s output NOTE The number of audio transmission channels and MIDI ports var ies on different mLAN16E compa...

Page 20: ...ttons enable you to specify the computer or MY16 mLAN as the wordclock master u PC MY16 mLAN This parameter enables you to specify the channels of audio data routed from the computer s audio output mLAN driver s audio output into the MY16 mLAN i PC MY16 mLAN This parameter enables you to specify the channels of audio data routed from the MY16 mLAN s output into the com puter s input o Connect butt...

Page 21: ...hat something other than mLAN Audio Out is selected for the Voice playback setting 2 From the Start menu select Settings Control Panel Sounds and Audio Devices Audio Make sure that something other than mLAN Audio Out is selected for the Sound playback setting 3 From the Start menu select Settings Control Panel Sounds and Audio Devices Audio then select any option other than the items from mLAN MID...

Page 22: ...kground ser vices in the Processor scheduling section Set the Visual Effects options to best perfor mance Windows XP Select Control Panel System Advanced Settings in the Performance section Visual Effects and select the radio button to the left of Adjust for best performance Windows Vista Select Control Panel System Advanced system settings in the upper left of the window Continue in the User Acco...

Page 23: ...l of mLAN Graphic Patchbay When the number indicated in bold is less than 519 upgrade the mLAN section of the i88X For detailed instructions refer to user_guide_e htm you can find by selecting for_i88X_user mLAN_updater folder For mLAN16E Upgrading the mLAN section of the mLAN16E You can get the version from the node information in mLAN Graphic Patchbay For more information refer to the manual of ...

Page 24: ...lick OK The uninstallation of mLAN Driver mLAN Tools is complete NOTE You can also uninstall the software by using Add or Remove Programs Programs and Features in the Windows Con trol Panel Remove the following two software programs in the listed order by following the steps below Be sure to remove software 1 then software 2 1 mLAN Applications for Yamaha 2 mLAN Tools 2 0 When using Windows XP 1 F...

Page 25: ...t need to update 1 3 Click Cancel to close the maintenance window NOTE If the n Driver AI Driver or mLAN Driver mLAN Tools has not been installed mLAN Driver mLAN Tools Installer starts after double clicking the setup exe file 2 Save the mLAN connection settings This process is necessary so that you can recall the mLAN connection settings after the update operation In mLAN Graphic Patchbay save th...

Page 26: ...ng Windows Vista click Continue if the User Account Control window appears After that the maintenance screen will appear 5 2 Select the radio button to the left of Update then click Next 5 3 Follow the instructions to uninstall the old version of the software then install the new version of the software For details refer to Uninstalling the software see page 24 and Installing the software see page...

Page 27: ... correct for both the mLAN device and the external device s The cable that connects the mLAN device and the external device may be damaged Refer to Setting up from the mLAN Auto Connector see page 16 Noise is produced Setting on the computer Make sure that your computer satisfies the system require ments Refer to System Requirements see page 3 Make sure that the latency setting of mLAN Driver is a...

Page 28: ... click the driver icon on the task bar then select ON Refer to Confirming the installation see page 12 Are the other settings of mLAN appropriate Refer to Unable to transfer receive audio data or MIDI data item in this chapter Recorded devices aren t selected Setting on the computer Use an ASIO compatible application Recording by an appli cation other than an ASIO compatible one is not possible Un...

Page 29: ...con nections of the mLAN devices in the order of power up Channels in excess of the permitted number will not be con nected If five or more mLAN devices including a computer have been connected to a network the total number of transmis sion channels of all devices will be limited You can connect up to 86 channels in Windows Launching mLAN Graphic Patchbay or updat ing to the latest information tak...

Reviews: