background image

7

RQT6573

Getting started

Page

1

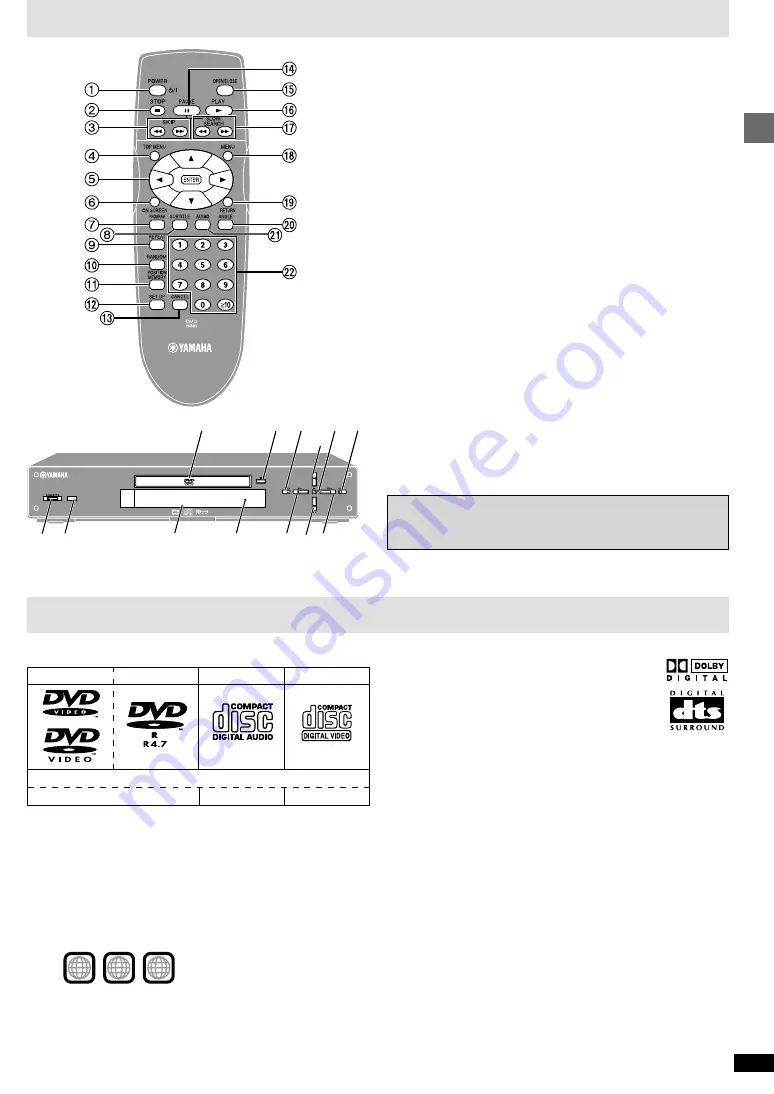
Standby/on switch (POWER 

Í

/I) . . . . . . . . . . . . . . . . . . . . . . . . 

0

6

Press to switch the unit from on to standby mode or vice versa.
In standby mode, the unit is still consuming a small amount of power.

2

Stop button (

 STOP) . . . . . . . . . . . . . . . . . . . . . . . . . . . . . . . . . 

0

8

3

Skip buttons (

:

9

 SKIP) . . . . . . . . . . . . . . . . . . . . . . . . . . . 

0

9

4

Top menu button (TOP MENU) . . . . . . . . . . . . . . . . . . . . . . . .  8, 11

5

Cursor buttons (

3

4

2

1

)/Enter button (ENTER) . . . . . . .  6, 8

6

Display button (ON SCREEN) . . . . . . . . . . . . . . . . . . . . . . . . . . .  13

7

Program button (PROGRAM) . . . . . . . . . . . . . . . . . . . . . . . . . . . .  10

8

Subtitle button (SUBTITLE) . . . . . . . . . . . . . . . . . . . . . . . . . . .  8, 12

9

Repeat button (REPEAT) . . . . . . . . . . . . . . . . . . . . . . . . . . . . . . .  10

:

Random play button (RANDOM) . . . . . . . . . . . . . . . . . . . . . . . . .  11

;

Position memory button (POSITION MEMORY) . . . . . . . . . . . . . 

0

9

<

Setup button (SET UP) . . . . . . . . . . . . . . . . . . . . . . . . . . . . . . .  6, 17

=

Cancel button (CANCEL) . . . . . . . . . . . . . . . . . . . . . . . . . . . . . . .  10

>

Pause button (

;

 PAUSE) . . . . . . . . . . . . . . . . . . . . . . . . . . . . . . . 

0

8

?

Open/Close button (OPEN/CLOSE) . . . . . . . . . . . . . . . . . . . . . . . 

0

8

@

Play button (

1

 PLAY) . . . . . . . . . . . . . . . . . . . . . . . . . . . . . . . . . . 

0

8

A

Slow/Search buttons (

6

 , 

5

 SLOW/SEARCH) . . . . . . . . . . . 

0

9

B

Menu button (MENU) . . . . . . . . . . . . . . . . . . . . . . . . . . . . . . . .  8, 11

C

Return button (RETURN) . . . . . . . . . . . . . . . . . . . . . . . . . . . . . . . 

0

6

D

Angle button (ANGLE) . . . . . . . . . . . . . . . . . . . . . . . . . . . . . . . . .  12

E

Audio button (AUDIO) . . . . . . . . . . . . . . . . . . . . . . . . . . . . . . . . .  12

F

Numbered buttons (1–9, 0, 

S

10) . . . . . . . . . . . . . . . . . . . . . . . . . 

0

8

G

Disc tray . . . . . . . . . . . . . . . . . . . . . . . . . . . . . . . . . . . . . . . . . . . . . 

0

8

H

Remote control signal sensor

I

Display

J

Standby indicator
When the unit is connected to the household AC outlet, this indicator
lights up in standby mode and goes out when the unit is turned on.

Control reference guide

1

H

J

3 > 3

G

? A

2 A

@

NATURAL SOUND  DVD PLAYER  DVD-S80

I

Buttons such as 

1

 function the same as the controls on the remote control.

Disc information

DVDs that can be played

This unit has a Dolby Digital decoder so you can play
DVDs with this mark.
This unit does not have a DTS decoder. Connect this
unit to equipment that has a DTS decoder to enjoy
DVDs with this mark.

Playing DVDs and Video CDs

The producer of these discs can control how they are played so you may
not always be able to control play as described in these operating instruc-
tions. Read the disc’s instructions carefully.

CD-R and CD-RW discs

This unit can play CD-DA (digital audio) and video CD format audio CD-R and
CD-RW that have been finalized (a process that enables CD-R/CD-RW
players to play audio CD-R and CD-RW) upon completion of recording. It may
not be able to play some CD-R or CD-RW due to the condition of the recording.

DVD-R discs

It may not be possible to play these discs in all cases due to the type of disc
or condition of the recording.

Handling precautions

Do not write on the label side with a ball-point pen or other writing instrument.

Do not use record cleaning sprays, benzine, thinner, static electricity
prevention liquids or any other solvent.

Do not attach labels or stickers to discs. (Do not use discs with exposed
adhesive from tape or left over peeled-off stickers.)

Do not use scratch-proof protectors or covers.

Do not use discs printed with label printers available on the market.

§

Including CD-R/RW and discs recorded with MP3.

Do not use irregularly shaped discs (e.g. heart-shaped), as these can dam-
age the unit.

Region number supported by this player

Region numbers are allocated to DVD players and software according to
where they are sold.

The region number of this player is “1”.

The player will play DVD-Video marked with labels containing “1” or “ALL”.

Example:

Discs that cannot be played

DVD-Audio, PAL discs, DVD-ROM, DVD-RAM, CD-ROM, CDV, CD-G,

i

RW, DVD-RW, CVD, SVCD, SACD, Divx Video Discs and Photo CD.

 Discs that can be played

DVD-Video

DVD-R

[DVD-V]

[VCD]

Indication used in instructions

Video CD

Audio CD

[CD]

§

2

4

1

1

ALL

Operations in these instructions are described mainly with
the remote control, but you can do the operations on the main
unit if the controls are the same.

Summary of Contents for DVD-S80

Page 1: ...RAL SOUND DVD PLAYER DVD S80 DVD S80 Before connecting operating or adjusting this product please read these instructions completely Please keep this manual for future reference DVD VIDEO CD CD PLAYER OWNER S MANUAL U ...

Page 2: ...all AC line filter s In the case of radio or TV interference relocate reorient the antenna If the antenna lead in is 300 ohm ribbon lead change the lead in to coaxial type cable If these corrective measures do not produce satisfactory results please contact the local retailer authorized to distribute this type of product If you can not locate the appropriate retailer please contact Yamaha Electron...

Page 3: ...ody when connecting or disconnecting it 4 Overloading Do not overload wall outlets and extension cords as this can result in a risk of fire or electric shock 5 Nonuse Periods When the unit is not being used turn the power off When left unused for a long time the unit should be unplugged from the household AC outlet 6 Attachments Do not use attachments not recommended by the unit manufacturer as th...

Page 4: ... TO SW S80 R L R L MARK 75Ω UNBAL SUBWOOFER PCM DTS DIGITAL OPTICAL DIGITAL AUDIO OUT AUDIO OUT MIXED 2CH PB PR SUBWOOFER COMPON VIDEO O L R R L 1 OPTICAL jack Connect this jack to the OPTICAL input jack of your AV amplifier using a commercially available optical cable By connecting to the digital jacks you can enjoy listening to the multi channel sound track of a DVD source with sound field effec...

Page 5: ... amplifier so that you can switch the both audio and video inputs at once 3 COMPONENT VIDEO OUT jacks These jacks transmit color difference and luminance separately and provide the best quality picture Connect these jacks to the corresponding jacks of your television If your AV amplifier equipped with COMPONENT VIDEO input and output jacks connect to the AV amplifier so that you can switch the bot...

Page 6: ...ails page 16 TV Aspect For setting details TV Aspect below 6 Press ENTER and then SET UP to end the settings To return to the previous screen Press RETURN TV Aspect Select 4 3 regular or 16 9 widescreen to suit your television If you have a regular 4 3 television you can also select how video on some discs is shown page 16 Video TV Aspect 4 3 Pan Scan Factory preset The pan and scan the original w...

Page 7: ...described in these operating instruc tions Read the disc s instructions carefully CD R and CD RW discs This unit can play CD DA digital audio and video CD format audio CD R and CD RW that have been finalized a process that enables CD R CD RW players to play audio CD R and CD RW upon completion of recording It may not be able to play some CD R or CD RW due to the condition of the recording DVD R di...

Page 8: ...gain before playing other sources so that a sudden increase in output does not occur When a menu screen appears on the television DVD V VCD Remote control only Press the numbered buttons to select an item To select a 2 digit number Example To select item 23 press S10 2 3 When playing DVDs you can also use 3 4 2 1 to select items Press ENTER to confirm your selection Play of the selected item now b...

Page 9: ...ng play press POSITION MEMORY 2 Press POWER Í I to switch the unit to standby or press OPEN CLOSE to remove the disc 3 When you are ready to play the disc again press 1 PLAY Play starts from the memorized position and the position is cleared When playing DVD Chapter Preview below To clear the position before play Press before recalling the memorized position You can memorize positions on up to fiv...

Page 10: ... items To select an item using the cursor buttons Press ENTER and 3 4 to select an item then press ENTER again to register the number All the items on a disc a title or a group are selected when you select ALL Times are not displayed when programming DVD Video and MP3 4 Press 1 PLAY Play now begins in the programmed sequence Some items cannot be played even if you program them DVD V To add or chan...

Page 11: ...rn to the file list screen Press RETURN Notes Discs must conform to ISO9660 level 1 or 2 except for extended formats MP3 files must have the extension MP3 or mp3 This unit is compatible with multi session but if there are a lot of sessions it takes more time for play to start Keep the number of sessions to a minimum to avoid this This unit is not compatible with ID3 tags This unit is not compatibl...

Page 12: ...o the selected one immediately If the subtitles overlap closed captions recorded on discs turn the subtitles off To clear display the subtitles 1 Press SUBTITLE 2 Press 1 3 Press 3 4 to select OFF or ON Angles During play Press ANGLE The number changes each time you press the button You can also use this button to turn the vocals on and off on karaoke discs Read the disc s instruction for details ...

Page 13: ... menu Audio menu 3 Press 2 1 to select the item 4 Press 3 4 to select the setting Items with 3 or 4 above and below can be changed by 3 4 Press ENTER if the setting does not change after pressing 3 4 Some items require different operations Read the following expla nations For your reference Depending on the condition of the unit playing stopped etc and the type of software you are playing there ar...

Page 14: ...r User mode The following items are also displayed when you select User a Contrast j7 to i7 b Brightness 0 to i15 c Color j7 to i7 Unit information Disc information e g DVD Video e g MP3 disc e g Video CD a T Title number DVD V T Track number CD VCD G Group number CD MP3 discs b C Chapter number DVD V T Track number in group CD MP3 discs c Time DVD V Press 3 4 to show the elapsed play time or rema...

Page 15: ...ight 3 Front leftiFront rightiCenter Audio menu a ADVANCED SURROUND DVD V Dolby Digital 2 channel or over only Use ADVANCED SURROUND Virtual Surround Sound to enjoy a surround like effect if you are using 2 front speakers If you are playing a disc with surround effects recorded on it the effect is broadened and sound seems to come from virtual speakers on either side 1 Natural effect l l l 2 Empha...

Page 16: ...hether to show on screen messages or not Demo A demonstration of the unit s on screen displays starts when you select On The demonstration stops when you press a button and the setting reverts to Off QUICK SETUP page 6 Answer questions to make basic settings Menus Disc Video Audio Display Others 1 The original language of each disc will be selected 2 Input a code number with the numbered buttons s...

Page 17: ...erminal OPTICAL PCM Down Conversion Select how to output audio with a sampling frequency of 96 kHz Select Yes if the equipment you connect cannot process signals with a sampling frequency of 96 kHz Select No if you use analogue connection irrespective of the type of equipment No Factory preset Output as 96 kHz There is no output if the disc has copy protection Select Yes in this case Yes Converted...

Page 18: ...rnative language is not selected with discs which do not contain more than one language In the case of some discs the alternative language cannot be selected with AUDIO or SUBTITLE Try selecting it from the disc s menu if one is available Menus are only displayed if they are recorded on the disc Subtitles appear only with discs that contain them Subtitles are cleared from the television Display th...

Page 19: ...coded picture I picture This is the standard picture and is a complete picture in itself This means it has the best picture quality and is the best to use when adjusting the picture P Predictive coded picture P picture This picture is calculated based on past I or P pictures B Bidirectionally predictive coded picture B picture This picture is calculated by comparing past and future I and P picture...

Page 20: ...ecifications Note Specifications are subject to change without notice Weight and dimensions are approximate YAMAHA ELECTRONICS CORPORATION USA 6660 ORANGETHORPE AVE BUENA PARK CALIF 90620 U S A YAMAHA CANADA MUSIC LTD 135 MILNER AVE SCARBOROUGH ONTARIO M1S 3R1 CANADA YAMAHA ELECTRONIK EUROPA G m b H SIEMENSSTR 22 34 25462 RELLINGEN BEI HAMBURG F R OF GERMANY YAMAHA ELECTRONIQUE FRANCE S A PA PARIS...

Reviews: