Introduction
Preparations
Basic Operation
Advanced
Operation
Additional
Information
Appendix
48
Remote Control Features
■
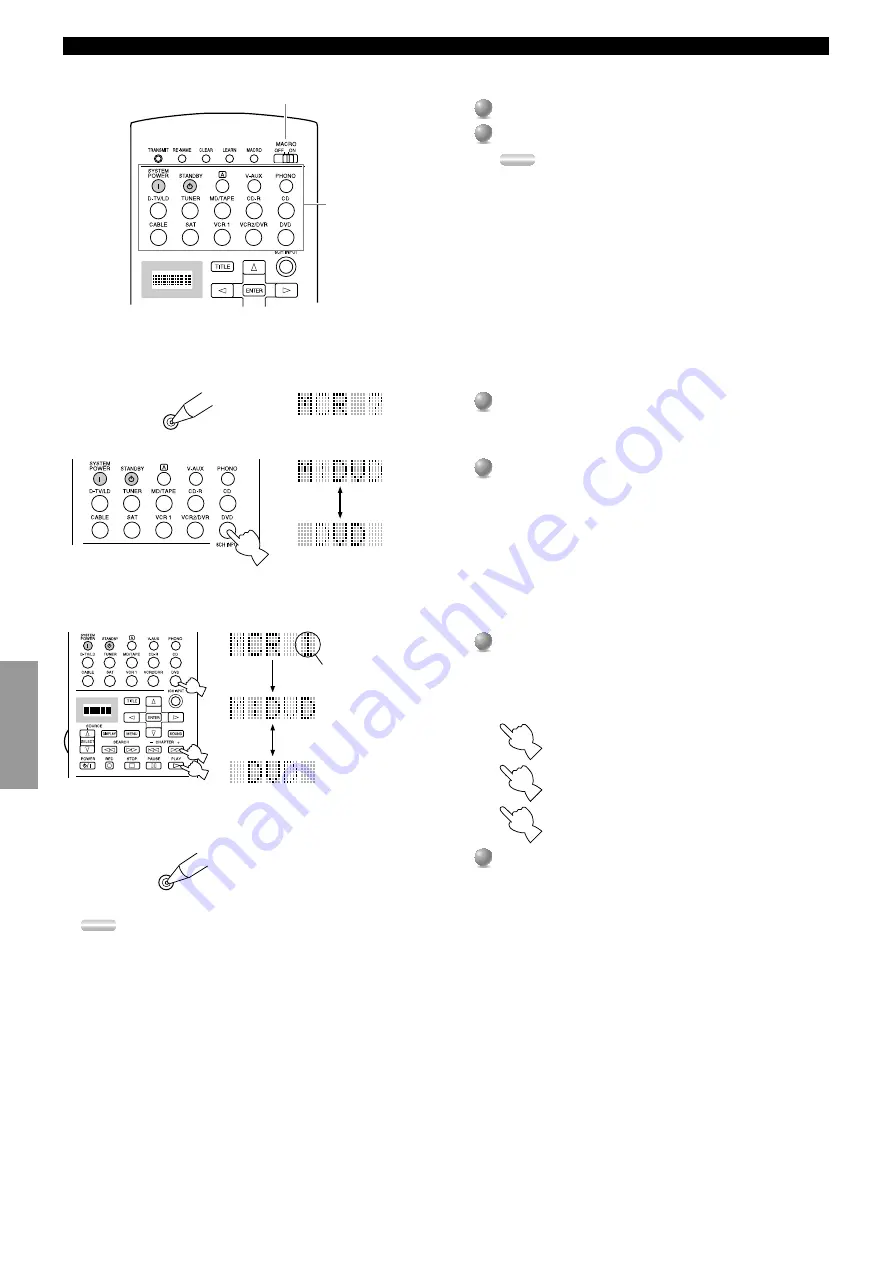
Operating the Macro feature
1
1
Set
MACRO ON/OFF
to
ON
.
2
2
Press a Macro button.
Notes:
• When you are finished using the Macro feature, set
MACRO
ON/OFF
to
OFF
.
• While the main unit is carrying out a macro program, the main
unit does not receive any other button’s function until the
macro is complete (the
TRANSMIT
indicator stops flashing).
• Continue to aim the remote control at the component the macro
is operating until the macro program is complete.
■
Programming a Macro
You can use the Macro feature to transmit many remote control commands by pressing a single button.
1
1
Press
MACRO
using a ball point pen or similar object.
• If you do not initiate the procedure within 30 seconds, the
macro programming process is canceled.
2
2
Press the macro button on which you want to program the
Macro.
• If you want to change the source component, use
SOURCE SELECT
h
/
g
or input buttons. When you use
input buttons, input is selected as a Macro step, whereas
SOURCE SELECT
h
/
g
only changes the component.
• The display window shows the button you chose for
programming the macro and the component name in
alternation.
3
3
Press the buttons of the functions that you want to include in
the macro sequence in order.
• You can set up to 10 Macro steps (10 functions).
(ex)
1
MCR 1 : DVD input
2
MCR 2 : DVD
y
3
MCR 3 : DVD
w
4
4
Press
MACRO
again when the sequence you want to
program is complete.
• After you set 10 steps, “FULL” is displayed.
Notes:
• “NG” appears in the display window when programming is not done correctly.
• “ERROR” appears in the display window in the following conditions: when pressing more than one button at once; and when
MACRO ON/OFF
is
switched to another position.
MACRO ON/OFF
Macro buttons
MACRO
Flashes
alternately
1
2
3
Flashes
alternately
indicates the number
of macrosteps you
entered
MACRO


