background image

May  2016

P 2

HD23F1JP0E8

da Vinci  

Jr.1.0 Pro

The purpose of this user manual is to help users understand and use the da Vinci Jr. 1.0 Pro 3D printer correctly. It contains 

the operating instructions, maintenance information and application skills of the da Vinci Jr. 1.0 Pro 3D printer. To learn 

more about the latest news of the da Vinci Jr. 1.0 Pro 3D printer, please contact local dealers or visit the official 

website of 

XYZprinting: http://www.xyzprinting.com

Trademarks

All trademarks and registered trademarks are the property of their respective owners.

Print History

New editions of this manual incorporate new and changed material different from previous editions. Minor corrections and 

updates may be incorporated into reprints of the current edition without releasing additional announcements or documenta-

tion regarding the updated version. The User Manual is for user reference only. If you need to obtain the latest information, 

you are welcomed to visit the XYZprinting website: www.xyzprinting.com

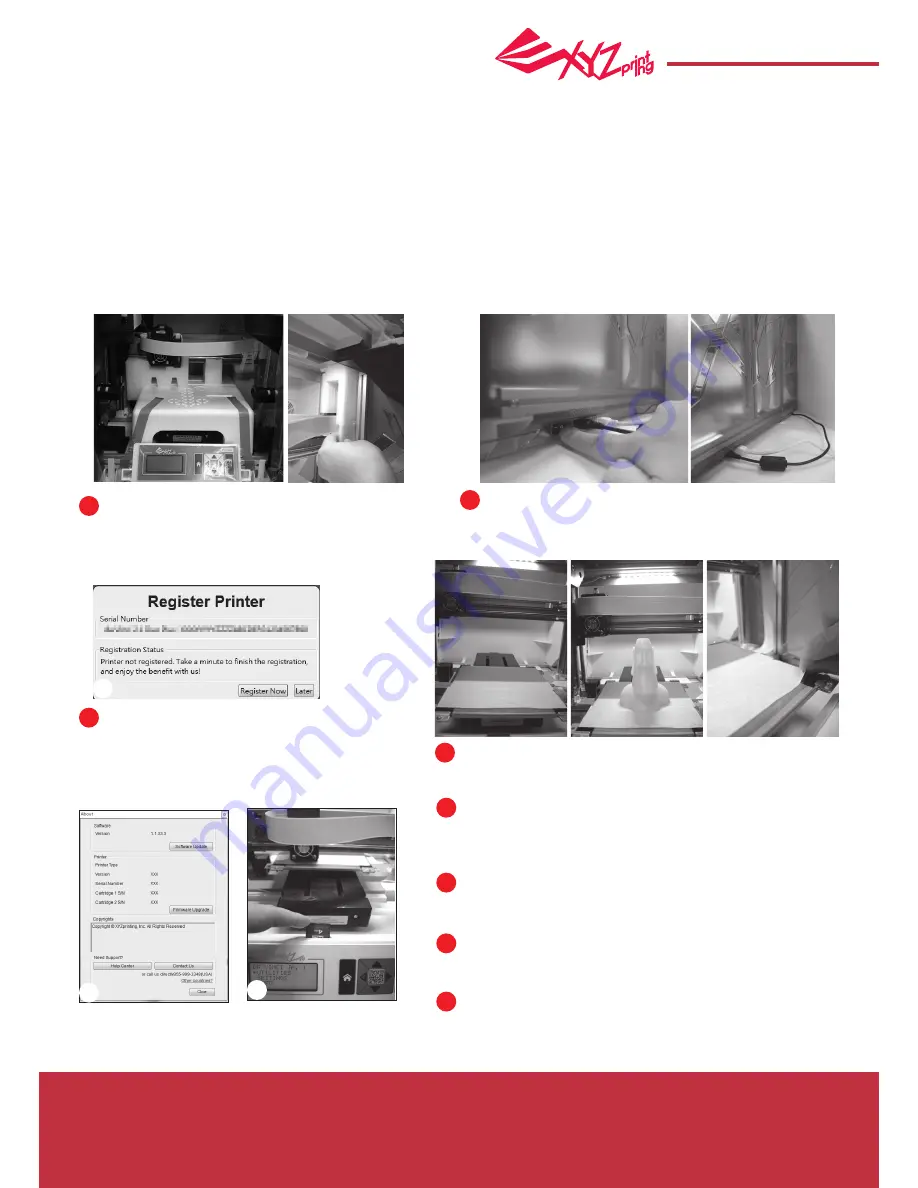
Before using this printer, please first remove 

the fixed materials from the printing module and 

printing bed. Switching on the printer's power 

without removing these fixed materials may 

damage the machine.

Registration via XYZware Pro before your first 

print is strongly recommended. When registered 

with XYZprinting, you will receive latest technical 

supports and updates. To register, simply click 

"Register Now" to begin.

You may use XYZware Pro to initiate manual updates to the printer 

firmware and software. When using the printer for the first time, 

we recommend connecting to the Internet and performing manual 

update once to obtain the latest resources.

The optimal room temperature for printing is 15-32 

C (60-90 

F). 

Printing quality may be affected if room temperature is higher or 

lower.
If you need more detailed technical support and program

resources, visit the website:  

http://support.xyzprinting.com/global_en/Support

Before operating the printer, insert the SD card in the SD card port 

to make sure that the printing program is able to run properly.

Before you start printing, please affix the bed tape on the print 

bed. The bed tape may be removed after printing is complete. (Bed 

tape can be reused.)

Before launching XYZware Pro, connect the PC to with 

printer using the USB cable. For a better user

experience, it is strongly advised to follow the proper

procedure for using the product.

Please carefully read the contents of the product 

instruction manual before using this product.

2

3

4

5

5

1

6

7

8

8

3

Summary of Contents for da Vinci Jr 1.0 Pro

Page 1: ...May 2016 P 1 HD23F1JP0E8 da Vinci Jr 1 0 Pro da Vinci Jr 1 0 Pro Quick Guide da Vinci Junior 1 0 Pro 3D Printer...

Page 2: ...t removing these fixed materials may damage the machine Registration via XYZware Pro before your first print is strongly recommended When registered with XYZprinting you will receive latest technical...

Page 3: ...Brush Accessory Checklist Important Safety Instruction for Use of Maintenance Tools Important Safety Instruction Scraper USB Wire Power Cord Bundled filament Bed Tape X 3pcs Filament spool axle ring P...

Page 4: ...urn on the power switch Be sure to remove the paper cardboard near the Y axis Unpacking the Product 5 9 6 4 10 7 Note please use the original power adapter and power cord along with the printer in ord...

Page 5: ...hat the guide tube has been tightly inserted into the feeding hole 2 1 Remove the extruder Press the white button at the back of the extruder to release it Install the filament guide tube to the extru...

Page 6: ...d push the filament all the way to the bottom so that the front end of the filament is completely inserted into the feed module Take out and separate the filament spool axle ring into its two componen...

Page 7: ...OAD FILAMENT EXTRUDER HEATING TEMPERATURE 210 C PLEASE WAIT LOAD FILAMENT EXTRUDER HEATING TEMPERATURE 210 C PLEASE WAIT LOADING PLEASE WAIT UNLOADING PLEASE WAIT OK TO RETURN UTILITIES CHANGE SPOOL H...

Page 8: ...ue and provide the details of leveling information 4 1A If CALIB COMPLETED is shown for the detection result and AUTO LEVELING IS DISABLED NOW is shown on the screen it indicates good platform levelne...

Page 9: ...ve Z AXIS Y AXIS to move print bed backwards and forwards 2 Select desired increment of travel with and buttons and press or hold or button for desired direction to move the extruder To home axes To m...

Page 10: ...rush to scrub the feed gear back and forth to remove the chips of filament out of the gear Replace the wire after the cleaning is completed 2 Press the black rubber fixer on top of hole and pull the g...

Page 11: ...opy paper to be drawn out smoothly but six sheets of copy paper cannot be passed 2 Increase decrease the value based on a scale of 0 05mm Increasing the value will increase the gap between the print m...

Page 12: ...the temperature settings exceed this recommended range Hang the spool on the filament spool holder prepared by yourself we recommend use the support bracket to avoid collaps ing when printing Print qu...

Page 13: ...ents are made using polymerized lactic acid which is extracted from corn sugarcane or other sugar containing crops and is regarded as the most environmentally friendly 3D printing material Unwanted PL...

Reviews: