


Charge Time:
4-5 Hours (1.5Ah)
Input:
100-240VAC, 50~60Hz, 14.5W
Output:
21V DC, 400mA
Tool Weight:
0.116kg
SPECIFICATIONS
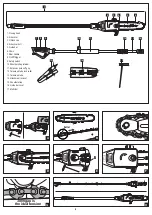
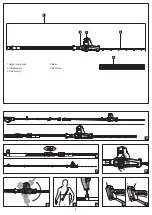
CONTROLS
Charger LED Indicators
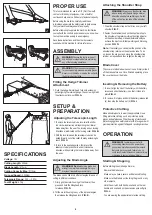
PROPER USE
This tool is intended for use in a DIY (Do It Yourself) context
or for hobbyist purposes. It is not built for continuous daily
use in a trade or professional capacity.
Before using the machine, carefully read these instructions,
especially the safety rules to help ensure that your machine
always operates properly.
Before attempting to operate the machine, familiarise
yourself with the controls and make sure you know how to
stop the machine quickly in an emergency.
Save these instructions and the other documents supplied
with this machine for future reference.
ALWAYS WEAR EYE, FACE AND
EAR PROTECTION
WARNING!
Ensure the tool is turned off and
disconnected from the power supply before
performing any of the following operations.
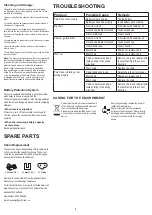
LED Indicator
Situation
GREEN (Flashing)
Stand By (no battery pack
is inserted)
RED (Illuminated)
Battery is charging (low
charge)
GREEN (Illuminated)
Battery is fully charged.
GREEN & RED (Flashing) Battery is faulty
GREEN & RED
(Illuminated)
Battery is too hot. Remove
battery from charger a let
cool. Insert battery again
when at room temperature
OPERATION
Charging Your Battery
WARNING!
To reduce the risk of electrical
shock, we recommend the use of a residual
current device rated 30mA or less.
Allow at least 3 hours of charge time before initial use of the
battery. Charge 18V Li-ion battery pack
XLBP-0185
only
with the
XLCH-0185
charger. The battery should be
charged in a cool dry place. It will take 2 to 3 charging/
discharging cycles before the battery achieves maximum
run time capacity.
NOTE:
The battery will not develop a memory, it does not
have to be fully discharged before recharging.
1. Connect the charging adaptor into the mains power outlet.
2. The charger LED will flash green showing power is being
supplied to the charger.
3. With the battery sitting on a flat surface, align the raised
ribs on the battery with the recess in the charger cradle
and slide onto the battery ensuring a firm connection.
4. The charger LED will illuminate red signifying that the
battery is charging. Battery is fully charged after 4-5
hours, green LED will illuminate.
5. When removing the charger from the battery, first press
the battery release tab, then slide the cradle from its
position.
NOTE:
The battery pack can become a little warm during
the charging. This is normal.
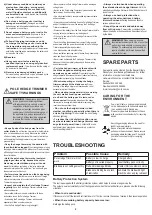
CARING FOR THE ENVIRONMENT
Power tools that are no longer usable should
not be disposed of with household waste but
in an environmentally friendly way.
Please recycle where facilities exist. Check
with your local council authority for recycling
advice.
Recycling packaging reduces the need for
landfill and raw materials.
Reuse of recycled material decreases
pollution in the environment. Please recycle
packaging where facilities exist.
Check with your local council authority for recycling
advice.
WARRANTY
YOUR WARRANTY FORM SHOULD BE RETAINED BY YOU AT ALL TIMES. IN ORDER TO MAKE A CLAIM UNDER
THIS WARRANTY YOU MUST RETURN THE PRODUCT TO YOUR NEAREST BUNNINGS WAREHOUSE WITH YOUR
BUNNINGS REGISTER RECEIPT. PRIOR TO RETURNING YOUR PRODUCT FOR WARRANTY. PLEASE TELEPHONE
OUR CUSTOMER SERVICE HELPLINE:
Australia 1800 069 486
New Zealand 0508 069 486
TO ENSURE A SPEEDY RESPONSE PLEASE HAVE THE MODEL NUMBER AND DATE OF PURCHASE AVAILABLE. A
CUSTOMER SERVICE REPRESENTATIVE WILL TAKE YOUR CALL AND ANSWER ANY QUESTIONS YOU MAY HAVE
RELATING TO THE WARRANTY POLICY OR PROCEDURE.
The benefits provided under this warranty are in addition to other rights and remedies which are available to you at law.
Our goods come with guarantees that cannot be excluded at law. You are entitled to a replacement or refund for a major
failure and for compensation for any other reasonably foreseeable loss or damage. You are also entitled to have the goods
repaired or replaced if the goods fail to be of acceptable quality and the failure does not amount to a major failure.
Generally you will be responsible for all costs associated with a claim under this warranty, however, where you have
suffered any additional direct loss as a result of a defective product you may be able to claim such expenses by contacting
our customer service helpline above.
1 YEAR REPLACEMENT WARRANTY
Your product is guaranteed for a period of 12 months from the original date of purchase and is intended for DIY (Do It
Yourself) use only. If a product is defective it will be replaced in accordance with the terms of this warranty. Warranty excludes
consumable parts, for example:
WARNING
The following actions will result in the warranty being void.
• Professional, Industrial or high frequency use.
• If the tool has been operated on a supply voltage other than that specified on the tool.
• If the tool shows signs of damage or defects caused by or resulting from abuse, accidents or alterations.
• Failure to perform maintenance as set out within the instruction manual.
• If the tool is disassembled or tampered with in any way.
XU1
Australia/New Zealand (Head Office)
Ozito Industries Pty. Ltd.
25 Fox Drive, Dandenong South, Victoria, Australia 3175


