background image

Xtreme Power Conversion Corporation

XPRT 6kVA & 10kVA User’s Manual

Page 18

Uninterruptible Power Supply

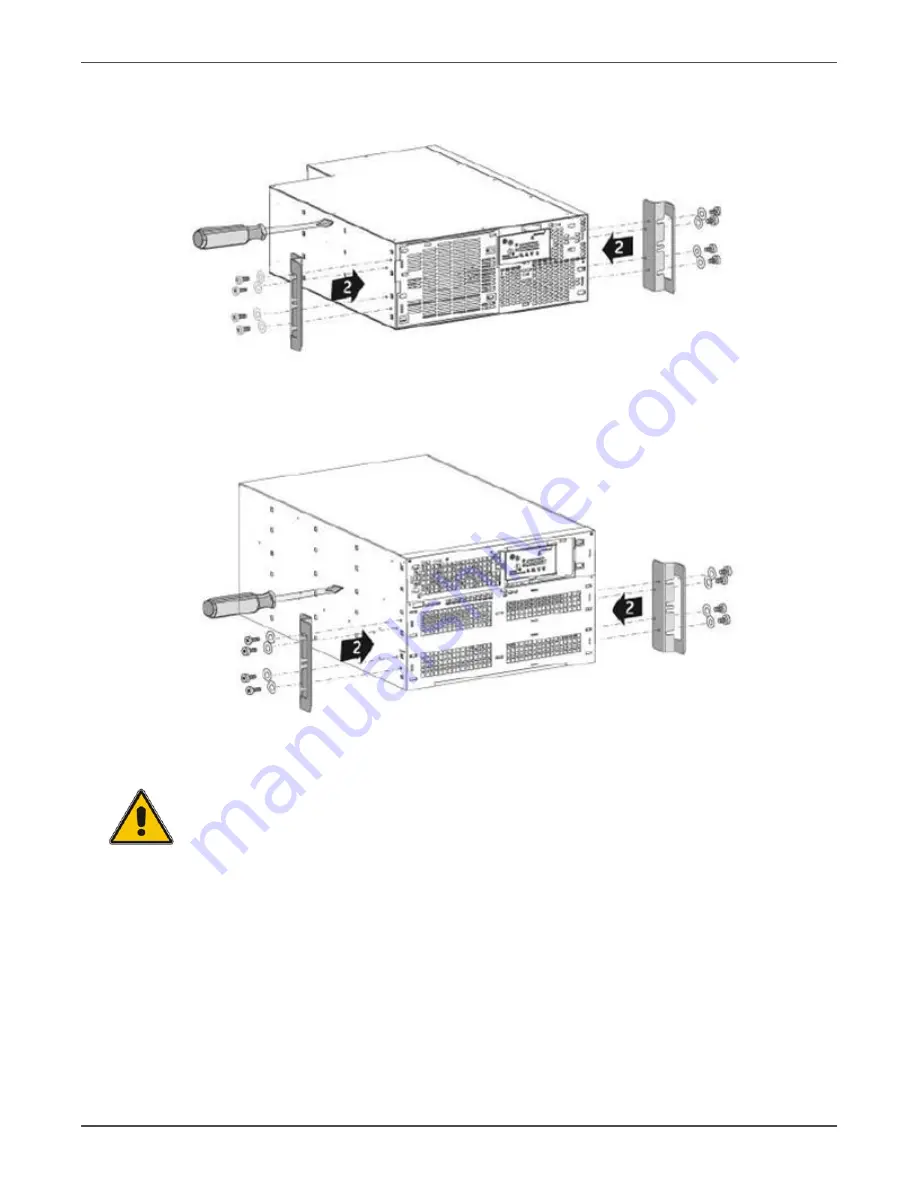
XPRT-6KVA RACK MOUNT ASSEMBLY

XPRT-10KVA RACK MOUNT ASSEMBLY

NOTE

Please consider the weight of the UPS prior to installation to ensure the rack and floor is ca-

pable of supporting the weight. For rack installation we recommend that the UPS is placed in 

the lower section of the rack. Fit the unit and the battery into the rack cabinet with the help 

of a second person.

Summary of Contents for 10kVA

Page 1: ...XPRT 6kVA 10kVA Online UPS 6kVA 10kVA Models User Installation Manual www xpcc com 2015 Xtreme Power Conversion Corporation All rights reserved Rev 1 26 15 ...

Page 2: ...nction 9 Free Run Mode 9 Diagnostic Tests 9 SystemConfiguration 10 Hardware Installation Guide 15 SafetyInformation 15 InstallationProcedures 16 Connecting Internal Battery Pack 6kVA Model 19 Connecting Internal Battery Pack 10kVA Model 21 Connecting Additional External Battery Packs 6kVA Model 22 Connecting Additional External Battery Packs 10kVA Model 24 Connecting Interface Devices 27 Standard ...

Page 3: ... 10kVA UPS Parallel System 43 NormalOperationConditions 43 Switching the UPS OFF 43 Status and Alarm Indications 45 On Bypass 45 OnBattery 46 Battery Low end of runtime 46 Bypass Out of Limits 46 Overload 46 ReplaceBattery 47 AlarmPriority 47 Fault Mode 48 Standby 48 Remote Emergency Power Off REPO 48 No Load Shutdown 49 AutoRestart 49 Battery Management 50 Battery Connection Test 50 Quick Battery...

Page 4: ... Model 53 Internal Battery Replacement 10kVA Model 54 Power Unit Maintenance 56 Power Unit Replacement 6kVA Model 56 Power Unit Replacement 10kVA Model 56 Troubleshooting 58 Specifications 59 Shipping List 59 Obtaining Service 60 Xtreme Power Conversion Limited Warranty 61 Xtreme Power Conversion Load Protection Policy 62 Appendix A SNMP WEB Card Optional 65 Introduction 65 LEDs 65 Features 65 Arc...

Page 5: ...ld void the user s authority to operate the equip ment under FCC rules IMPORTANT SAFETY INSTRUCTIONS SAVE THESE INSTRUCTIONS This manual contains important instructions that should be followed during installation and maintenance of the UPS It also gives all necessary information about the correct use of the UPS Before attempting to install and start up the UPS carefully read this manual Keep this ...

Page 6: ...ICALLY LIVE PARTS Related to all situations with potentially hazardous voltage NOTE Check for sufficient floor and elevator loading capacity Move the UPS and the battery pack in its original package to the final destination room Do not stack other package on top WARNING Pay attention to the HEAVY WEIGHT of the UPS when downloading the UPS from the pallet Never try to lift the unit by yourself Gene...

Page 7: ... and 45 C 4 F and 113 F every 1 month CAUTION In case of storage pay attention to Maintenance And Servicing All maintenance and servicing except replacement of the batteries and plug in cards is to be carried out by qualified skilled personnel only A battery can present a risk of electrical shock and high short circuit current Never dispose of batteries in a fire they may explode Do not open or mu...

Page 8: ... including computers workstations process control systems telecommunications systems sales terminals other critical instrumentation etc The purpose of the UPS is to protect these systems from poor quality utility power complete loss of power or other associated problems Electrical interference exists in many forms causing problems in AC power from lightning power company ac cidents and radio trans...

Page 9: ...d and on line mode reactivates immediately Switching back to on line mode occurs when input voltage is outside 10 of nominal 15 selectable when input frequency is outside of 3Hz or when no input line is available Although high efficiency is standard the default operation is in on line mode Bypass can be activated in the LCD panel though on line can be run permanently if preferred Free Run Mode The...

Page 10: ...wing should be taken into consideration The total demand of the protected system shall dictate the output power rating VA Allow a margin for future expansion or calculation inaccuracies from measured power requirements Backup time required will indicate the battery size needed If the load is less than the UPS nominal power rating then actual backup time is longer The following options are availabl...

Page 11: ...Xtreme Power Conversion Corporation XPRT 6kVA 10kVA User s Manual Page 11 Uninterruptible Power Supply 6kVA FRONT VIEW XPRT 6000HB 90000036 BUNDLE REAR VIEW WITH UPS INTERNAL BATTERY HARDWIRE PDU ...

Page 12: ...PRT 6kVA 10kVA User s Manual Page 12 Uninterruptible Power Supply XPRT 6000B 90000013 BUNDLE REAR VIEW WITH UPS INTERNAL BATTERY RECEPTACLE PDU 4 5 20R 1 L6 30R 1 L14 30R XPRT 10000B 90000014 REAR VIEW STANDARD HARDWIRE INTERNAL BATTERIES ...

Page 13: ...reme Power Conversion Corporation XPRT 6kVA 10kVA User s Manual Page 13 Uninterruptible Power Supply XPRT 10000 90000016 XPRT PDU3 90000035 REAR VIEW W PDU 4 5 20R 2 L5 20R 2 L6 30R FRONT PANEL HORIZONTAL ...

Page 14: ... battery packs if available supply the power until either the batteries are depleted or the utility input power returns Green Operation LED This LED will be on when the output is supplied by the UPS not on bypass Yellow Bypass LED This LED will be on when the UPS operates in Bypass Mode the utility input power is passing directly to the load If this LED blinks then the input voltage is out of bypa...

Page 15: ...egain power to the outlets on the UPS Hardware Installation Guide Inspect the UPS for damage after unpacking If any damage is present please immediately notify the carrier and place of purchase NOTE The internal battery packs for these UPS ship separately FOR the 6kVA model there is 1 in ternal battery pack and for the 10kVA model there are 2 internal battery packs are shipped separately WARNING I...

Page 16: ...NFPA 70 For model XPRT 10000 A disconnect switch shall be provided by others for ac input and output circuit To reduce the risk of fire connect only to a circuit provided with a branch circuit overcurrent protection for 30 amperes rating in accordance with the National Electric Code ANSI NFPA 70 For model XPRT 6000 CAUTION To reduce risk of fire connect the UPS only to a circuit provided with fuse...

Page 17: ... is now ready for further connection proceed with internal battery connection Rack Mount Installation 1 Place the UPS cabinet horizontally on a flat surface 2 Install the mounting brackets that came with the unit using the provided screws 3 Install the UPS into a 19 rack The UPS cabinet must be supported by mounting rails do not mount it by using the mounting brackets only ...

Page 18: ...PRT 10KVA RACK MOUNT ASSEMBLY NOTE Please consider the weight of the UPS prior to installation to ensure the rack and floor is ca pable of supporting the weight For rack installation we recommend that the UPS is placed in the lower section of the rack Fit the unit and the battery into the rack cabinet with the help of a second person ...

Page 19: ...rom the UPS cabinet It has to be mounted inside the unit before the UPS installation Please proceed with the following steps 1 Unpack the battery pack from its container 2 Place the battery pack in front of the battery compartment aligning the rear connector to the front panel 3 Slide the battery pack into the battery compartment until the rear connector is plugged with the UPS in ternal DC socket...

Page 20: ...Xtreme Power Conversion Corporation XPRT 6kVA 10kVA User s Manual Page 20 Uninterruptible Power Supply XPRT 6KVA SLIDE BATTERY PACK INTO UPS XPRT 6KVA ATTACH BATTERY COVER ON UPS ...

Page 21: ...n Please proceed with the following steps 1 Unpack the two battery packs from its container 2 Place the battery packs in front of the battery compartment aligning the rear connector to the front panel 3 Slide the battery packs into the battery compartment until the rear connector is plugged with the UPS internal DC socket 4 Fix the battery cover by tightening screws 5 Mount the front panels by pus...

Page 22: ...ttery Cover activates if not activated the UPS will not start XPRT 10KVA MOUNT PLASTIC FRONT PANELS Connecting Additional External Battery Packs 6kVA Model The additional external battery pack connects to the UPS in the same way whether the UPS is being used in tower or rack mount format When used in tower format the UPS and additional battery packs can be mounted together in one set of mounting s...

Page 23: ...ovided with the battery between UPS and battery pack plug it into the UPS battery socket and the nearest battery connection socket on the battery pack On first startup the value of the total battery capacity has to be set with the UPS Monitoring software XPRT 6KVA UPS BATTERY PACK XPRT 6KVA UPS BATTERY PACK CABLE CONNECTION ...

Page 24: ...cceptable to use the UPS without first charging the battery but the runtime may be reduced Connecting Additional External Battery Packs 10kVA Model For the XPRT BP5 external battery pack for the XPRT 10kVA the battery packs are shipped with the battery trays separate from the battery pack The battery trays need to be mounted inside the battery pack after the battery pack is set in position 1 Unpac...

Page 25: ...external battery pack connects to the UPS in the same way whether the UPS is being used in tower or rack mount format When used in tower format the UPS and additional battery packs can be mounted together in one set of mount ing supports Connect the cable provided with the battery between UPS and battery pack plug it into the UPS battery socket and the nearest battery connection socket on the batt...

Page 26: ...rruptible Power Supply XPRT 10KVA UPS BP5 TOWER INSTALLATION XPRT 10KVA UPS BP CABLE INSTALLATION NOTE If further battery packs are used they connect via the previous battery pack Thus the cable provided is attached via the nearest socket connection on the existing battery cabinet ...

Page 27: ...lot Prepare the se rial communication cable for DB9 communication port connection or the network cable for SNMP communica tion connection as follows 1 Choose from the 2 provided ferrite beads the smaller one for serial communication and the bigger one for SNMP communication 2 Place the cable part that is closest to the UPS connector inside the ferrite bead For SNMP communication twist it once arou...

Page 28: ...munication 3 RxD serial communication 4 Remote shutdown only on battery 5 Communication ground 6 7 Battery Low open emitter 8 Utility failure open emitter 9 Utility failure open collector Open the SNMP slot by removing the two screws and the cover then pull in the easy installation SNMP Card and connect previously prepared network cable SNMP CARD INSTALL 6KVA UPS SNMP CARD INSTALL 10KVA UPS ...

Page 29: ... installation procedure Open all the input output switches breakers on the power distribution and ensure no one is able to close them during this installation step 1 For installation with Optional Power Distribution Unit please see the appropriate section of this manual 2 Remove the terminal cover HARDWIRE INSTALL 6KVA UPS HARDWIRE INSTALL 10KVA UPS 3 Punch out the appropriate holes in the termina...

Page 30: ... Power Supply HARDWIRE INSTALL 6 10KVA UPS 4 Input connect the input utility wires to the terminals L1 L2 Line and N Neutral and the ground wire to GRD Ground connection is essential HARDWIRE WIRE CONNECTIONS 6KVA UPS NOTE Use on No 10 AWG 75C Copper Wire Terminal tightening Torque 20 in lb ...

Page 31: ...ne and N Neutral and the ground wire to GRD Ground Re install the terminal cover HARDWIRE TERMINAL COVER RE INSTALL 6KVA UPS HARDWIRE TERMINAL COVER RE INSTALL 10KVA UPS 6 In case of external batteries ensure the battery cable is connected between the battery cabinet and the UPS 7 Connect utility power to the UPS 8 Proceed to the Quick Start section of these instructions If parallel operating unit...

Page 32: ... A different power distribution set equipped with Maintenance Bypass switch can be installed on the rear side of the unit To replace the Power Distribution Unit on the 6kVA or to place the optional Power Distribution Unit on the 10kva proceed as follows 1 Ensure the UPS is completely shutdown with all breakers opened 2 Disconnect internal batteries and external battery packs by removing cabling fr...

Page 33: ...m the UPS The UPS is now ready for the new PDU assembly 7 On the 6kVA model align terminals on the backside of the PDU with the ones on the UPS and slide the PDU into the UPS PDU INSTALL 6KVA UPS 8 On the 10kVA model connect terminals on the backside of the PDU with connections in the PDU tray on the backside of the UPS and slide the PDU into the UPS ...

Page 34: ...rs on the UPS are off 2 In case external battery packs are used switch on the battery pack circuit breaker 6KVA BATTERY PACK BREAKER 3 Ensure that the manual bypass switch on the PDU is turned to the UPS position 6KVA PDU BYPASS SWITCH 4 Close all switches and breakers upstream from the UPS 5 Switch the INPUT CIRCUIT BREAKER placed on the rear side of the UPS to ON position ...

Page 35: ...CIRCUIT BREKAER on the rear side of the UPS 6KVA OUTPUT CIRCUIT BREAKER 9 The UPS is now in operation equipment connected to the UPS output can now be switched on 10 Load will be shown on the LOAD LED BAR Startup 10kVA UPS stand alone not parallel systems 1 Ensure that all breakers on the UPS are off 2 In case external battery packs are used switch on the battery pack circuit breaker 10KVA BATTERY...

Page 36: ...ess the keypad UPS ON for 1 second Within a few seconds OPERATION LED will be illuminated and BYPASS LED will be extinguished 8 Close the OUTPUT CIRCUIT BREKAER on the rear side of the UPS 10KVA OUTPUT CIRCUIT BREAKER 9 The UPS is now in operation equipment connected to the UPS output can now be switched on 10 Load will be shown on the LOAD LED BAR Operation Normal Operation Conditions 1 The UTILI...

Page 37: ...r 2 Press the keypad for 1 second to switch the UPS to BYPASS TO TURN THE UPS OFF 3 Press the keypad for a second time for 1 second to switch the UPS OFF If electrical isolation is required e g for maintenance purposes proceed with the following steps 4 Turn the OUPUT CIRCUIT BREAKER to OFF position 6KVA OUTPUT BREAKER 10KVA OUTPUT BREAKER 5 Turn the INPUT CIRCUIT BREAKER to OFF position ...

Page 38: ...should be out on the front panel of the UPS the UPS is shutdown Maintenance Bypass It is possible to bypass the UPS for maintenance purposes using the Maintenance Bypass Switch on the 6kVA PDU or use the standard bypass built into the 10kVA model If required proceed with the following steps 1 Switch the UPS on BYPASS by a For 6kVA i Press the keypad UPS OFF button on the front panel for 1 second i...

Page 39: ...External Bypass condition the residual DC voltage in the unit will be eliminated within 5 minutes Once the maintenance is performed on the UPS resume normal conditions by following these steps 1 Close the INPUT CIRCUIT BREAKER 2 Wait 45 seconds to allow the output voltage to stabilize 3 Press the keypad UPS ON for 1 second Within a few seconds OPERATION LED will be illuminated and BY PASS LED will...

Page 40: ...he paralleling cable delivered with each 10kVA UPS allows you to connect up to 3 10kVA UPS together in a paral lel system Installation of a Parallel System 1 All inputs of the UPS must be supplied from the same source Be sure that L1 L2 N correspond on all the units of the parallel system All inputs must be individually protected with fuses or breakers 2 All outputs must be connected together supp...

Page 41: ...the output cables is 3 meters 5 The overall system load may not exceed 100 load of a single UPS in the configuration without the ad dition of an external maintenance bypass Optional Xtreme Power bypass panel is available to meet this requirement Please contact Xtreme Power Sales for additional information Installing the Parallel Connection NOTE Ensure that the UPS is isolated prior to installation...

Page 42: ...t 2 UPS1 to Port 1 UPS2 etc 10KVA UPS CONNECT DB9 PARALLEL CABLE 3 One cable connects two UPS is parallel To connect a third UPS into the parallel system repeat the process as above 10KVA UPS CONNECTING 3 PARALLEL UNITS 4 For a quick start of the system proceed to the Startup section of this manual 5 Each UPS needs a different configuration of the DIP switch as identification of unit in the parall...

Page 43: ...FOR ADDITIONAL 10KVA UPS IN PARALLEL CONFIGURATION 8 Close the OUTPUT CIRCUIT BREAKER on the rear side of the UPS REPEAT STEP FOR ADDITIONAL 10KVA UPS IN PARALLEL CONFIGURATION 9 The UPS is now in operation equipment connected to the UPS output can now be switched on 10 Load will be shown on the LOAD LED BAR Normal Operation Conditions 1 The UTILITY INPUT is present and within the tolerance as sho...

Page 44: ...Y PACKS are connected switch the BATTERY PACK CIRCUIT BREAKER to the OFF position and disconnect battery cabling at the rear of the UPS 7 Open all switches and breakers upstream to the UPS 8 Remove internal and external battery pack connections and disconnect additional battery packs All LEDs should be out on the front panel of the UPS the UPS is shutdown REPEAT STEP FOR ADDITIONAL 10KVA UPS IN PA...

Page 45: ... BYPASS 0 5 H FAULT ON STANDBY LEGEND O OPERATION MODE L LOW PRIORITY ALARMS H HIGH PRIORITY ALARMS INTERMITTENT CONTINUOUS 0 5 NUMBER OF LEDs THAT CAN BE ON DEPENDING ON RUNTIME CAPACITY LOAD BAR MUTE BUZZER PRESS BUTTON BRIEFLY On Bypass The UPS is equipped with an automatic bypass switch This switch automatically transfers the load to the utility input power if the UPS is unable to deliver the ...

Page 46: ...load the shutdown procedure should be completed within 2 minutes after the bat tery low alarm started If only part of the output capacity of the UPS is used this period can be longer with aged batteries this period can be shorter When the batteries are fully discharged the UPS is no longer able to supply the connected equipment and eventu ally output power is lost Bypass Out of Limits The input ut...

Page 47: ...If the batteries are aged they must be replaced as soon as possible to ensure full protection for your equipment Perhaps the replace battery alarm occurs after a test which you started immediately after installation or after a power failure In this case the alarm may be incorrect as the batteries have been partially discharged during transport or storage or during the power failure For this reason...

Page 48: ...e unit Standby In standby mode the UPS is turned off output power is lost and the batteries are being recharged To put the UPS in Standby press for 1 second the UPS OFF switch the UPS switches to bypass Press one more time UPS OFF switch for 1 second The UPS is now in standby mode Most changes to the UPS settings are only possible in bypass or standby mode Remote Emergency Power Off REPO REPO may ...

Page 49: ...load shutdown is enabled if the load is less than 5 and in case of utility failure the UPS will switch off avoid ing a deep discharge of the batteries and output power is lost NO LOAD SHUTDOWN is disabled as default It is possible to enable this feature via the UPS Monitoring Software Auto Restart Default enabled AUTO RESTART may be disabled via the UPS Monitoring Software Auto Restart acts after ...

Page 50: ...p battery test will update the runtime calculation and may be started via the UPS Monitoring Software The test will start only if the battery charge level is higher than 90 and the load is at least 20 of the nominal rating The runtime calculation will be updated only if the test can run uninterrupted for a complete battery discharge NOTE When executing a deep battery test the available runtime in ...

Page 51: ...connected directly to an Ethernet network The card is fitted into the SNMP Card Slot For more information please refer to the user manual that comes with the interface card Extended Runtime Extended runtime can be obtained by connecting a separate extended battery pack to the UPS In this case the UPS must be informed about the new total battery capacity to allow a reliable recalculation of the ava...

Page 52: ...cluding the battery conduct dangerous voltages except the COM port output For your safety only authorized service personnel may remove the UPS or BP cabinet cover General The XPRT Series UPS is virtually maintenance free Adhere to proper environmental requirements as shown in the Specification and keep the air inlets outlets free of dust NOTE Except for battery replacement refer maintenance and se...

Page 53: ...rt the battery terminals Shorting may cause the battery to burn When working with batteries remove watches rings or other metal objects and only use insulated tools Avoid charging batteries in a sealed container Proper disposal of batteries is required Refer to your local codes for disposal requirements Never dispose of batteries in fire they may explode Never dismantle or reassemble batteries the...

Page 54: ...t 7 Fix the battery grille by tightening screws 8 Re install the two front covers NOTE To avoid battery malfunction in case of additional batteries connected all battery packs have to be replaced It s not possible to replace only 1 pack Avoid connection between new and old battery packs Internal Battery Replacement 10kVA Model In case of battery failure please proceed with the following steps NOTE...

Page 55: ...tery trays side by side in front of the battery compartment aligning the rear connector to the front panel 7 Slide the battery tray into the battery compartment and reconnect the DC cabling on each battery tray Affix the 2 battery brackets with the screws to hold the battery trays in the UPS cabinet 8 Fix the battery grille by tightening screws 9 Re install the two front covers NOTE To avoid batte...

Page 56: ... Switch the UPS to manual bypass 2 Loosen the 3 mounting screws on the PDU and slide it out from the power module 6KVA POWER UNIT SEPERATION FROM PDU 3 Loosen the 2 terminal cover screws on the back side of the PDU slide the cover over the terminals and re affix the screws 6KVA PDU TERMINAL COVER 4 The Power Module can now be replaced If internal batteries are not at the end of life they can be pl...

Page 57: ...mounting screws of the power module cover and remove it 5 Slide the power module out of the UPS cabinet 6 Power module can now be replaced 7 Slide in the new power module until the rear connector of the power module is plugged into the socket on the UPS 10KVA POWER UNIT REINSTALL 8 Reposition the power module cover and re affix with the 5 screws 9 Re affix the 3 front covers 10 Switch the UPS back...

Page 58: ...reset breaker Input utility indicator not illuminat ing acoustic alarm intermittent No input utility voltage present UPS on battery Input utility indicator not illuminat ing input utility voltage present acoustic alarm intermittent Input fuse blown or circuit breaker tripped Replace fuse or reset breaker Alarm LED illuminated continuous acoustic alarm UPS failure Contact UPS dealer or go to www xp...

Page 59: ...10 for 300 sec 130 for 30 sec 200 for 5 sec Crest factor 3 1 at full load BATTERY Battery quantity and size 12 9AH 144VDC 24 9AH 288VDC Recharge time 3 hours to 90 PHYSICAL UPS dimensions W x D x H 16 9 x 22 5 x 6 9 in 4U 16 9 x 26 0 x 10 6 in 6U UPS weight 162 lbs 309 lbs BP dimensions W x D x H 16 9 x 22 5 x 3 5 in 2U 16 9 x 26 0 x 6 8 in BP weight 95 lbs 200 lbs ENVIRONMENT Temperature 32 104 F...

Page 60: ... will ask you for the above information and if possible help solve your problem over the phone In the event that the unit requires factory service the technician will issue you a Return Mate rial Authorization number RMA If you are returning the UPS to Xtreme Power for service please follow these procedures 1 Pack the UPS in its original packaging If the original packaging is no longer available a...

Page 61: ... void if a the equipment is repaired or modified by anyone other than XPC Corporation or a XPC Corporation approved third party b the equipment is damaged by the customer is improperly used or stored is subjected to an adverse operating environment or is operated outside the limits of its electrical specifi cations or c the equipment has been used or stored in a manner contrary to the equipment s ...

Page 62: ... the XPC Limited Warranty against certain losses caused by a Power Disturbance for properly connected electronic equipment referred to as the Connected Equipment subject to certain terms and conditions provided below This policy applies only to the original purchaser of the Product If the Product is transferred or sold to another person or entity this policy is void Load Protection Policy Dollar a...

Page 63: ...he Load Protection Policy The following damage is not covered by this Policy 1 Restoration of lost data and reinstallation of software 2 Damage from a cause other than AC power line transients except for damage due to telephone line Local Area Network or CATV transients which is covered only if the Product offers such protection 3 DAMAGE CAUSED BY FAILURE TO PROVIDE A SUITABLE INSTALLATION ENVIRON...

Page 64: ...n issue payment to the Purchaser for either the cost of repair of the Connected Equipment or the Fair Market Value of the damaged Connected Equipment up to the dollar limits stated above XPC reserves the right to require the Purchaser to transfer title and deliver the Connected Equipment to XPC if it chooses to reimburse the Purchaser for the fair market value of the Connected Equipment XPCs maxim...

Page 65: ...n on the optional SNMP Web Card that can be used with these products SNMP WEB CARD FRONT VIEW LEDs The front panel LEDs have the following meaning STATUS MEANING LAN NETWORK OFF NO LAN CONNECTION DETECTED ON LAN CONNECTION ESTABLISHED NO COMMUNICATION BLINK LAN CONNECTION ESTABLISHED RECEIVE OR TRANSMIT ACTIVE UPS FAIL OFF OK NO FAULT ON NO UPS CONNECTION ACTIVE OFF FAULT OF DEVICE BLINK DEVICE OK...

Page 66: ... the main sections of this UPS User s Manual before installing or operating the equipment If any problems are encountered with the installation procedure please contact the support xppc com before proceeding Switch off the UPS and wait for approximately 2 minutes or place the UPS into maintenance bypass If switching to maintenance bypass make sure the utility input voltage is stable before switchi...

Page 67: ... to a PC CONNECTOR PIN OUT AS FOLLOWS PIN FUNCTION 2 TD TRANSMIT DATA 3 RD RECEIVE DATA 5 GND Configuration Configuration via serial connection Connect the SNMP Web Card to a computer using a standard 1 1 serial communications cable Run a terminal simulator e g HyperTerminal on a PC running Windows Configure the terminal simulator as follows ᴏ ᴏ 115 200bps ᴏ ᴏ 8 data bits ᴏ ᴏ 1 stop bit ᴏ ᴏ parity...

Page 68: ...lnet IP The default username login and password are ge and ge A command line configuration interface is entered WEB BROWSER Launch a web browser Enter the URL of the SNMP Web Card http IP The default username and password are ge and ge Note Saving the settings Apart from some network parameters most settings are immediately active However the card will revert to the last saved settings at reboot T...

Page 69: ... interface either serial connection or telnet by injecting the reboot command Using a web browser selecting Reboot in the menu Access WEB INTERFACE After the installation and configuration of the SNMP Web Card the connection can be tested with a web browser Launch the browser Enter the URL of the SNMP Web Card http IP e g http 192 168 24 14 When prompted enter username and password The SNMP Web Ca...

Reviews: