background image

9

For more cool and exciting XTM Racing products, visit our website at http://xtm.globalhobby.com

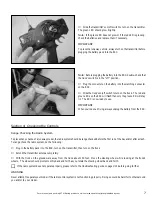
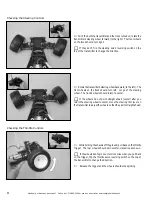
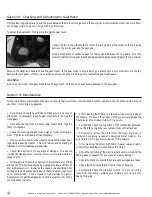
While holding the chassis off the ground, push forward on the

throttle trigger.  The rear wheels should spin clockwise as shown.

Release the trigger and the wheels should stop spinning.

Section 5:  Electronic Speed Control

The ESC included in your Baja Bullet truck does not require any programming or setup.  This is done for you automatically when you
turn on the transmitter and the truck.  Listed below is some information you may find useful about the ESC:

The ESC includes a brake and reverse function.  When you let go of the throttle trigger, the truck will coast.  When you push the

throttle trigger, the truck will brake.  When you push the throttle trigger all the way forward, the truck will go into reverse.  Note that the
truck will not instantly go into reverse if it's moving forward.  It will brake first, then go into reverse.  This saves wear on the motor and
drivetrain.

The ESC includes signal and temperature protection circuitry.  The ESC will not work if there is a problem with the signal or a low

battery.  In this case the red and green LEDs will flash.  To reset the ESC, turn the ESC off and on again - you may need to recharge the
battery first.  If the ESC has overheated, it will stop and the red and green LEDs will light continuously.  The ESC will resume use
automatically after the ESC's temperature has dropped lower than 80º - 90º Celsius.

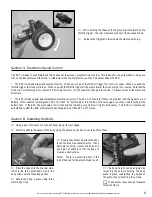
Using a pair of scissors cut out each decal along its outer edges.

Carefully adhere the decals to the body using the photos on the box cover to position them.

Section 6:  Installing the Body

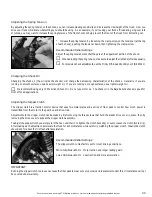
Double check that no parts of the body

touch the tires or suspension arms.  If any
parts are touching, remove the body and
use a pair of scissors to trim the body to
clear any obstructions.

Note:

There is a predrilled hole in the

top of the body for the antenna tube to exit.

The body height can be adjusted by

removing the screws holding the body
posts in place, readjusting the height of
the posts, then reinstalling the screws.

Make sure to leave enough clearance

for shock travel.

Place the body onto the chassis, mak-

ing sure the three predrilled holes in the
body slide over the three body posts.

Secure the body in place using three

metal body clips.

Summary of Contents for Baja Bullet

Page 1: ...odily harm and or injury The XTM Racing Baja Bullet RTR 2WD electric truck is not intended for those under 12 years of age unless closely supervised by an adult XTM Racing products are distributed exclusively by Global Hobby Distributors 18480 Bandilier Circle Fountain Valley CA 92728 All contents copyright 2002 Global Hobby Distributors Version V2 0 March 2002 Baja Bullet Truck Features Built and...

Page 2: ...provided a Troubleshooting Guide beginning on page 13 The troubleshooting guide is provided to help you find a quick and immediate resolution to any number of problems that might occur If you cannot solve a problem using the troubleshooter or if you have any other questions or concerns please contact us below XTM Racing Customer Service 18480 Bandilier Circle Fountain Valley CA 92728 Phone 714 963...

Page 3: ...e for your radio system Channel Frequency Hitec Part tx rx 67427xx 66427xx 01 16 995 02 27 045 03 27 095 04 27 145 05 27 195 06 27 255 61 75 410 90 75 990 Through 67475xx 66475xx Note that xx is the actual channel number you want to purchase 27Mhz 75Mhz Battery Cover This cover houses the 8 AA Alkaline batteries that power the transmitter Crystal This is the frequency crystal of the transmitter Yo...

Page 4: ...o proportional power for the motor Motor The Baja Bullet uses a powerful 21 turn electric motor for good speed and torque out of the box Receiver The receiver picks up the signals from the transmitter and sends those signals to the ESC and the steering servo Shock The shocks used on the Baja Bullet are oil filled and use a spring that is well suited for most off road conditions The shocks can be e...

Page 5: ...nna down into the molded hole in the top of the transmitter Thread the antenna clockwise into place and tighten it gently until is stops Remove the plastic battery cover Install 8 AA Alkaline batteries into the battery tray making sure that the polarity is correct Reinstall the battery cover Carefully insert the end of the antenna wire into one end of the plastic antenna tube Slide the antenna thr...

Page 6: ...the mount itself Slide the battery into the molded slot in the chassis WARNING Do not plug the battery into the ESC yet Charge the motor battery using your AC DC peak charger Note When you buy new battery packs they do not come fully charged They must be charged before they re first used Slide the battery back as far as it will go in the slot then push the front of the battery down completely Rein...

Page 7: ... use IMPORTANT When you re done driving always unplug the battery from the ESC Section 4 Checking the Controls To prevent any chance of a runaway model the radio system should be range checked before the first run of the day and or after a crash To range check the radio system do the following Plug in the battery pack into the ESC turn on the transmitter then turn on the truck Extend the transmitt...

Page 8: ...Let go of the steering wheel The truck s wheels should return to center If the wheels do not point straight ahead center after you return the steering wheel to center move the steering trim lever on the transmitter to adjust the wheels so that they point straight ahead While holding the chassis off the ground pull back on the throttle trigger The rear wheels should spin counter clockwise as shown ...

Page 9: ...ll not work if there is a problem with the signal or a low battery In this case the red and green LEDs will flash To reset the ESC turn the ESC off and on again you may need to recharge the battery first If the ESC has overheated it will stop and the red and green LEDs will light continuously The ESC will resume use automatically after the ESC s temperature has dropped lower than 80º 90º Celsius U...

Page 10: ...ires have negative camber If the tops of the tires lean out away from each other the tires have positive camber Recommended Initial Settings For driving on smooth surfaces set both the front and back wheels at 0 degrees For driving on rough surfaces set the front wheels at 1 degrees and the back wheels at 2 degrees Camber settings should be measured with the truck at its normal ride height For mor...

Page 11: ... to the gear box and drive train Adjustments to the slipper clutch can be made by first removing the three screws that hold the plastic drive cover in place then by removing the drive cover to expose the slipper clutch assembly To adjust the slipper clutch you simply turn the hex nut either in to tighten the clutch less slip or out to loosen the clutch more slip After making each adjustment accele...

Page 12: ...the condition of the transmitter batteries If you think they might be low replace them with a fresh set Periodically remove the motor from the truck and clean it inside and out using a specially designed motor cleaner Be very careful not to get motor cleaner on the chassis After cleaning the motor with motor cleaner always lightly oil the motor bushings on each end of the motor Check the condition...

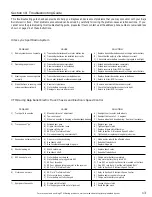
Page 13: ...that motor battery connector is tight C Damage to receiver after a crash C Return to Hitec RCD for repair XTM Racing Baja Bullet Electric Truck Chassis and Electronic Speed Control PROBLEM CAUSE SOLUTION 1 Truck pulls to one side A Steering trim out of adjustment A Readjust trim to center both wheels B Toe in not equal B Readjust the toe in to 1 2 degrees C Wheel on one side is hanging or has dama...

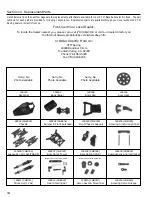
Page 14: ...06 Suspension Arm Set FR RR 149207 CHB007 Rear Shock Tower 149208 CHB008 Rear Upright L R 149209 CHB009 Rear Suspension Arm Bracket 149211 CHB011 Shock Set 1 Pair 149212 CHB012 Inner Steering Set 149213 CHB013 Servo Saver Mount Set 149214 CHB014 Steering Servo Linkage First Visit Your Local Dealer To locate the dealer nearest you please call us at 714 963 0133 or visit our dealer directory on the ...

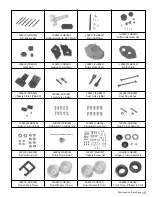
Page 15: ...s L R 149228 CHB028 Rear Dog Bones 149229 CHB029 Rear Joint Cup Set 149234 CHB034 King Pin Set w E Clip 149235 CHB035 Ball Bearing Set 149236 CHB036 Motor Pinion Gear 149237 CHB037 Chassis Screw Set 149238 CHB038 Slipper Clutch Assembly 149239 CHB039 Front Shock Tower 149240 CHB040 Front Wheels 1 Pair 149241 CHB041 Rear Wheels 1 Pair 149242 CHB042 Front Tires Ribbed 1 Pair 149226 CHB026 Front Axle...

Page 16: ...t authorized or equipped to perform warranty work on XTM Racing products When requesting warranty service please observe the following Crash damage will not be covered under warranty Do not request warranty service for a crash damaged product If you are requesting warranty on anything other than just the radio control system always send your Baja Bullet complete with the transmitter Please unplug ...

Reviews: