background image

Connect the Hub 5 to your Personal Wireless Router

Before you start: 

Disconnect your computer from the Xplornet Modem.

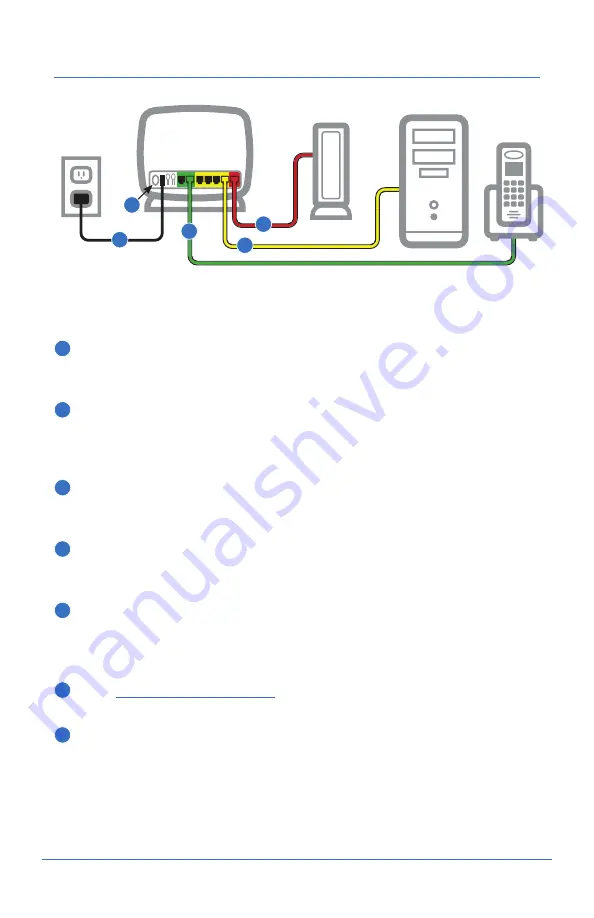
1

 Disconnect your computer or any existing router from the Xplornet  

  Modem. Plug one end of the red cable into the LAN port on the  

  Modem and the other to the red WAN port on the Hub 5 router.

2

 If using a computer, take the yellow cable and connect one end to the  

  Hub 5 router in either one of the four yellow LAN ports and the other  

  end to your Computer’s Ethernet port. If not using a computer, skip  

  this step.

3

 If using Xplornet Home Phone, connect your telephone by attaching  

  one end of the green RJ-11 cable to the Phone1 port of the Xplornet  

  Hub 5 router and the other end to your telephone base unit.

4

 Connect the small black power adaptor cord into the Power port on  

  the Hub 5 router and then plug the other end of the adaptor into a  

  120-volt household outlet.

5

 Power on your Xplornet Hub by pressing the On/Off button on the  

  back of the device.

Activate your Home Phone service:

6

 Go to 

www.myxplornet.com

 and enter your User Name and  

  Password to to activate or login to your account. 

7

 Now you are ready to connect to Wi-Fi Internet and use your Xplornet  

  Home Phone.

X P L O R N E T


H U B

  U S E R   G U I D E


 7


Modem

Xplornet  

Hub 5

Modems may vary 

in appearance

4

3

2

1

5

For more help on setting up your Hub 5 router, activating your Xplornet  

Home Phone Service, or setting up your Whole Home Wi-Fi service, go to  

www.xplornet.com and navigate to the the 

Support | Getting Started section

.

Summary of Contents for Hub 5

Page 1: ...2021 Xplornet Hub 5 User Guide...

Page 2: ......

Page 3: ...additional Wi Fi Units for Whole Home Wi Fi 8 9 Change Your SSID Name and Password 10 What is an SSID 10 Connect a Wireless Device to the Internet 10 Connection Troubleshooting 11 Xplornet Hub Wi FI F...

Page 4: ......

Page 5: ...ur Xplornet Hub 5 provides Home Phone Whole Home Wi Fi and Wi Fi Router service This guide will help you set up your device Just follow the easy step by step instructions and start connecting to what...

Page 6: ...evice do not use liquid or spray to clean it Keep the air vent clean and clear of debris and keep all liquid away from the device s surface Should anything fall into the Xplornet Hub through the air v...

Page 7: ...rnet com By Phone 1 866 841 6001 In the Box You will find the following items included Xplornet WiFi Unit AC Power Adapter RJ 45 LAN Network Cable RJ 45 WAN Network Cable Ifanypartsaremissing pleaseco...

Page 8: ...is established and a correct IP address obtained Solid Red Internet connection failed Flashing Green Data is being transmitted WLAN Applies to both 2 4Ghz and 5Ghz LED indicators Solid Green The WLAN...

Page 9: ...phone through the telephone line LAN1 LAN4 RJ 45 port is used to connect the modem to computer or other network devices WAN RJ 45 port is used to connect to your Xplornet modem WPS WLAN Protected Set...

Page 10: ...rvice These steps will guide you in the setup of the Xplornet Hub The Xplornet Hub should be the only device directly attached to the Xplornet service modem COMPLETE SETUP 1 USB interface 2 On Off but...

Page 11: ...Xplornet Hub 5 router and the other end to your telephone base unit 4 Connect the small black power adaptor cord into the Power port on the Hub 5 router and then plug the other end of the adaptor into...

Page 12: ...installed Wait 3 minutes for it to start up e Press the WPS button on the back of the Controller and then on the Agent The light on both units will flash green while they are pairing The light on the...

Page 13: ...a new Satellite click yes i Otherwise there will be an Add Satellite button at the bottom g Follow the prompts This includes entering the SSID of the AGENT unit h Wait 5 minutes for the sync to comple...

Page 14: ...nd on the back of your actual Hub 3 Go to User Name and Password section of the menu and change your SSID user name and password to your choosing Be sure to write down your password and store it secur...

Page 15: ...ing towards the centre of the home Keep at least 6 feet away from electrical devices or components that generate interference like a microwave oven home security system or blue tooth devices Ensure th...

Page 16: ...do Check to see if the WLAN light is on and green If not unplug the modem and Hub from power for 30 seconds and plug them back in My devices are connected but I can t access the Internet what should...

Page 17: ...Settings Allows homeowner to select level of power and optimal uncongested channel Guest SSID s Provides the ability to setup and additional 2 4 and 5 GHz band that is open to visitors Quality Metric...

Page 18: ...housing language training and employment 311 Local Municipal Government Information Services Non emergency information from your local municipal government 411 Information Directory Assistance Helps y...

Page 19: ...o activate your Home Phone service In order to login to the Xplornet Activation portal you need your password In most cases your username will be the email address you provided to Xplornet when you si...

Page 20: ...o update your phone features online visit myxplornet com which will allow you to view your phone usage change your preferences and customize your account based on your needs If you plan to port your e...

Page 21: ...all 9 1 1 If you do not inform the emergency operator of your location there is a risk of sending emergency services to the wrong address Be prepared during any service interruption Your VoIP phone se...

Page 22: ...nges of Canada s vast geography through our deployment of Canada s first national 4G network which leverages both fixed wireless towers on the ground and next generation satellites in space Our custom...

Page 23: ...NOTES...

Page 24: ...Wi Fi Direct Wi Fi Alliance WMM and Miracast are registered trademarks of Wi Fi Alliance Wi Fi CERTIFIED Wi Fi Protected Setup Wi Fi Multimedia WPA2 Wi Fi CERTIFIED Passpoint Passpoint Wi Fi CERTIFIED...

Reviews: