background image

ENG 

14


Engl

ish


Connection 

General information 

1. 

Assure that the device is switched off 

and unplugged. 

2. 

Read the manual of your TV and at-

tend to the safety instructions. 

3. 

Connect the power cable at last with a 
electronic socket.


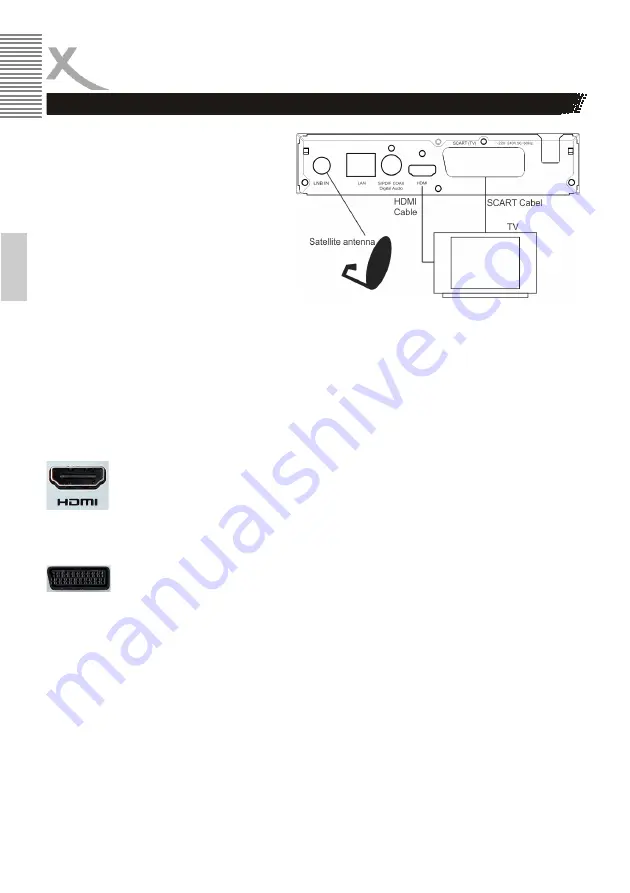
The DVB-S2 receiver could be connected either through HDMI or SCART to TV. Please connect the 

receiver through HDMI if possible. The TV could only display the signal in high definition quality 

through HDMI output. 


HDMI:


 Connect the HDMI output of Receiver to a free HDMI input of the TV. Please read 

the manual of your TV to select the HDMI input. Generally the TV does not switch 

automatically to the HDMI input upon connection. A HDMI cable is necessary for 

this connection. 


SCART:


 Connect the TV SCART output of Receiver to a AV input of the TV. Please read the 

manual of the TV to select the SCART input. Generally the TV does not switch auto-

matically to the SCART input upon connection. A SCART cable is necessary for this 

connection. It is not included in the delivery of the receiver. 


Notes: 



The Receiver is designed for TV with 16:9 as aspect ratio. Please refer to the page 32 how to 

set a TV with aspect ratio 4:3 to fit the receiver. It is also described there how to change the 

HDMI resolution and signal type under the SCART connection. 



Please employ high quality cables. Low quality cables (especially up 1,5 m length) might 

cause picture failure or make an image transmission impossible. Poorly shielded cables might 

result in “double image” or disturbing sound. 

Connecting to the TV 

Summary of Contents for HRS 2610

Page 1: ...User Manual HD DVB S2 Receiver HRS 8664 HRS 8660 HRS 8659 HRS 8658 HRS 8566v2 HRS 8556v2 HRS 2610 SD DVB S2 Receiver ...

Page 2: ......

Page 3: ...e TV 14 Connection to satellite dish 15 Connection to a Hi Fi system 15 Connecting to USB storage 15 Initial Installation 16 Initial Installation 16 Dish Setup preparation 17 Dish Setup Procedure 18 Dish Setup explanation of the parameters 19 Channel Search 20 Daily Use 21 Switch Channel 21 Channel List 21 Favourite 21 Subtitles 21 Audio settings of TV programs 22 Teletext 22 Mute 22 Change Volume...

Page 4: ...ded files 24 Delete recorded files 24 USB Media Player 25 Supported file formats 25 Supported Media 25 Photos 26 Music 27 Movie 27 Supported Formats 29 Settings 30 Main Menu 30 Program 30 Picture 32 Channel Search 33 Time 33 Option 34 System 35 USB and Apps 36 Troubleshooting 37 Specifications 38 Warranty 39 ...

Page 5: ... All the safety and operating instructions should be read before the product is operated 2 Retain Instructions The safety and operating instructions should be retained for future refer ence 3 All operating and use instructions should be followed Satellite dish XORO DVB Receiver is designed for the connection to a regular satellite dish Please have the satellite dish installed by a technician to in...

Page 6: ...el of the machine 9 Only operate the machine if the electrical voltage stated on the type plate beneath the machine agrees with the voltage on your plug socket The wrong voltage can destroy the machine 10 Do not open the appliance 11 Pull out the mains plug if the appliance is not to be used over a long er period of time 12 Take care that nobody can trip over the power supply cable 13 To disconnec...

Page 7: ...layer is just playing very quiet sections This cold dam age the speaker if very loud passages starts all of a sudden after the quiet section 7 Switch the player off by the Off On switch if it is not going to used for a longer period of time 8 Disconnect the main plug during thunderstorms 9 Slots and openings in the cabinet are provided for ventilation and to ensure reliable operation of the produc...

Page 8: ...controls may result in damage and will often require extensive work by a qualified technician to restore the product to its normal operation e If the product has been dropped or damaged in any way and 3 When the product exhibits a distinct change in performance this indicates a need for service 4 When replacement parts are required be sure the service technician has used replacement parts specifie...

Page 9: ...emoved from the old appliance without destroying it By properly disposing of old products you contribute to environmental protection and human health Consumers must take responsibility for deleting any personal data that may be stored on the old appliance before disposing of it Recycling of paper and cardboard The material recycling symbol on the packaging board and on the user manual indicates th...

Page 10: ...llowing accessories are included XORO DVB S2 Receiver Remote Control User Manual Notes Please employ only the original accessories Shall any item be damaged or missing please contact directly the shop where you bought this product Features Accessoires ...

Page 11: ...ock or status information 4 CH key switch to previous channel 5 CH key switch to next channel 6 Power button 7 LED indicator Green Power On Red Standby 1 Aerial Input LNB IN 2 Network Connector RJ45 3 Digital audio output S PDIF coaxial not present in HRS 8658 4 HDMI output 5 TV SCART output 6 Power cord Rear Panel ...

Page 12: ...ove and exchange old batteries Leaking out battery acid can damage your health and the remote control 2 Clean leaking out battery acid with a cloth 3 In case of skin contact immediately wash the affected area 4 Please contact a medic after swallowing the battery or battery acid immediately 5 Seek medical advice if battery acid has been swallowed In case of contact with your eyes wash out the eyes ...

Page 13: ...al buttons RECALL to previous program or higher directory INFO i to access information page fast rewind fast forward I I previous next file start play back II Pause Stop playback access Media player Recording PVR Display recorded files red button V FORMAT change HDMI solution green button ASPECT change aspect ratio yellow button TIMER display timer list blue button Notes Some buttons function only...

Page 14: ... A HDMI cable is necessary for this connection SCART Connect the TV SCART output of Receiver to a AV input of the TV Please read the manual of the TV to select the SCART input Generally the TV does not switch auto matically to the SCART input upon connection A SCART cable is necessary for this connection It is not included in the delivery of the receiver Notes The Receiver is designed for TV with ...

Page 15: ...e Receiver It takes the receiver under circumstances some time to recognize the USB and get ready for further operation Please remove the USB storage only after playback processes are completed Following USB devices will be supported USB storage Max capacity 2048B File system FAT32 NTFS MBR Partition Style Notes There are a variety of USB storages on the market Not all of them conform the specific...

Page 16: ...r LNB DiSEqC System with nonstandard components Most of the customers could complete the installation by selecting load the pre inst Load the Pre inst A program list of the satellite ASTRA 19 2 is saved in the factory firmware German TV programs top this list In most cases the installation is completed with loading the program list Select the OSD language and country and decide whether to load the...

Page 17: ...will have to know which IF Channel is available and its corre sponding Frequency Please ask the installer if any of the parameter is not known If you live in a rental house or apartment please ask the renter Example for Germany The most satellite antennas orient satellite ASTRA 19 2 and have a universal or Digital LNB We recommend the pre installed list in the case If you would not like to use the...

Page 18: ...ellites select a further satellite with CH Press OK and define the parameter on the right side Repeat this procedure for all satellites available for your receiver Notes After a correct setting an approximate value of the signal quality will be shown on the lower part of the menu If a satellite is missing on the list press the RED button A dialogue winter appears input the value for longitude East...

Page 19: ...ing will only have to be changed in very rare cases A false setting will re sult in missing program or no signal reception at all standard Auto Toneburst Tone burst switcher has two input ports enabling the connection of 2 antennas or LNB to the receiver If you have a Tone burst switcher you will have to select one of the both con nections A or B for the satellite chosen on the left side DiSEqC Di...

Page 20: ...y missing programs Please employ Blind Scan It takes a little bit longer but will result in a complete program list If you have added a new satellite on the menu of Satellite Setting please employ Blind scan for there is no transponder list available for the newly added satellite There is no Blind scan option in case of UniCable system Encrypted All programs both free and encrypted programs Pay TV...

Page 21: ...a channel after the name GOTO Choose a satellite show all programs EXIT Exit the program list Favourite If you have defined favourite groups you can access this list by pressing the FAV button The oper ation on the favourite list is as following FAV display favourite list Next previous favourite list Next previous program OK Starting the chosen TV program EXIT Exit favourite list Subtitles Press S...

Page 22: ...ss the MUTE button to switch off the tone Press the MUTE button once more the tone will be turned on again Change Volume To increase or decrease the volume press the VOL VOL button If you output DolAC3 or other surround sound formats as Bitstream through HDMI or S PDIF the volume is not regulated by the receiver Information You will have the access to various of information by pressing the i butto...

Page 23: ...in the window Timer New Further settings on this window are Repeat and Mode The option Repeat defines whether the program will be recorded once or regularly The option Mode will have to be set for recording as RECORD Press OK to save the setting The pro grammed broadcast appears now on the timer list Press EXIT to close a dialogue window Press EXIT repeatedly to quit EPG window Notes Please do not...

Page 24: ...dcasts Next previous recorded file OK playback the chosen recorded file in preview window RED Switch full screen preview GREEN Rename the recorded file YELLOW Delete the recorded file Playback fast forward fast rewind II Pause press again to resume playback EXIT STOP stop the playback switch to the record ing list Rename recorded files Choose a recorded file from the list to be renamed and press t...

Page 25: ...dia play is started You have these four options Music Photo Movie PVR Only available for the models which support PVR Supported file formats Pictures JPEG BMP Music MP3 WAV or video files MPEG 1 MPEG 2 MPEG 4 and more Note Due to the legal requirements of CE conformity the customer is asked to only connect USB Sticks to the USB port If you want to play music videos or pictures von USB media connec...

Page 26: ...re OK Start Slide show EXIT quit the preview window Display Photos Start the slide show with PLAY or OK The slide show will proceed according to the settings in the USB menu I Next picture I Previous picture RED Zoom picture Green Rotate picture 90 in counter clock wise direction YELLOW Rotate picture 90 in clockwise direction i Show information of the picture like file name resolution and file si...

Page 27: ...ovie file is 1920 x 1080 pixel The file name should not contain more than 15 letters If a character is not recognized correctly for example special characters there appears at the place of this character an underline _ Following video containers are supported AVI MKV MP4 MPG VOB MOV etc Various codecs are supported They will have to be created according to the established standards For MPEG 2 appl...

Page 28: ... resolution picture frequency AUDIO Switch audio track SUB T 1x display subtitle alternatives 2x change subtitle setting MENU back to file browser the movie continues in preview window back to file browser the movie continues in preview window GOTO Jump to a certain self defined time Fast forward backward I Previous movie I Next movie Pause STOP Stop the play back REPEAT Repeating modes Single tra...

Page 29: ... Main MP4 AVI MP4 MPEG4 Xvid 1 00 Xvid 1 01 Xvid1 02 Xvid 1 03 Xvid 1 10 beta 1 2 H 264 1920x1080 30P MP3 H264 Main Profile and High Profile Level 4 0 MPEG4 Simple Profile and Ad vanced Simple Pro file Level 5 MKV MKV H 264 MPEG 1 2 4 1920x1080 30P MP2 MP3 H264 Main Profile and High Profile Level 4 0 MPEG4 Simple Profile and Ad vanced Simple Pro file Level 5 AVI AVI 1 0 2 0 DMF0 1 2 MPEG2 MPEG4 Xv...

Page 30: ...ress the RED button to mark the program Choose a position for the marked program with Press OK to move the program to the chosen place Notes You can mark multiple programs with the RED button Move the program through input of new program number Select a program with to be moved Press the RED button Input the new position with the numerical button 0 9 Press ok to move the program to the given place...

Page 31: ...e a channel as any favourite group and a channel may belong to multiple groups Select a program with to be categorized Press FAV to access the favourite menu Select a favourite group with Press OK The channel is marked with a Star symbol You can choose mulitple favourite groups here Power off at this time leaves the configuration of favourite groups unsaved Press EXIT once to close the Favourite w...

Page 32: ... black bar 16 9 Pillar box for 16 9 TV Content with different Aspect Ratio will be displayed without distortion but with black bar 16 9 Pan scan for 16 9 TV 16 9 Broadcast will be full screen displayed without distortion 4 3 Broadcast will be displayed without distortion but with the picture enlarged This setting is especially suitable for 4 3 Letter box programs to reduce the black bar You can sw...

Page 33: ...iver sets the time automatically as soon as a satellite program is received The Time Zone will have to be set correctly so that the receiver could calculate the local time properly Time Zone setting Auto The receiver set the Time Zone automatically Manual You can define the Time Zone Time Zone You can define the Time Zone as long as the Time Offset is given as Manual For Germany it is MGZ 1 and it...

Page 34: ...ase choose PCM Attention The receiver could only decode AC3 surround sound and out put it as analogue or PCM stereo Other surround sound could be outputted under circumstances as Bitsteam RAW though SPDIF or HDMI In this case the analogue and PCM stereo tone are not available Please use the AUDIO button to choose the AC3 Sound track of a program if it is available If you output the AC3 or other su...

Page 35: ...on and input the password Note All settings will be cancelled You will have to go through the channel scan once more Information Access information on software and hardware Recall List You can change the function of the RECALL button If off is given the receiver displays the last program upon pressing the RECALL button IF it is set on a list of programs seen at last will be displayed upon pressing...

Page 36: ...e colour of subtitle letters PVR Configure Recording device This menu shows the information size and file system on the USB If the USB storage has multiple partition you can choose a partition with Press OK to confirm The TMS storage sets the maximal capacity to be used for Time Shift Function Format Choose a USB storage or partition to be formatted at Format Choose at File System the wished file ...

Page 37: ...tup TV channel or program is scrambled Remote control does not work Change the batteries Operate within normal range max 5 meters 30 The sensor is pointed to by bright light No sound Cancel Mute Press MUTE button Increase volume Press VOL button Pay attention to connection to TV set or amplifier Audio Subtitle without function or can no choose Change audio track press AUDIO button Change subtitle ...

Page 38: ...Hz Impedance 75 Ohm Video Decoder Standards MPEG4 AVC H 264 HP L4 MPEG 2 MP HL Aspect Ratio 4 3 16 9 Resolution up to 1920 x 1080p Conditions of Operation Temperature of Operation 0 40 C Humidity 5 90 non condensing Depending on electrical consumption of the USB connected Note Weight and dimensions are not absolutely exact values Specifications are subject to change ...

Page 39: ...tteries etc This limited warranty covers the warranty re quirements set by authorities in your country This limited warranty only is valid in the country the product was purchased This limited warranty does not cover finishes accessories or batteries nor does it cover dam age resulting from accident misuse abuse dirt water battery leakage tampering servicing performed or attempted by unauthorized ...

Page 40: ...XORO by MAS Elektronik AG Weidegrund 3 21614 Buxtehude Germany www xoro de ENG V3 FS www ...

Reviews: