background image

Making Copies

ColorQube™ 9201/9202/9203
Quick Use Guide

12

Making Copies

1.

Load your documents face up in the Document Feeder Input Tray. Adjust 
the top and bottom guides to just touch the documents.
Or...........

Lift up the Document Feeder. Place the document face down onto the 
Document Glass and register it to the arrow at the top right rear corner. 
Close the Document Feeder.

2.

Press the 

Clear All (AC)

 button 

once to cancel any previous 
screen programing selections.

3.

Press the 

Services Home 

button and select the 

Copy


option. 
The 

Copy

 features are 

displayed.

4.

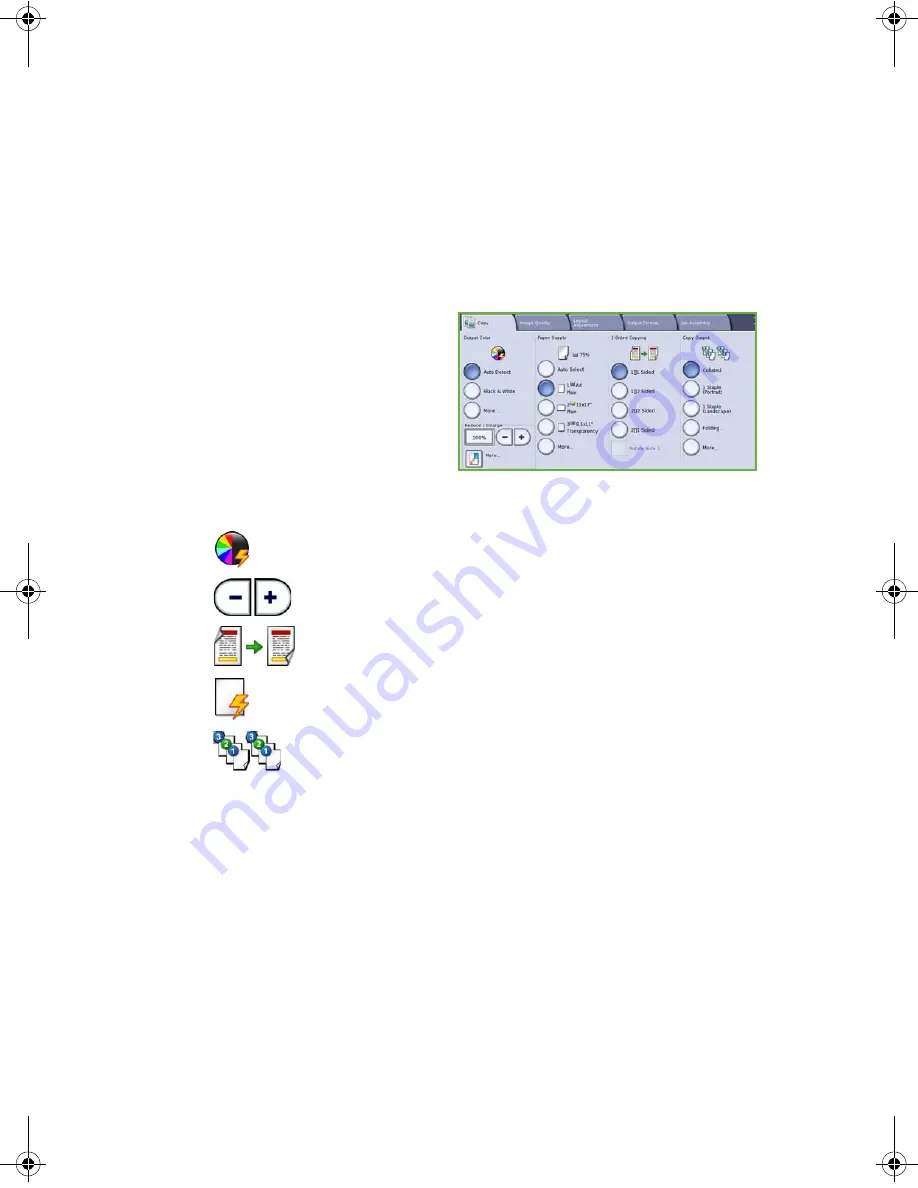
Select the required features using the touch screen:

5.

Enter the copy quantity using the numeric keypad and press 

Start

 to scan 

the originals.

6.

Remove the originals from the Document Feeder or glass when scanning 
has completed.

Note:

The Copy job enters the job list ready for printing.

7.

Select 

Job Status

 to view the job list and check the status of your job.

If your job is held in the list it requires additional resources to print. To 
identify the resources required, select the job and select 

Job Details

Once the resources are available the job will print.

Output Color

 is used to replicate the original colors or to 

change the output to black and white, color or a single color.

Reduce / Enlarge

 can be used to reduce or enlarge the image 

by 25% to 400%.

2-Sided Copying

 is used to produce 1 or 2 sided copy output.

Paper Supply

 is used to select the required tray and size of 

paper for the copy output.

Copy Output

 is used to select collate, staple or fold options 

(depending on the finishing device available).

Summary of Contents for ColorQube 9203

Page 1: ...Xerox ColorQube 9201 9202 9203 Quick Use Guide...

Page 2: ...nd or other countries Copyright protection claimed includes all forms of matters of copyrightable materials and information now allowed by statutory or judicial law or hereinafter granted including wi...

Page 3: ...get started 5 Multifunctional Device Overview 6 Power On and Off 9 Load Paper into the Paper Trays 10 Loading Documents 11 Making Copies 12 Printing a Document 15 Sending a Fax 17 Internet Fax 21 Serv...

Page 4: ...Table of Contents ColorQube 9201 9202 9203 Quick Use Guide 4...

Page 5: ...Guide This Quick Use guide will give you an overview of the features and options that may be available on your device and your resources for maximizing system performance and productivity Before you g...

Page 6: ...ifold and Hole Punch kits can be installed with this finisher Paper Trays 1 2 and 3 These trays are standard on the device Trays 1 and 2 are used for media sizes 5 5x8 5 to 11x17 A5 to A3 Tray 3 is us...

Page 7: ...Accounting Standard Standard Standard Tray 1 2 3 4 Bypass Standard Standard Standard Tray 5 Paper Feed Platform Option Option Option Tray 6 Post Process Inserter Option Option Option 80 GB Hard Drive...

Page 8: ...atus Use to check the device status the billing meter and the status of consumables or print various reports Use this button also when accessing the System Administrator mode Stop Stops the job in pro...

Page 9: ...vice has completely powered off Do not physically move the device unless it has been powered off for more than 30 minutes Energy Saver and Quick Restart The Energy Save button on the control panel can...

Page 10: ...y basis The device can be set to wake up when activity is detected or a specific time can be entered Fast Resume reduces the time taken to wake up This changes the default sleep low power timeouts and...

Page 11: ...eder Input Tray Adjust the top and bottom guide to just touch the documents Or 2 Lift up the Document Feeder Place the document face down onto the Document Glass and register it to the arrow at the to...

Page 12: ...the originals 6 Remove the originals from the Document Feeder or glass when scanning has completed Note The Copy job enters the job list ready for printing 7 Select Job Status to view the job list an...

Page 13: ...olor Balance Use to enhance the balance of the overall mixture colors on the output copies Layout Adjustment tab Original Orientation Use to set the direction the originals are loaded in the Document...

Page 14: ...e this feature to insert a blank page between each transparency Page Layout This feature places a defined number of originals on one or both sides of the paper Job Assembly tab Build Job Use to build...

Page 15: ...overs inserts and exceptions The Color Options tab enables you to select the output color variation The Layout Watermark tab has various options to add watermarks to pages change image orientation lan...

Page 16: ...tion Select Disabled to disable the feature Saved Settings Frequently used features of a print job can be saved with the Saved Settings option This enables you to name save and recall almost all selec...

Page 17: ...Keypad Dial select the Enter Number area on the touch screen and enter the number using the numeric keypad Manual Dial if a telephone handset is attached to the device select the Manual Dial key and...

Page 18: ...job list ready for sending 8 Select Job Status to view the job list and check the status of your job Dialing Characters are alphanumeric characters which have a specific fax function and can be entere...

Page 19: ...ce a large document to fit on a smaller sized paper or split a large document onto several pages Book Faxing Allows you to set the options for copying books and other bound originals Fax Options tab C...

Page 20: ...9201 9202 9203 Quick Use Guide 20 Job Assembly tab Build Job Use to build a job that requires different settings for each page s of the original into a single fax job For further information about Fax...

Page 21: ...t Clear Text To enter a Copy To e mail address select Cc using the drop down menu and enter the e mail address of the copy recipient Select Add to add the e mail address to the recipient list Select C...

Page 22: ...Original Orientation Set the direction the original documents are loaded into the Document Feeder Original Size Use this option to specify how the system determines the size of the originals or to se...

Page 23: ...keypad Fax Directory select the Fax Directory button select an entry from the Fax Directory to add to the Recipient list 5 Select Add to add the number to the Recipient list 6 Select the required fea...

Page 24: ...olored paper or newspapers Layout Adjustment tab Original Orientation Set the direction the original documents are loaded into the Document Feeder Original Size Use this option to specify how the syst...

Page 25: ...screen programing selections 3 Press the Services Home button and select the Workflow Scanning option The Workflow Scanning features are displayed 4 Select a Template for the job from the templates di...

Page 26: ...e the dark background resulting from scanning colored paper or newspaper Resolution Adjust the output resolution to achieve the required scan output Quality File Size Use to enhance the quality of the...

Page 27: ...as and to optimize the file for viewing and printing only Document Management Allows you to setup customizable fields that needs to be completed as part of the template Add File Destinations Add addit...

Page 28: ...ox Using the touch keypad enter the subject Select Save to save and return to the previous screen 6 Enter the recipient s e mail address by selecting the New Recipient button Ensure To is displayed on...

Page 29: ...tput Image Enhancement Use to automatically reduce or eliminate the dark background resulting from scanning colored paper or newspaper Resolution Use to adjust the output resolution to achieve the req...

Page 30: ...ot required on the scanned image E mail Options tab Attachment Name Set the file name of the attached job File Format Use this option to set the best file format to save as and to optimize the file fo...

Page 31: ...work processes Powerful documentation features for example Booklet Creation Special Pages Build Job and Annotations To maximize job productivity use the Job Status button to access the Active jobs li...

Page 32: ...serial number Ink Sticks Load Solid Ink Sticks in the Ink Loading area up to 6 Solid Ink Sticks per color can be loaded while the device is running When loading Solid Ink Sticks check that the correc...

Page 33: ...creen should all be cleaned using a soft lint free cloth lightly dampened with water Xerox Cleaning Fluid or Anti Static Cleaner can be used to clean the document glass but must be applied using a clo...

Page 34: ...ure the Document Feeder is not overloaded a maximum of 100 documents can be loaded Ensure that the edge guides are adjusted to touch the sides of the originals The device will not print from a worksta...

Page 35: ...to their correct positions Note Paper Clearance areas may vary depending on your device model and configuration Clearing the Document Feeder The display will indicate when a document jam has occurred...

Page 36: ...ation Device Reports Device information can be accessed at the device to view or print reports Press the Machine Status button touch Machine Information and Information Pages Select the required infor...

Page 37: ...ion on the displayed printer driver screen On Internet Services To access Internet Services open the web browser from your workstation In the URL field enter http followed by the IP Address of the dev...

Page 38: ...Help ColorQube 9201 9202 9203 Quick Use Guide 38...

Reviews: