Xerox 7400DN - Phaser Color LED Printer, User Manual
Grab your Xerox 7400DN Phaser Color LED Printer Accessories Manual for free download. This manual provides detailed guidance on how to optimize the performance of your printer. Get your manual now from manualshive.com and take full advantage of this incredible printer to meet all your printing needs.
Share
Download


Reviews:
No comments
Related manuals for 7400DN - Phaser Color LED Printer

C7300
Brand: Oki Pages: 2

PHASER 6140
Brand: Xerox Pages: 4

KX-MC6040 - Color Laser Multi-Function...
Brand: Panasonic Pages: 24

Pixma TS7700i Series
Brand: Canon Pages: 554

OKIFAX 5050
Brand: Oki Pages: 98

wematter Atmosphere
Brand: 3D Systems Pages: 11

LD1110
Brand: Lanier Pages: 234

2231W-1
Brand: Wang Pages: 181

C9800hdn
Brand: Oki Pages: 20

apeosport-v c5585
Brand: Fuji Xerox Pages: 493

681T
Brand: Intermec Pages: 2

Accel-a-Writer 8200
Brand: Xante Pages: 12

AstroJet S1
Brand: Astro Machine Pages: 5

C7006dw
Brand: Gestetner Pages: 144

FS-1041
Brand: Kyocera Pages: 16

DocuColor 240
Brand: Xerox Pages: 6

MX6000
Brand: DataCard Pages: 2
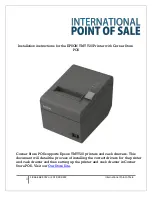
TMT T20
Brand: Epson Pages: 15


