background image

Xerox Document Centre User Guide

Page 41

Try T

h

es

Jobs

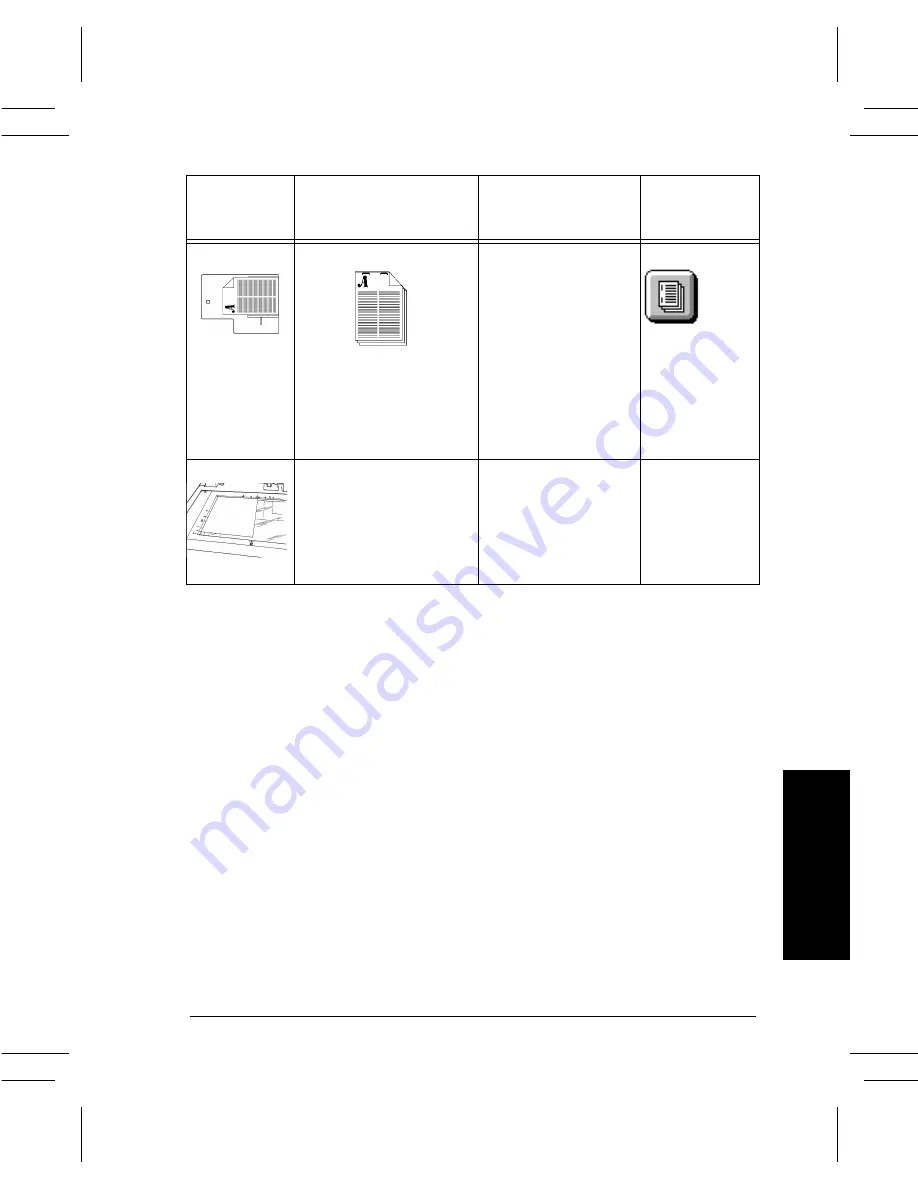
Auto Paper Supply or 
select the appropriate 
size SEF paper.

Build Job is required when 
stapling copies made from 
the document glass.
See page 53 for more 
information about Build 
Job.

Auto Paper Supply or 
select the appropriate 
size LEF or SEF paper.

Feed Direction 
of Common 
Paper Sizes

Desired Staple Location

Paper Supply

Output Options
Select this 
Staple Button

8.5 x 11
11 x 17
8.5 x 14

Summary of Contents for 460 DC/ST

Page 1: ...ed supplies In the USA Calling for Service and ordering Replaceable Units 1 800 821 2797 USA Ordering Supplies 1 800 822 2200 USA In Canada Calling for Service 1 800 939 3769 Canada Ordering Supplies...

Page 2: ...on pour lesquelles Xerox Canada lt e d tient des permis d utilisation The Document Centre ST model includes an implementation of LZW licensed under U S Patent 4 558 302 Product names used in this guid...

Page 3: ...net Software Consortium DHCP nor the names of its contributors may be used to endorse or promote products derived from this software without specific prior written permission This Software Is Provided...

Page 4: ...ot occur in a particular installation If this equipment does cause harmful interference to radio or television reception which can be determined by turning the equipment off and on the user is encoura...

Page 5: ...erference and 2 this device must accept any interference received including interference that may cause undesired operation Contact Xerox Corporation Phone 1 800 828 6571 Address 800 Phillips Road Web...

Page 6: ...ill be advised of your right to file a complaint with the FCC 4 If the telephone company requests information on what equipment is connected to their lines inform them of A the telephone number this u...

Page 7: ...rs to certified equipment should be made by an authorized Canadian maintenance facility designated by the supplier Any repairs or alterations made by the user to this equipment or equipment malfunctio...

Page 8: ...Silver Certificates l Treasury Notes and United States Bonds l Federal Reserve and Federal Reserve Bank Notes l Certificates of Deposit l National Bank currency l Fractional Notes l Paper money and P...

Page 9: ...or insignias carried by military or Naval personnel or by members of the various Federal Departments and Bureaus such as the FBI and Treasury unless the photograph is ordered by the head of such Depa...

Page 10: ...x Xerox Document Centre User Guide...

Page 11: ...nformation 5 Laser Safety 6 Operational Safety 7 Safety Extra Low Voltage Approval 9 Welcome 11 Features for printing from your workstation 12 Printing from the Embedded Web Server Internet Services 1...

Page 12: ...39 Making 2 Sided Copies 42 Improving Image Quality 43 Removing Unwanted Marks on the Edges of Copies 44 Copying Pages from Books or other Bound Documents 45 Using Reduction Enlargement 46 Shifting a...

Page 13: ...ts Faxing a Document 58 Network Scanning Overview Optional Feature 60 Scanning Options 61 E mail Overview Optional Feature 63 E mailing a Document without a template 64 Document Management Fields Over...

Page 14: ...xiv Xerox Document Centre User Guide...

Page 15: ...and approval and compliance to established environmental standards Please read the following instructions carefully before operating the machine and refer to them as needed to ensure the continued sa...

Page 16: ...must meet the requirements stated on the data plate on the rear of the machine 2 The socket outlet shall be installed near the equipment and shall be easily accessible 3 Use the power cable that is s...

Page 17: ...o connect the Document Centre to an electrical outlet that lacks a ground connection terminal 6 The power cord is the disconnect device for this machine 7 Do not override or disable electrical or mech...

Page 18: ...rrect the problem l The Document Centre emits unusual odors or makes unusual noises l The power cable is damaged or frayed l A wall panel circuit breaker fuse or other safety device has been tripped l...

Page 19: ...levels meet safe limits The minimum cubic requirements are listed below To determine if the room has the required volume to meet the ozone requirement the length of the room multiplied by its width an...

Page 20: ...Centre complies with international safety standards and is certified as a Class 1 Laser Product With specific regard to lasers the equipment complies with laser product performance standards set by g...

Page 21: ...ent l Always exercise care when moving or relocating the equipment Please contact your local Xerox Service Department to arrange relocation of the machine to a location outside of your building l Alwa...

Page 22: ...Never attempt any maintenance function that is not specifically described in the documentation l Never remove any covers or guards that are fastened with screws There are no operator serviceable area...

Page 23: ...afety regulations All system ports meet the requirements for Safety Extra Low Voltage SELV circuits for connection to customer owned devices and networks Additions of customer owned or third party acc...

Page 24: ...Page 10 Xerox Document Centre User Guide...

Page 25: ...you to create booklets put multiple images on a single page insert dividers into a transparency set and combine multiple segments into a single job l fewer jams and damaged originals l high quality o...

Page 26: ...he types of print jobs you can do are l 1 sided or 2 sided l Stapled sets if you have a Finisher l Resolutions up to 1800x1800 dpi l Add standard or customized watermarks l Secure Printing print your...

Page 27: ...ur web browser This feature supports print ready file formats only All files must be submitted in formats such as PDF PostScript TIFF Follow these steps to send a job 1 Type the Document Centre s Inte...

Page 28: ...the job queue by scanning it even while the Document Centre is printing another job Make Copies Look Like Originals The Document Centre allows the reproduction of high quality images especially photo...

Page 29: ...rency feature to produce transparencies with transparency separators in one step Use the Booklet Creation feature to automatically sequence and reduce or enlarge the images when making booklets Use th...

Page 30: ...stributed through an e mail system l automatically placed into a Document Management Application Once your original paper document has been converted to an electronic digital document you can change m...

Page 31: ...ments you can produce on the Document Centre the table below lists several applications that you may not have considered Most of these jobs can also be done from the Print Driver if you are connected...

Page 32: ...Document Centre User Guide 2 Sided Copies Page 42 Improving Image Quality Page 43 Removing Unwanted Marks Page 44 Copying Pages From Books or Other Bound Documents Page 45 Your Desired Original Output...

Page 33: ...nt Centre User Guide Page 19 Welcome Using Reduction Enlargement Page 46 Shifting an Image Page 47 Adding Covers Page 48 Placing Multiple Images on a Single Page Page 49 Your Desired Original Output R...

Page 34: ...age 20 Xerox Document Centre User Guide Making Transparencies with Dividers Page 50 Making Brochures and Booklets Page 51 Copying Mixed Size Originals Page 52 Your Desired Original Output Refer to Pag...

Page 35: ...Job Overview Unique Programming for Each Segment Page 53 Copying Bound Documents Using Build Job Page 54 Using Build Job and Sample Set Page 55 Your Desired Original Output Refer to Page Segment 1 Se...

Page 36: ...erox Document Centre User Guide Network Faxing l to a Single Number l to Multiple Numbers Page 58 Network Scanning l to File l to Desktop l to E Mail l to Fax Page 61 Your Desired Original Output Refe...

Page 37: ...ment Glass underneath the cover to scan originals that will not feed through the Document Feeder Press the Touch Screen to make copy selections Use the buttons to access other features Use Tray 6 as y...

Page 38: ...p of the document away from you l If using the Document Glass Use the Document Glass to copy bound stapled folded or wrinkled originals odd or oversize documents books or glossy photographs Raise the...

Page 39: ...py selections Use the keypad to enter the number of sets 3 Press Start After Start has been pressed the Job Progress screen will appear This screen displays information about your job After your job i...

Page 40: ...dministrator can limit access to Document Centre services such as E mail Network Scanning and Network Fax by enabling Authentication If Authentication is enabled you will be presented with a Login Req...

Page 41: ...and Password 3 Press the Enter button The system will validate the login information If the account information is authenticated the restriction will be released Remember to logout to prevent unautho...

Page 42: ...copies may print incorrectly or the originals may jam For fastest performance place the originals Long Edge Feed with the top of the document away from you l If using the Document Glass Raise the Doc...

Page 43: ...emplates tell the Document Centre how to create the scan file and where to send it after it is processed For information about templates refer to page 60 Select additional scan features and resources...

Page 44: ...place the originals Long Edge Feed with the top of the document away from you l If using the Document Glass Raise the Document Glass Cover Place the original face down into the top left corner of the...

Page 45: ...er the fax number using the numeric keypad For multiple numbers Touch the Add To Send List button and enter another number For more information refer to page 56 If you have 2 sided originals select 2...

Page 46: ...ding paper in Tray 5 the Bypass Tray Use Tray 5 to load special or odd size stock Insert paper as shown Do not load paper above the maximum fill line Pull out the extension bar to accommodate paper th...

Page 47: ...ueue l Press Promote to move near the top of the job queue l Press Release to start to print a held job This feature is used to print the sets that are automatically held after using the Sample Set or...

Page 48: ...number in the following procedure to login 1 At the login screen enter your assigned User Number using the keypad Press Enter 2 Press Login to a General Account or User Pathways If User Pathways is se...

Page 49: ...D button and enter your User ID using the keypad that appears on the Touch Screen Press the Save button 2 Press the Account ID button and enter your Account ID using the keypad that appears on the Tou...

Page 50: ...Print 4 Select Secure Print Setup enter a 4 Digit Secure Print ID then click OK 5 When you are ready to retrieve your secure print job go to the Document Centre At the Document Centre 1 Press the Job...

Page 51: ...you load your originals If the scanning faxing or e mail options are not installed the appearance of this screen will be different l Touch the screen to make the most of your selections Use the keypad...

Page 52: ...Copying Tab Output 2 sided Copy Reduction Enlargement and Paper Supply 3 Use the keypad to enter the number of copy sets 4 Press the Start button HINT Auto automatically Reduces or Enlarges your copy...

Page 53: ...tions based on the table below Press the More button to access 2 staples 2 Use keypad to enter the number of copy sets 3 Press the Start button FeedDirection of Common Paper Sizes Desired Staple Locat...

Page 54: ...Paper Supply or select the appropriate size LEF paper To achieve optimum staple location with this feed direction you must select 8 5 inch SEF Paper Supply FeedDirection of Common Paper Sizes Desired...

Page 55: ...Job is required when stapling copies made from the document glass See page 53 for more information about Build Job Auto Paper Supply or select the appropriate size LEF or SEF paper FeedDirection of Co...

Page 56: ...the screen The most common selections are on the Basic Copying Tab Output 2 sided Copy Reduction Enlargement and Paper Supply 3 Select which 2 sided option you want These options are displayed when th...

Page 57: ...mage Adjustment Tab Press the Image Quality button 5 Select the setting that best matches your original then press the Save button Lighten Darken provides controls to adjust the lightness or darkness...

Page 58: ...gement and Paper Supply 3 Use the keypad to enter the number of copy sets 4 Depending on the configuration of your machine press either the More Copy Features Tab or the Image Adjustment Tab 5 Press t...

Page 59: ...ts 4 Depending on the configuration of your machine press either the More Copy Features Tab or the Image Adjustment Tab 5 If necessary change the image quality setting by pressing the Image Quality bu...

Page 60: ...Use the keypad to enter the number of copy sets 4 In the Basic Copying Tab under Reduce Enlarge select an existing preset or press the More button Select from the additional presets or enter your des...

Page 61: ...n selections are on the Basic Copying Tab Output 2 sided Copy Reduction Enlargement and Paper Supply 4 Use the keypad to enter the number of copy sets 5 Depending on the configuration of your machine...

Page 62: ...d Paper Supply 4 Use the keypad to enter the number of copy sets 5 Depending on the configuration of your machine press the More Copy Features Tab or the Image Adjustment Tab 6 Press the Image Quality...

Page 63: ...e Multi Up button then press On 4 Select the correct orientation of your originals based on the information displayed on the screen 5 Select the number of rows and columns Press the Save button 6 Ensu...

Page 64: ...or the Output Format Tab If More Copy Features Tab is selected press Output Format Tab 4 Press the Transparencies button 5 On the Transparency Dividers screen select either Blank or Imaged Dividers Se...

Page 65: ...press Output Format Tab 3 Press the Booklet Creation button Follow the instructions on the screen 4 Press the Booklet Creation On button then press the Save button 5 Press One or Two sided Originals t...

Page 66: ...ither the More Copy Features Tab or the Image Adjustment Tab 3 Press the Original Input button then press the Mixed Size Originals button 4 Press Save then press the Basic Copying Tab 5 On the Basic C...

Page 67: ...The same set of programmingapplies to entire copy job Copy Job with Build Job Each segment can be programmed differently Build Job Examples l Make image quality settings on one segment that are not re...

Page 68: ...largement and Paper Supply 3 Use the keypad to enter the number of copy sets 4 Depending on the configuration of your machine press the More Copy Features Tab or the Job Assembly Tab 5 Select Build Jo...

Page 69: ...the More Copy Features Tab is selected press the Job Assembly Tab 4 Press Build Job then press the Build Job On button Press the Save button Select Sample Set and Save to produce a single complete set...

Page 70: ...ed to network fax solution software The Key Operator or Administrator can limit access to this feature by enabling Authentication When Authentication is active you will be required to login before usi...

Page 71: ...ry on a Server 3 The Network Fax Server retrieves the digital file from the Fax Repository processes it and sends it to the destination Receiving a FAX The Network Fax Server receives an incoming Fax...

Page 72: ...mber to log out to prevent unauthorized access 3 Enter the fax number using the numeric keypad some configurations require entering a digit and the Dial Pause button to reach an outside line 4 If orig...

Page 73: ...you may select the desired resolution and number of sides scanned 11 Press the Start button 12 If enabled by the network fax solution software the machine will print a Transmission Report once the fax...

Page 74: ...nt after it is processed 2 The user selects a Distribution Template that meets these requirements Not all scanning features require the use of a template You can scan to fax or scan to e mail without...

Page 75: ...ate or modified an existing one using CentreWare Network Scanning services tools you must update the template list at the machine so it reflects the latest information Option Typical Application Scan...

Page 76: ...Network Scanning Services guide for information on creating a template You can modify your template by pressing the Sides Scanned button to select 1 sided 2 sided or 2 sided Rotate Side 2 4 Press the...

Page 77: ...on When Authentication is active you will be required to login before using the E mail feature Remember to log out to prevent unauthorized access Getting to Know the Process Sending an E mail Message...

Page 78: ...s 4 Select either the To Cc or Bcc button The Add Entry screen will display 5 Using the touch screen enter an SMTP compliant recipient name You can choose an Address Book and enter the full name or a...

Page 79: ...e data The information is stored in the Job Log with your scanned file You can use your company s Document Management Information software to access the Job Log to retrieve or route the stored files N...

Page 80: ...tor or Administrator can provide the address if you do not know it 1 Type the Document Centre s IP address in your browser The Document Centre s Home Page will open 2 Select Services 3 Select the Dist...

Page 81: ...ogin Procedures 27 Network Access 26 Overview 26 Unauthorized Access 27 Auto Paper Selection 38 Auto Reduction Enlargement 38 B Binding Edge 47 Booklet Creation feature 51 Border Erase 44 Bound Docume...

Page 82: ...copies 39 Duplex copies 39 E Edge Erase 44 Electronic Auditron 35 E mail Authentication 26 63 64 E mail without a template 61 64 Overview 63 Using a template 61 Embedded Web Server 12 Enlargement Red...

Page 83: ...Numbers 22 Network Scanning 22 Authentication 26 Create electronic files 16 Document Management Fields 65 Overview 60 To Desktop 22 61 To E Mail 22 61 To Fax 22 61 To File 22 61 Normal 43 O On Off bu...

Page 84: ...7 Signature Booklet See Booklet Creation 51 Stapling 39 Status of Job 33 T Template Creating Refer to CentreWare Network Scanning Services E mail without a template 63 Overview 60 Template List 62 Thu...

Page 85: ......

Reviews: