background image

Phaser 3100MFP/X

- 1 -

1 - Security - Software use li

cense - Environment - License

Security

Safety introduction

Notices and safety

Please read the following instructions carefully before operating the machine and refer to them as needed to 
ensure the continued safe operation of your machine.

Your Xerox product and supplies have been designed and tested to meet strict safety requirements. These include 
safety agency evaluation and certification, and compliance with electromagnetic regulations and established 
environmental standards. 

The safety and environment testing and performance of this product have been verified using Xerox materials only.

WARNING

: Unauthorized alterations, which may include the addition of new functions or connection of external 

devices, may impact the product certification. Please contact your Xerox representative for more information.

Marks, Labels

Symbols

All warnings and instructions marked on or supplied with the product should be followed.

EMC

Note to users in the United States of America

This equipment has been tested and found to comply with the limits for a Class B digital device, pursuant to Part 
15 of the FCC Rules. These limits are designed to provide reasonable protection against harmful interference in 
a residential installation.

This equipment generates, uses and can radiate radio frequency energy and, if not installed and used in 
accordance with the instructions, may cause harmful interference to radio communications. However, there is no 
guarantee that interference will not occur in a particular installation.
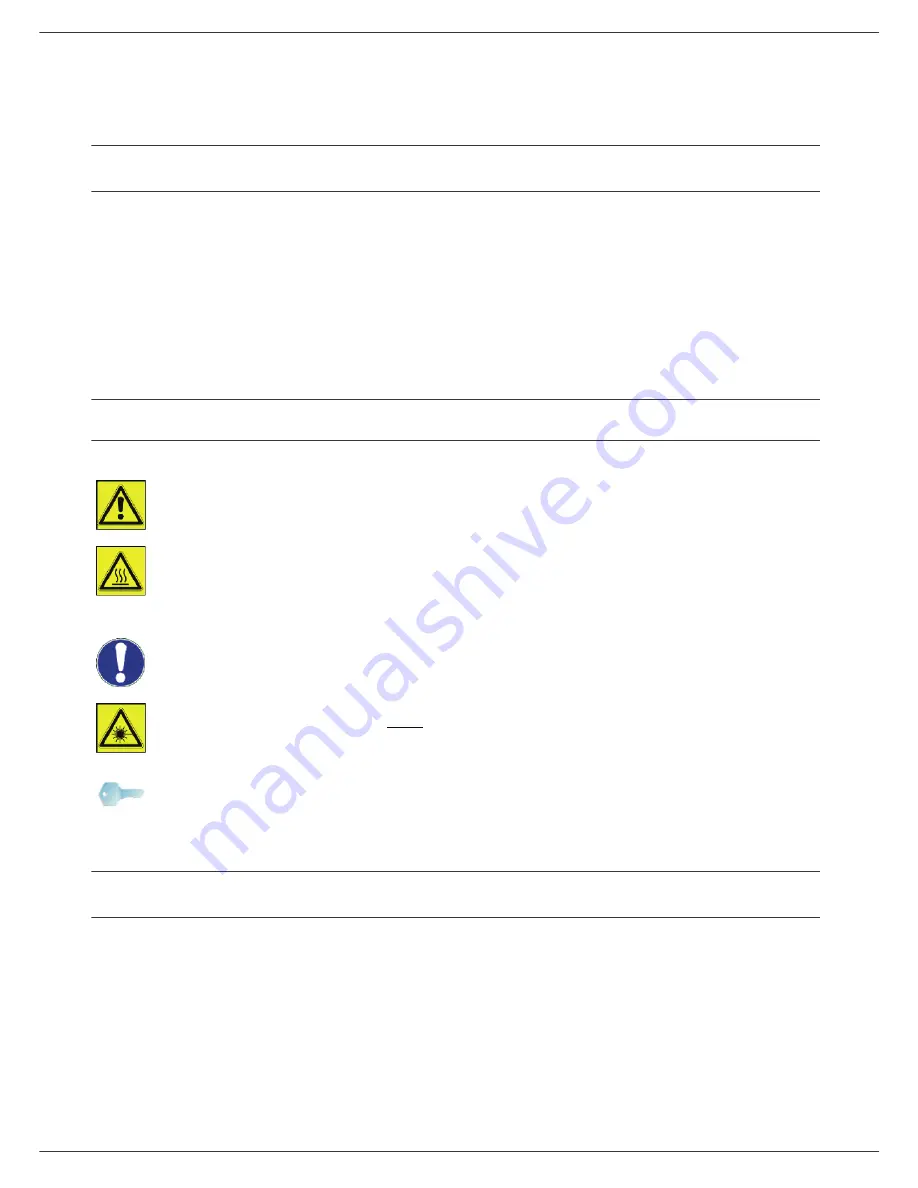
WARNING

: This symbol alerts users to areas of the equipment where there is the possibility of 

personal injury.

WARNING

: This symbol alerts users to areas of the equipment where there are heated or hot 

surfaces, which should not be touched.

CAUTION

: This symbol alerts users to areas of the equipment which require special attention to avoid 

the possibility of personal injury or damage to the equipment.

WARNING

: This symbol indicates a Laser is being used in the equipment and alerts the user to refer 

to the appropriate safety information.

TIP

: This symbol identifies information that is being emphasized and is important for you to remember.

Summary of Contents for 3100MFPX - Phaser B/W Laser

Page 1: ...TELECOM User Guide 253107569 A_ENG XEROX Phaser 3100MFP X ...

Page 2: ...ther information on our website www xerox com The multifunction machine lets you connect a USB DECT base to one of the USB ports of the device and register DECT handsets to this base You can then make and receive calls with the registered DECT handsets using the multifunction machine telephone line standard cordless telephone use Voice communication is an option that works only with a specific USB...

Page 3: ...Supply 15 For Fax or Telephone 15 Paper recommendations 15 Loading paper in the main paper tray 15 Handling of paper 15 Humidity control 15 Handling the machine 15 Operator shocks 15 Moving the machine 15 Handling the print cartridge 15 Rules for use symbols 16 Machine Overview 17 Control panel 18 Accessing menus 18 Packaging contents 19 Device installation 19 Installing the document feeder 19 Pap...

Page 4: ... counter 43 Display the consumables status 43 Calibrate your scanner 43 Directory 44 Creating subscribers record 44 Creating subscribers list 44 Modifying a record 44 Deleting a record or a list 44 Printing the directory 45 Saving Restoring the directory Smart card option 45 Games and Calendar 46 Sudoku 46 Print a grid 46 Print the solution to a grid 46 Calendar 46 Network features 47 Type of radi...

Page 5: ...e outbox log 70 The inbox log 70 Fax parameters 71 Access to fax parameters 71 Description of the tab Logs and Reports 71 Description of the tab Fax Parameters 71 Cover page 72 Creating a cover page template 72 Creating a cover page 73 Description of the tab Cover page 74 SMS Communications depending on model 75 Presentation of the SMS window 75 Send an SMS 75 Follow up of SMS 76 The outbox 76 The...

Page 6: ...ted States of America This equipment has been tested and found to comply with the limits for a Class B digital device pursuant to Part 15 of the FCC Rules These limits are designed to provide reasonable protection against harmful interference in a residential installation This equipment generates uses and can radiate radio frequency energy and if not installed and used in accordance with the instr...

Page 7: ...eam is totally enclosed during all phases of customer operation and maintenance For Europe Asia This machine complies with IEC 60825 1 1993 A1 1997 A2 2001 standard is classified as laser class 1 product and is safe for office EDP use It contains one class 3B laser diode 10 72 mW max 770 795 nm and other class 1 LEDs 280 µW at 639 nm Direct or indirect reflected eye contact with the laser beam mig...

Page 8: ...ce this equipment where people might step on or trip on the power cord This equipment should not be placed in a room unless proper ventilation is provided Please contact your local Authorized dealer for further information Electrical Safety Information 1 The power receptacle for the machine must meet the requirements stated on the data plate on the rear of the machine If you are not sure that your...

Page 9: ... ozone during normal operation The ozone produced is heavier than air and is dependent on copy volume Install the system in a well ventilated room If you need additional information about ozone please request the Xerox publication Facts About Ozone part number 610P64653 by calling 1 800 828 6571 in the United States and Canada In other markets please contact your local Xerox representative Mainten...

Page 10: ...any other number for which charges exceed local or long distance transmission charges In order to program this information into your FAX machine refer to Installation and follow the steps provided Data Coupler Information This equipment complies with Part 68 of the FCC rules and the requirements adopted by the Administrative Council for Terminal Attachments ACTA On the rear of this equipment is a ...

Page 11: ...ils of which are displayed either on the machine or contained within the user guide If the equipment is causing harm to the telephone network the Telephone Company may request that you disconnect the equipment until the problem is resolved Repairs to the machine should be made only by a Xerox representative or an authorized Xerox service agency This applies at any time during or after the service ...

Page 12: ...on Product Recycling and Disposal USA and Canada Xerox operates a worldwide equipment take back and reuse recycle program Contact your Xerox sales representative 1 800 ASK XEROX to determine whether this Xerox product is part of the program For more information about Xerox environmental programs visit www xerox com environment html If your product is not part of the Xerox program and you are manag...

Page 13: ... placed on the market For recycling and disposal information contact your local authorities In the United States you may also refer to the Electronic Industries Alliance web site http www eiae org Perchlorate Material This product may contain one or more Perchlorate containing devices such as batteries Special handling may apply please see http www dtsc ca gov hazardouswaste perchlorate Energy Pro...

Page 14: ...er network that is why it is imperative to apply the following safety measures your device shall be connected to a power outlet located nearby The outlet shall be easily accessible Your device is delivered with a grounded power cord It is imperative to connect a grounded connector to a grounded outlet connected to the building earthing For installation conditions and safe use precautions refer to ...

Page 15: ...has warning labels at the positions shown below For your safety you must never touch these surfaces when you remove a paper jam or when you replace the Toner cartridge Symbols for the main power switch In accordance with IEC 60417 this machine uses the following symbols for the main power switch means POWER ON means POWER OFF ...

Page 16: ...ies of them This license will automatically be canceled in case you do not respect the terms of this license If the license is rendered invalid you agree to destroy all copies of the program and the associate documentation Warranty The Software is provided as is with no warranties what so ever whether expressed or implied including without limitation any warranties of merchantability or fitness fo...

Page 17: ... the Adobe products referred to here are registered trademarks of Adobe Systems Incorporated PaperPort11SE is a registered trademark of ScanSoft Microsoft Windows 2000 Microsoft Windows Server 2003 Microsoft Windows XP Microsoft Windows Vista and any other Microsoft product referred to here are registered trademarks of Microsoft Corporation registered and or used in the United States and or in oth...

Page 18: ...t humidity included between 15 to 54 Machine The section below describes the precautions to be taken when using the machine Never turn the machine off and never open the covers while printing Never use gas or flammable liquids or objects generating magnetic field close to the machine When you unplug the power cord always grasp the connector and not the cord A damaged cord presents a potential fire...

Page 19: ...u spill something into the product You suspect that your product needs service or repair Your product s cover has been damaged Do not incinerate spilled toner or used toner Toner dust might ignite when exposed to an open flame Disposal can take place at our authorised dealer or at appropriate collection sites Dispose of the used print cartridge in accordance with local regulations CAUTION Protect ...

Page 20: ...mount of loaded paper must not exceed the loading mark If the loading mark is exceeded this may cause feed failure skewing and paper jams Adding paper during printing must be avoided because it may cause multi feeds When removing the paper tray from the machine always support it with both hands to avoid dropping it If you use paper already printed by your machine or another printer the printing qu...

Page 21: ...noring these notes could result in moderate or minor injury or damage to the machine or to property Be sure to read these notes They can be found in the Safety information section of this manual Important Indicates points to pay attention to when using the machine and explanations of likely causes of paper misfeeds damage to originals or loss of data Be sure to read these explanations Note Indicat...

Page 22: ...LINE port telephone cable connection 7 EXT port connection for external telephone devices 8 Slave USB interface connector for PC 9 Master USB interface connector USB key 10 Master USB interface connector USB key 11 Manual paper feed setup guides 12 Manual input tray 13 Paper tray 14 Print cartridge access cover 15 Output support 16 Paper output 17 Smart card insertion slot ...

Page 23: ...eletes the character to the left of the cursor 5 Key input or line feed 6 Key access to special characters 7 Key Shift 8 Key document scan to the PC or an external storage device USB key 9 Key copy 10 Key stops the current PC print job 11 Key sending of an SMS Short Message Service 12 Key fax 13 Key address book 14 Key manual telephone line connection listen for tone during fax transmission 15 Key...

Page 24: ...ing to the security notices stated at the beginning of this booklet 3 Remove all tape from the machine 4 Remove the plastic protection film from the screen Installing the document feeder 1 Secure the document feeder by fitting the two clips B in the notches A provided for this purpose Paper tray installation Your machine supports a number of sizes and types of media refer to Specifications page 83...

Page 25: ...tack in the tray 200 sheets of 80 g m paper for instance 6 Slide the tray back in its location Print cartridge installation 1 Stand in front of the machine 2 Grasp the left and right sides of the cover and pull it towards you at the same time 3 Unpack the new print cartridge Gently roll the cartridge 5 or 6 times to distribute the toner evenly inside the cartridge Thoroughly rolling the cartridge ...

Page 26: ...help you configure your machine by guiding you through the basic settings If you wish to modify the setting displayed press the OK button If you do not want to modify the displayed setting press the C button the Easy Install function then displays the next basic setting 1 To modify the display language press the OK button 2 Select the desired language using the or buttons and confirm with OK 3 To ...

Page 27: ...re installing the machine in France behind your company s PABX enter 10 10 digits being the standard telephone number length for France Use C to correct an entry Press the OK button to confirm 13 Enter the local prefix number 10 characters max using the numerical keypad This prefix will automatically be added when an external number is dialled To insert a pause for dial tone sign press simultaneou...

Page 28: ... are not recommended may lead to improper printing refer to the paragraph Specifications page 83 Curled envelope after printing should be fixed manually Small wrinkles on the edge of the wide side of envelopes smearing or less clear printing may appear on the reverse side Gently press the envelope to release any air before loading it into the manual feed tray Load envelope in a proper position aft...

Page 29: ...egistration arrows near the top left of the document glass 2 Press the button 3 Press the button Advanced copying Advanced copy allows the user to do custom setups for the current copy job 1 Place the document to be copied face up in the automatic document feeder or Place the document face down on the document glass aligned with the registration arrows near the top left of the document glass 2 Pre...

Page 30: ...g on the desired printing quality AUTO TEXT PHOTO or QUALITY TEXT with the buttons or then confirm with the OK button For optimal results with ID documents select the PHOTO resolution 7 Adjust the contrast level with the buttons or then confirm with the OK button 8 Adjust the desired brightness level with the buttons or then confirm with the OK button 9 Choose the paper type NORMAL THICK with the ...

Page 31: ...ns or 3 Setup the desired coordinates with the numerical keypad or the buttons and 4 Confirm your choice by pressing the OK button 5 Exit this menu by pressing the button Contrast setup The CONTRAST parameter allows you to choose your output s contrast 845 ADVANCED FCT COPY CONTRAST 1 Press enter 845 using the keypad 2 Setup the desired level of contrast with the buttons and 3 Confirm your choice ...

Page 32: ... the button Left and right printing margin shift If you want to you can offset the lateral margins of the document to the left or right during printing 855 ADVANCED FCT SCAN PRINT PRINTER MARG 1 Press enter 855 using the keypad 2 Setup the left right margins offsets by 0 5 mm steps with the buttons and 3 Confirm by pressing the OK button 4 Exit this menu by pressing the button Top and bottom print...

Page 33: ... transmission This function allows you to transmit a document at a later time To program a delayed transmission you need to identify the subscriber number transmission time feeder type and number of pages To delay the transmission time of your document 1 Place the document to be copied face up in the automatic document feeder or Place the document face down on the document glass aligned with the r...

Page 34: ... Default tray set to Manual Default tray set to Automatic Relay broadcast Your fax machine initiator can relay a document in other words transmit a document to your subscribers via a remote fax and with a precise relay list To do this the initiator fax and the remote fax must both have the relay function To relay you need to supply the remote fax with the document and the relay list number The rem...

Page 35: ...mory activating or deactivating the fax answering machine Saving an access code 383 FAX FAX ANSW ANSWER CODE 1 Press enter 383 using the keypad 2 Enter the code 4 digits and confirm with OK 3 Exit this menu by pressing the button Activating Deactivating the answering machine 382 FAX FAX ANSW ACTIVATION 1 Press enter 382 using the keypad 2 If you saved an access code for your fax answering machine ...

Page 36: ...ad 2 Using the keys and select the option ON to print all rerouted documents automatically 3 Confirm your choice with OK 4 Exit this menu by pressing the button Transmission waiting queue This function lets you obtain a recap of all documents queuing for transmission including those in deposit or in delayed transmission etc It allows you to Consult or modify the waiting queue In this waiting queue...

Page 37: ... named MBX code to all subscribers equipped with a fax compatible to yours MBX 00 is public It is handled directly by the machine to record the messages of the fax TAD as soon as this is put into service MBX s 01 to 31 are private Each is password protected They can be used to receive documents confidentially The use and access to MBX 01 31 is dependent upon an initialization defined by an MBX cod...

Page 38: ...e desired MBX out of the 31 MBX s or enter the number of the MBX directly and press OK The document is placed in the feeder and saved in the selected MBX MBX deposit in a remote fax 1 Insert the document in the automatic document feeder 2 Select 35 FAX MBX SENDING 3 Enter your subscriber s number for MBX deposit or choose your dialling mode and validate with OK 4 Enter the subscriber s MBX number ...

Page 39: ...in deposit 1 Insert the document to deposit in the automatic document feeder 2 Select 34 FAX POLLING TX 3 Choose the deposit type according to the table below 4 Confirm deposit by pressing OK Polling a deposited document 33 FAX POLLING RX 1 Select 33 FAX POLLING RX 2 Enter the number of the party whose document you want to poll or choose your dialling mode You can poll several documents using the ...

Page 40: ... editor is at your disposal for upper case letters use the Ï key to move inside the data entry field use and to move in the text from one word to another press CTRL and one of the navigator keys or to go to the next line use to delete a character by moving the cursor to the left use Í or C 3 Confirm with OK 4 Dial the number of the recipient mobile phone or any other SMS compatible device in one o...

Page 41: ...he end of March 1h and October 1h You will just be informed of this change by a message on the screen The default parameter is ON Warning message On automatic changing to summer winter time a message will be displayed to inform you that the machine time has been changed or Your next action on the keypad will cause the message to be automatically cleared Your fax number Your name Your machine will ...

Page 42: ...3 To exit this menu press Language This setting enables you to choose the menu language of your choice By default the machine is set to English To select the language 203 SETUP GEOGRAPHICAL LANGUAGE 1 Press enter 203 using the keypad 2 Select the required language using and then press the OK key to confirm 3 To exit this menu press Local prefix This function is used when your fax is connected to a...

Page 43: ...e reduced images will not appear on the transmission report 3 To exit this menu press Economy period This function allows you to defer a fax transmission to off peak hours and thus reduce the cost of your communications The economy period via the telephone network at off peak hours is preset by default from 7 00 pm to 7 30 am Nevertheless you may change this time slot To modify the economy period ...

Page 44: ...ies and confirm with OK 3 To exit this menu press At each document reception your machine will print the number of copies requested Fax or PC reception This menu combined with a software program installed on your PC will enable you to select the machine you wish to receive the documents on fax PC PC if available fax otherwise 244 SETUP RECEPTION PC RECEPT For more details please refer to Fax commu...

Page 45: ...er Description 1 Scanning mode Default value of the scan mode resolution for the documents to be transmitted 2 TX header Important this parameter is by default activated on the US model and cannot be modified If this parameter is on your header will appear on all documents sent to your subscribers with your name number date and number of pages Warning If you send a fax from the automatic document ...

Page 46: ...ze The Discard Size parameter only defines the printing of received faxes The number of lines of a document can be too high for the paper size loaded This parameter defines the threshold beyond which the extra lines are printed on a second page Below this threshold extras lines are deleted If you choose ON the threshold is set on 3 centimeters If you choose OFF the threshold is set on 1 centimeter...

Page 47: ...firm with OK 5 Exit this menu by pressing the button Lock the SMS service This function prevents access to the SMS service To access the SMS service locking menu 815 ADVANCED FCT LOCK LOCK SMS 1 Press enter 815 using the keypad 2 Enter the four digit access code using the keypad 3 Press OK to confirm 4 With the buttons or choose ON and confirm with OK 5 Exit this menu by pressing the button Lock t...

Page 48: ...e 824 ADVANCED FCT COUNTERS PRINTED PG 1 Press enter 824 using the keypad 2 The number of printed pages appears on the screen 3 Exit this menu by pressing the button Display the consumables status You can read at any time the remaining toner in the cartridge This level appears in percentage 86 ADVANCED FCT CONSUMABLES 1 Press enter 86 using the keypad 2 The available toner percentage appears on th...

Page 49: ...ress enter 12 using the keypad 2 Enter the LIST NAME with the alphanumerical keypad 20 characters maximum confirm with OK 3 CALLED NUMBER use or to select from existing records the contacts of your list and confirm with OK Repeat this operation for each subscriber you want to add to your list 4 Enter the GROUP NUMBER assigned to your list with the numerical keypad or accept the displayed number an...

Page 50: ...RY SAVE LOAD SAVE 1 Press enter 16 using the keypad 2 Select SAVE to save directory entries on the Smart card and confirm with OK 3 Insert your Smart card To restore the contents of your directory from your Smart card 162 DIRECTORY SAVE LOAD LOAD 1 Press enter 16 using the keypad 2 Select LOAD to restore directory entries from the Smart card and confirm with OK 3 Confirm with OK 4 Insert your Smar...

Page 51: ...RT SOLUTION 1 Press enter 5 using the keypad Confirm with OK 2 Select SUDOKU using the or button 3 Confirm with OK 4 Select PRT SOLUTION using the or button 5 Select the level of difficulty EASY MEDIUM HARD EVIL using the or button 6 Confirm with OK 7 Choose the grid you want by entering the number on the numeric keypad 1 to 100 8 Confirm with OK 9 Choose the number of copies you want by entering ...

Page 52: ...e your machine into a radio network WLAN 1 Configure the network to your PC 2 Set up the parameters for your machine so that it can function in a network 3 Having set up the parameters for your device install the Xerox Companion Suite software onto your PC with the necessary printer drivers Once the machine is incorporated into a WLAN network you can from your PC print documents on the multifuncti...

Page 53: ...ode the sub menu CHANNEL appears enter a figure between 1 and 13 and confirm with OK 7 Select your encryption method OFF WEP or WPA and confirm with OK If you choose WEP enter the WEP key that you are using on your network If you choose WPA enter the WPA or WPA2 key that you are using on your network Note You can be sure of perfect communication if you use an approved adaptor in conjunction with y...

Page 54: ...e menu SETUP using the keys or and confirm with OK 2 Select WLAN using the keys or and confirm with OK 3 Select PARAMETERS using the keys or and confirm with OK 4 Select GATEWAY using the keys or and confirm with OK 5 The number of your gateway will appear in the format 000 000 000 000 Enter the new gateway for your machine in the format displayed and confirm with OK 6 Exit this menu by pressing t...

Page 55: ...ents Refer to the paragraph Software installation page 57 An example of how an AD HOC network may be set up Below is an example of how to configure an Ad hoc network without security protection using the following parameters network name house radio type ad hoc channel 1 PC s IP address 169 254 0 1 PC s subnetwork mask 255 255 0 0 PC s gateway 0 0 0 0 IP address of the multifunction machine 169 25...

Page 56: ...he network house once this has been detected 5 Now set up the WLAN network connection of your PC To do this you must configure the element Protocol Internet TCP IP for the WLAN connection that has been created If this element is set up in such a way as to obtain an IP address automatically you must change it to manual mode to set up the TCP IP address 169 254 0 1 in our example the subnet mask 255...

Page 57: ...your files ALL to print all the files stored on the USB memory key Select ALL with the or buttons and confirm with OK The printing is started automatically SERIES to print a series of files stored on the USB memory key Select SERIES with the or buttons and confirm with OK FIRST FILE and the first indexed file appears on the screen Select with the or buttons the first file of the series to print an...

Page 58: ...B memory key contents After a period of inactivity your machine will return to the main menu To view the USB memory key again please proceed as follows 07 MEDIA MEDIA ANALYSIS 1 Press enter 07 using the keypad 2 The scanning of the USB memory key is started 3 You can print or delete the detected files stored on your USB memory key Refer to the previous chapters Save a document on a USB memory key ...

Page 59: ... WHITE the picture will be saved in TIFF format COLOUR the picture will be saved in JPEG format You can choose the image resolution that will be scanned to the USB memory key the default resolution is AUTO Press the button several times and select the resolution you require Scanning in BLACK WHITE icon text resolution icon photo resolution no icon auto resolution Scanning in COLOUR icon text resol...

Page 60: ... As the telephone line is now used for both communication fax SMS and telephony features you may need to adjust the machine reception settings see Reception Mode page 38 Registering DECT handsets By default the USB DECT base comes with one registered handset To register additional handsets GAP compatible to the base you will need to put both the base and the handset in registration mode To registe...

Page 61: ...it this menu press Unregistering DECT handset This function is used to unregister a handset from the DECT base You will no longer be able to make or receive calls with a handset once you unregister it 892 ADVANCED FCT DECT UNREGISTER 1 Press enter 89 using the keypad Confirm with OK 2 Select UNREGISTER using the or button and confirm with OK The LCD screen displays the list of handsets registered ...

Page 62: ...cribes the following installation procedures full installation of the Xerox Companion Suite software installation of the drivers only Installing the full software package Turn your PC on and log in as administrator 1 Open the CD ROM drive insert the installation CD ROM and close the drive 2 An installation procedure is automatically run Auto run If it does not double click on setup exe at the CD R...

Page 63: ...ing installation procedures installation of drivers using the Xerox Companion Suite software manual installation of drivers Installing the drivers using the Xerox Companion Suite software Turn your PC on and log in as administrator 1 Open the CD ROM drive insert the installation CD ROM and close the drive 2 An installation procedure is automatically run Auto run If it does not double click on setu...

Page 64: ...Select INSTALL DRIVERS in the list and click on the NEXT button 9 Select the destination folder for installation and click on the NEXT button 10 The final installation is ready to be executed Click on the INSTALL button 11 A screen informs you of the installation progress 12 Click on OK to finish the installation The Xerox Companion Suite software is now installed on your PC You can now connect yo...

Page 65: ...ts Connections Make sure that your machine is powered off The connection between the PC and the machine requires a USB 2 0 shielded cable no more than 3 meters long 1 Locate your USB cable connectors and connect as shown below on the picture Note This installation mode is only possible on Windows 2000 XP and Vista Important It is recommended to install the Xerox Companion Suite software first and ...

Page 66: ...rs with the Xerox Companion Suite software see paragraph Uninstall the drivers using the Xerox Companion Suite software If you have installed the drivers manually see paragraph Uninstall the drivers manually Uninstall the drivers using the Xerox Companion Suite software Run the programs removal from the menu START ALL PROGRAMS XEROX COMPANION SUITE PHASER 3100MFP UNINSTALL 1 A confirmation screen ...

Page 67: ...nnected to your PC monitor the machine activities monitor the status of the machine consumables from the PC quickly access the graphic editor applications To manage the machine run the Companion Director application by clicking on the icon located on your desktop or from the menu START ALLPROGRAMS XEROX COMPANION SUITE PHASER 3100 MFP COMPANION DIRECTOR Checking the connection between the PC and t...

Page 68: ...s managed by the PC Selecting the current device Only one device at a time may be connected to the PC The current device may be selected by clicking on the radio button corresponding to the device Status of the connection The status of the connection between the current device and the PC is indicated by a colour The following table defines the possible states of the connection Device parameters 1 ...

Page 69: ... Companion Suite features Document scanning The document analysis can be carried out in two ways either by the SCAN TO function application accessible from the Companion Director window or from the SCAN button on the machine or directly from a standard compatible application Scanning with Scan To Run the application by clicking on the XEROX COMPANION DIRECTOR icon located on your desktop or from t...

Page 70: ...g a document on the machine from your PC is like printing a document in Windows 1 Use the PRINT command from the FILE menu of the currently open application on the screen 2 Select the XEROX PHASER 3100MFP printer Printing in duplex mode with the machine The machine offers the ability to print a document in manual duplex mode from your PC To print a document in manual duplex mode 1 Use the PRINT co...

Page 71: ...ssary operations depending on the selected binding mode Long sides Short sides 8 Press OK on the control panel to resume printing 9 Even pages are printed on the other side of the sheets Once all pages are printed remove the explanation sheet Binding mode Printing Long sides Short sides PRINTING PC PUT THE PRIN AND PRESS OK Important The PC generates and prints a page explaining how to reload the ...

Page 72: ...ck dial key Click on OK The new contact is added to the list Add a group to the machine s address book 1 Click the link ADDRESS BOOK of the window MF DIRECTOR 2 Select the machine address book 3 Click NEW and select GROUP in the displayed menu 4 Enter the name of the group The group may consist of contacts from the address book or new contacts 1st case group members are from the address book Click...

Page 73: ...ally generated during export 1 Select IMPORT in the menu FILE of the window ADDRESS BOOK 2 Select the file to import click on OPEN Fax communications depending on model The fax communication enables you to send documents as faxes from one of the scanners of your machine from the hard disk or from the screen of your PC receive fax documents monitor communications through various services the inbox ...

Page 74: ...o all contacts in your list of contacts Your send request can then be checked if necessary in the outbox Send a fax from an application This method is used to directly send a document you have created using a desktop application without printing it beforehand 1 From your desktop application select FILE PRINT 2 Select the printer COMPANION SUITE FAX and click OK The fax window is displayed 3 To sen...

Page 75: ...ls not put through The requests are displayed in the order in which they are executed The cancelled requests are filed at the end of the list so that they are more accessible if you want to work with them request a new send or delete them The send memory items sent The sent memory is used to keep all faxes you have sent The information in the send memory is the recipient of the fax the date the fa...

Page 76: ...nted after each fax is sent Printing of the outbox log The log is printed automatically when its contents fill a page Option Description Transmission speed Fax default transmission speed Line number Number of the line where your machine is connected Dialling prefix This dialling prefix will be automatically inserted in front of the number before sending on this line Type of dialing Must be program...

Page 77: ...rmation provided for each recipient of a document To create this cover page template there are two major steps First step Create a background image with the logos and the layout that you wish Second step Add the field that you want to be displayed in the cover page fax number comment subject and so on As mentioned before these fields will be filled by Fax application at emission time For the first...

Page 78: ...over Page and check the check box named With the cover page b Click on the button New this displays a new window with the title Creation of the cover page c Press the button Open in the toolbar change the file filter to fax and browse to the directory C Program Files Companion Suite Pro LM Documents FAX Temporary that contains the background image that you have created in the First step d Click on...

Page 79: ...ow Description of the tab COVER PAGE Important Adjust the size of your field so that the text is readable Field Description Name of the cover page Either the name of the page selected by default or the page you have selected to use Sender You can enter information concerning the sender Recipient You can enter information concerning the recipient If the word Auto is entered in one of the fields the...

Page 80: ... of the address directory in the field CONTACT LIST and click on Repeat this operation as many times as necessary use the button to delete a contact from the list of contacts 5 If necessary program the advanced features to send later or give priority to the SMS by pressing the button ADVANCED PARAMETERS 6 Click on OK to send your SMS to all contacts in your list of contacts Your send request can t...

Page 81: ...as its contents fill a page The information held in the log is the SMS recipient the date of sending of the SMS the status sent cancelled The sent item memory items sent The sent item memory is used to keep a copy of all SMS messages you have sent The information in the sent item memory is the SMS recipient the date of creation of the SMS the date of sending of the SMS the size of the SMS SMS Para...

Page 82: ...dge at any time before it reaches its end of cycle To replace the print cartridge proceed as shown below 1 Insert the smart card provided with the new print cartridge as shown on the picture below The following message appears 2 Press OK The following message appears 3 Stand in front of the device 4 Grasp the left and right sides of the cover and pull it towards you at the same time 5 Raise and re...

Page 83: ... document feeder when one or more vertical lines appear on the copies of documents placed on the document feeder presence of debris ink glue etc in the paper transport mechanism the message YOU SHOULD CLEAN THE ROLLER OF THE SCANNER FEEDER PLEASE REFER TO USER MANUAL PRESS STOP WHEN THE ROLLER IS CLEANED warns you that the document feeder cannot transport paper sheets anymore dust dirt or debris o...

Page 84: ... Message displayed when starting the machine CLOSE COVER PRINTER The printer front cover is open close it TONER EMPTY REPLACE OK Replace the print cartridge PAPER JAM REMOVE TONER A sheet of paper is jammed in the machine Take out the print cartridge and remove the jammed paper sheet Take out the paper tray and remove the jammed paper sheet Then open and close the consumable cover PAPER JAM EXTERN...

Page 85: ...on from the feeder You have the choice between waiting until the transmission takes place at the given time restarting the transmission immediately by pressing abandoning transmission by pressing To eject the document press again Transmission from memory You have the choice between waiting until the transmission takes place at the given time restarting the transmission using the transmission queue...

Page 86: ...s mailbox The mailbox number does not exist Code 18 Relay Bcst impossible You requested a document relay from a remote fax which does not have the relay broadcast function Code 19 Subscriber has stopped The communication has been stopped by your subscriber Example a fax wanted to poll your fax but there is no document deposited Code 1A Disconnected The transmission has not started The telephone li...

Page 87: ...ng Paper empty Once the problem is resolved printing resumes from the first non printed page No paper feed Once the problem is resolved printing resumes from the first non printed page Exception If the document was to be printed in manual duplex mode the printing of the document is cancelled Paper jam Paper format problem Toner empty The printing of the active document is cancelled Documents waiti...

Page 88: ...ating systems computer specifications software applications connection modes USB or WLAN paper sizes as well as file types and sizes Preheating time 21 sec First page out time 13 sec Type Autonomous Black and White Copy speed 20 ppm maximum Resolution 600 dpi Multiple copies 99 pages maximum Zoom range 25 to 400 Type Colour scanner Document feeder capacity 50 sheets Colour depth 36 bits Resolution...

Page 89: ...nance Consumable specifications Print cartridge Specifications are subject to changes for improvement without notice Phaser 3100MFP Standard Capacity Print Cartridge Phaser 3100MFP High Capacity Print Cartridge 106R01378 106R01379 ...

Page 90: ...t of our continuing quest for total customer satisfaction all of our products are made with ease of use and reliability in mind If you need assistance during or after product installation please visit the Xerox website for online solutions and support http www xerox com ...

Reviews: