background image

23

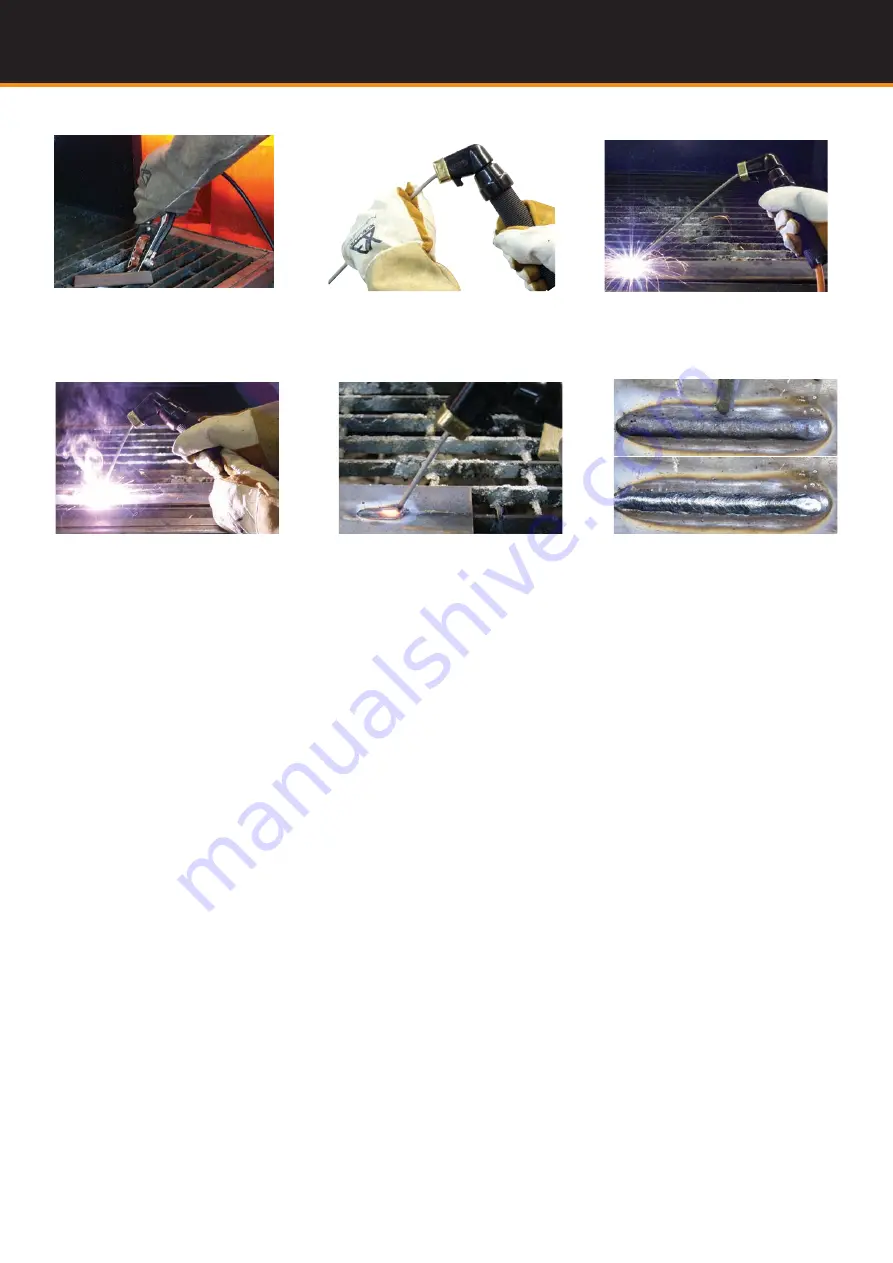
Continued - Set Up Procedure for MMA (Stick) Welding: 


6)

 Connect the Earth Clamp securely to 

the work piece or the work bench.

4) Place the electrode into the electrode 
holder and clamp tight.

5) Strike the electrode against the work 
piece to create and arc and hold the elec-
trode steady to maintain the arc

6) Hold the electrode slightly above the 
work piece to maintain the arc while 
travelling at an even speed to create and 
even weld deposition.

7) 

To finish the weld, break the arc by 

quickly snapping the electrode away from 
the work piece.

8) Wait for the weld to cool and carefully 
chip away the slag to reveal the weld 
metal below. 

Razor

32OAC/DC

 TIG-MMA

ARC FORCE - 

What is the Arc Force Control and what does it do?

During welding arc voltage drops as the arc gets tighter and can cause the electrode to stick to the work piece. Arc force should be set 
according to the electrode diameter, electrode type, welding current and the technical requirement. When you set the arc force high the 
machine senses the drop in voltage, as the electrode is about to stick/short circuit to the work piece the machine responds by increasing 
the arc voltage and welding current momentarily (per millisecond). This boost in arc voltage/current blasts away base metal and elec-
trode to prevent the electrode from sticking itself to the work piece. High arc force means the molten droplet from the melting electrode 
is larger with quicker transistion preventing the electrode from sticking, however too much arc force may create excessive spatter. Low 
arc force will result in a softer arc with minimal spatter and a nice shaped weld bead, however it may lead to the electrode sticking to the 
work piece easier, therefore the arc force should be adjusted to provide a smooth arc transistion between the electrode and workpiece 
without it sticking and without providing excessive spatter. Higher Arc Force is more suited to thicker electrodes under low amperage 
settings, out of postion welding, low hydrogen type electrodes where a forceful arc characteristic is preferred to maintain the arc and 
better control penetration.  Lower Arc Force is better suited to hardfacing and cast Iron electrodes where a soft buttery arc is preferred to 
prevent the electrode material diluting too much with the base metal.

IMPORTANT NOTES - 

For MMA (Stick) Welding 

DC MMA ELECTRODE POLARITY -

 What is the electrode polarity and why is it important.

When using a DC power source, the question of whether to use electrode negative or positive polarity arises.  

Direct current flows in one direction in an electrical circuit and the direction of current flow and the composition of the elec

-

trode coating will have a definite effect on the welding arc and weld bead. Refer to the electrode manufacturers recommenda

-

tion for polarity choice.

With DC electrode (+) positive (reverse) polarity, more heat is generated at the workpiece. This produces welds with deep penetration 
and a narrower weld bead and can reduce the incidence of lack-of-fusion defects in the weld.
DC electrode (-) negative (straight) polarity generates more heat at the electrode and produces welds with shallower penetration. DC 
(-) negative electrode results in a higher burn off rate and therefore a higher deposition rate at a given current. It is generally the chosen 
polarity for most GP Electrodes.

AC MMA ELECTRODE Welding.

AC MMA (Stick) welding came about from old technology of AC transformer welding machines.   Electrodes were manufactured to run 
on these AC machines. In fact, the electrodes made for AC welding will usually perform better on DC.   AC is much louder and delivers a 
more violent arc which can cause inclusions and slag in the weld.  Generally AC is more diffcult to weld with than DC.

There can be a a phenomenon called “arc-blow” with DC current where a magnetic field can build up and push the arc off to one side.  If 

you are having issues with magnetism creating arc blow then the AC can help stabilise the arc and bring things back in line.
But for most other applications, AC is not needed. There are some Aluminium MMA electrodes available that do require AC current.

Summary of Contents for RazorWeld Razor TIG320 ACDC

Page 1: ...tand this instruction manual carefully before the installation and operation of this equipment TIG32O ACDC OPERATING MANUAL XA TIG320RZ ACDC K YEAR MACHINE WARRANTY 1 1 R NE TY MACHINE WARRANTY YEAR P...

Page 2: ...d technical personnel that provide us with market trends market feedback and customer comments and requirements Secondly they provide a customer support service that is second to none thus ensuring ou...

Page 3: ...cedure for DC AC DC MIX ARC Welding 28 DC TIG Welding 29 DC Pulse TIG Welding 30 DC PULSE TIG Welding Set Up Procedure Operation 31 TIG Welding Fusion and Filler Wire Technique 32 Machine Set Up for A...

Page 4: ...metal and sparks Frequently inspect input power cable for wear and tear replace the cable immediately if damaged bare wiring is dangerous and can kill Do not use damaged under sized or badly joined ca...

Page 5: ...explode Because gas cylinders are normally part of the welding process be sure to treat them carefully CYLINDERS can explode if damaged Protect gas cylinders from excessive heat mechanical shocks phy...

Page 6: ...will automatically compensate for input voltage variations within a specific range In circumstances where the voltage of the input power supply exceeds the stipulated value it is possible to cause dam...

Page 7: ...7 Electrical Schematic Diagram Razor32OAC DC TIG MMA...

Page 8: ...c Trigger Control 2T 2s 4T 4S Remote Amp Control Optional MMA stick electrode AC and DC Output Ignition Amp 10 80A Ignition Time 0 01 1 5 sec Arc Force adjusts arc energy to suit electrode application...

Page 9: ...mote Control The Remote Interface allows connection of either Torch Remote or Foot Pedal for remote control of amperage output Job Memory Job memory function allows you to enter and store weld paramet...

Page 10: ...r 7 Rotary Encoder 1 Fault Alarm 2 On Off Swicth 3 Coolant Filler 4 Front Panel 5 Water Connector Inlet 6 Water Connector Outlet 8 Power switch on off 9 Water Cooler Connector 10 Inlet gas connector 1...

Page 11: ...or Inlet 6 Water Connector Outlet Water Cooler Rear Layout Description 2 6 5 3 4 1 7 1 1 2 3 4 6 1 Cylinder Rack 2 Cable Hanger 3 Cylinder Tray 4 Solid Rubber Wheel 5 Tig Rod Holder 6 Front Locking Ca...

Page 12: ...ions No SECTION DESCRIPTION INSTRUCTION PAGE 8 MMA MODE PROGRAM 19 9 REMOTE CONTROL MODE SELECT 20 10 WATER COOLER MODE SELECT 20 11 JOB SAVE 21 12 JOB RECALL DELETE SELECT 21 13 JOB SELECT 21 14 GAS...

Page 13: ...on 5 Pulse Select Enables choice of Pulse Mode Pulse Off Pulse On Pulse Off Select by pushing the button to cycle through to illuminate the icon Pulse On Select by pushing the button to cycle through...

Page 14: ...nt of the parameter Turn the Encoder to adjust the setting Push the Encoder to lock the setting 6A Weld Program Selecting weld program parameters Turn the Encoder to set the Start Amp value Range is 1...

Page 15: ...own to the finish amperage The setting shows on the digital display It is the amperage the machine will deliver at the finish of the welding sequence Up Slope Time Provides selection for the amount of...

Page 16: ...ush the Encoder to lock the icon ready for adjustment AC Hz Provides selection to adjust the frequency of the AC square wave in AC TIG mode Allows adjustment of frequency of the AC square wave cycle T...

Page 17: ...eter selection Select by turning the Encoder Knob to cycle through the weld parameter icons The icon will illuminate when selected Push the encoder knob to lock the icon The LED icon will blink on and...

Page 18: ...eld during SPOT Weld cycle Adjusts the amount of time the welding output stays on after arc igintion SPOT MODE Selecting SPOT mode allows setting of an ON time and OFF time of the welding cuurent Afte...

Page 19: ...icon ready for adjustment The value selected shown on the digital display represents the amount AMPS Selected 8 MMA IGNITION TIME Provides selection and adjustment of the electrode IGNITION Time start...

Page 20: ...flow and welding off time via a signal circuit connected to Pins 3 4 IMPORTANT NOTE This sensor circuit will turn off the welding output should there be no or insufficent water flow from the water co...

Page 21: ...d JOB number press the JOB SAVE button JOB number The selected JOB number will show on the digital display JOB SAVE JOB recall select Select a JOB number Press the JOB select button the Gas Test butto...

Page 22: ...cket Earth Connected to the output socket 2 Turn the power source on using the on off switch located on the rear machine panel 3 Set the MMA weld settings using the MMA weld program on the front panel...

Page 23: ...s out of postion welding low hydrogen type electrodes where a forceful arc characteristic is preferred to maintain the arc and better control penetration Lower Arc Force is better suited to hardfacing...

Page 24: ...c into the molten pool and becomes the deposited weld metal The deposit is covered and protected by a slag which comes from the electrode coating The arc and the immediate area are enveloped by an atm...

Page 25: ...greater than the diameter of the core wire Electrode Angle The angle that the electrode makes with the work is important to ensure a smooth even transfer of metal When welding in down hand fillet hori...

Page 26: ...Switch on the machine using the On Off switch at the rear of the machine 10 Set the weld parameters using the front panel set procedure on the following page Installation Set Up for DC TIG Welding DC...

Page 27: ...The value selected shown on the digital display represents the of time that the Peak Amp is on dur ing the pulse cycle 5 Select Tungsten Diameter Turn the Encoder to set the Pre Gas Time Pre Gas Time...

Page 28: ...e 11 Select Finish Amperage Push the Encoder to lock the icon ready for adjustment Push the Encoder to lock the icon ready for adjustment Push the Encoder to lock the icon ready for adjustment Turn th...

Page 29: ...the greatest amount of flexibility to weld the widest range of material and thickness and types DC TIG welding is also the cleanest weld with no sparks or spatter HF ARC IGNITION for TIG tungsten ine...

Page 30: ...overall heat input As a rule use enough background current to reduce the weld pool to about half its normal size while still keeping the weld pool fluid As a guide start by setting the background ampe...

Page 31: ...shows on the digital display Push the Encoder to lock the icon ready for adjustment Turn the Encoder to set Base Amperage The setting shows on the digital display Push the Encoder to lock the icon rea...

Page 32: ...torch Add Tig filler wire Retract the filler wire Move the torch forward to the front of the weld pool Repeat the process gas shield TIG Welding Fusion Technique Manual TIG welding is often considere...

Page 33: ...it s representatives will be responsible for any gas loss 9 Switch on the machine using the On Off switch at the rear of the machine 10 Set the weld parameters using the front panel set procedure on...

Page 34: ...encoder knob to cycle through to illuminate the AC Hz icon see page for detailed AC Hz information Push the Encoder to lock the icon ready for adjustment Push the Encoder to lock the icon ready for ad...

Page 35: ...p Select by turning the encoder to cycle through to illuminate the Peak Amp icon Base Amp Select by turning the encoder to cycle through to illuminate the Down Slope icon Finish Amp Select by turning...

Page 36: ...with the RAZOR320ACDC machine to adjust the frequency of the AC Square Wave output It means that the amount of time that it takes the AC square wave to complete a full cycle switch from postive to ne...

Page 37: ...with AC TIG arc rectification arc stutter arc wandering and arc stoppage These problems typically occur during the transition between positive and negative phase of the alternating cycles The current...

Page 38: ...results in more heat being driven into the Tungsten Electrode and excessive Electrode Positive can still result in the Tungsten overheating and melting BALANCED SQUARE WAVE FORM Balance Adjusted for H...

Page 39: ...xpress the AC Balance by referencing the percentage of time spent in either the Electrode Positive or Electrode Negative phase of the AC cycle and often do not tell you which they are referring to whe...

Page 40: ...lse parameters by turning the encoder to cycle through the front panel to select the pulse parameter icons and make settings as show in the following step by step procedure Turn the Encoder to set the...

Page 41: ...ompared to DC waveform which can be varied from 5 95 It is good practice never to exceed the value of 50 DC waveform which would otherwise impair the oxide removal and flushing portion of the weld and...

Page 42: ...mote receptacle on the front panel of the machine Connection and operation of the remote foot control XA RFC 2 Remote amperage controls allow remote welding current adjustment from the welding machine...

Page 43: ...he welding machine The amount of gas flow needed to do the job will depend on the welding gas and the job being done but a common setting to start with is 10 L min SHIELDING GASES Shielding gases are...

Page 44: ...ifetime and overall cost effectivenes When E3 Tungsten Electrodes are compared with 2 thoriated tungsten E3 requires fewer re grinds and provides a longer overall lifetime Tests have shown that igniti...

Page 45: ...running lengthwise and thus grinding crosswise is grinding against the grain If electrodes are ground crosswise the electrons have to jump across the grinding marks and the arc can start before the t...

Page 46: ...her Cover ATERCO200 80 Sheath x 8m Inc Leather Cover 19 ATN45V07OB WF Water Feed Hose x 4m O B Rubber ATN45V08OB WF Water Feed Hose x 8m O B Rubber 20 ATN45V09OB QGS Gas Supply Hose x 4m O B Rubber AT...

Page 47: ...ens Collet Body 1 0mm T2GL16 Gas Lens Collet Body 1 6mm T2GL24 Gas Lens Collet Body 2 4mm T2GL32 Gas Lens Collet Body 3 2mm 61 5mm 5 16 32 UNEF Gas Lens Collet Body Gas Lens Body Filter Kits Small Par...

Page 48: ...15 l min flow rate Check hoses and fittings for holes leaks etc Moisture on the base metal Remove all moisture from base metal before welding Contaminated base metal Remove materials like paint greas...

Page 49: ...al Incorrect filler wire Check the filler wire and change if necessary 8 Arc difficult to start or will not start DC welding Possible Reason Suggested Remedy Incorrect machine set up Check machine set...

Page 50: ...larger electrode Poor welding technique Use the correct welding technique or seek assistance for the correct technique Poor joint preparation Check the joint design and fit up make sure the material i...

Page 51: ...rom the date of purchase XCEL ARC Inverter MIG SWF MTS MMA TIG TIG ACDC Plasma Power Source Only 2 Years RAZORWELD Inverter MIG SWF MTS MMA TIG TIG ACDC Power Source Only 3 Years RAZORCUT Inverter Pla...

Page 52: ...t or the Contractual Remedies Act and therefore also entitled to at the consumer s discretion either a refund of the purchase price of the goods or repair of the goods or replacement of the goods Retu...

Page 53: ...der Earth Clamps MMA TIG Welding Torch Consumables such as Tungsten Electrodes Collet Collet Body Alumina Nozzle Torch Head Torch Head water Cooled Torch Head Flexible Back Caps Gas Lens Torch Handle...

Page 54: ...54 NOTES...

Page 55: ...55 NOTES...

Page 56: ...56 RazorWeld Esseti New Zealand Limited PO Box 4189 Palmerston North 4442 Phone 06 355 1103 Fax 06 354 2437 Email sales esseti co nz www esseti co nz Xcel Arc Esseti NZ LTD 2022 New Zealand Limited...

Reviews: