background image

9

USER GUIDE

Page

REMOTE CONTROL

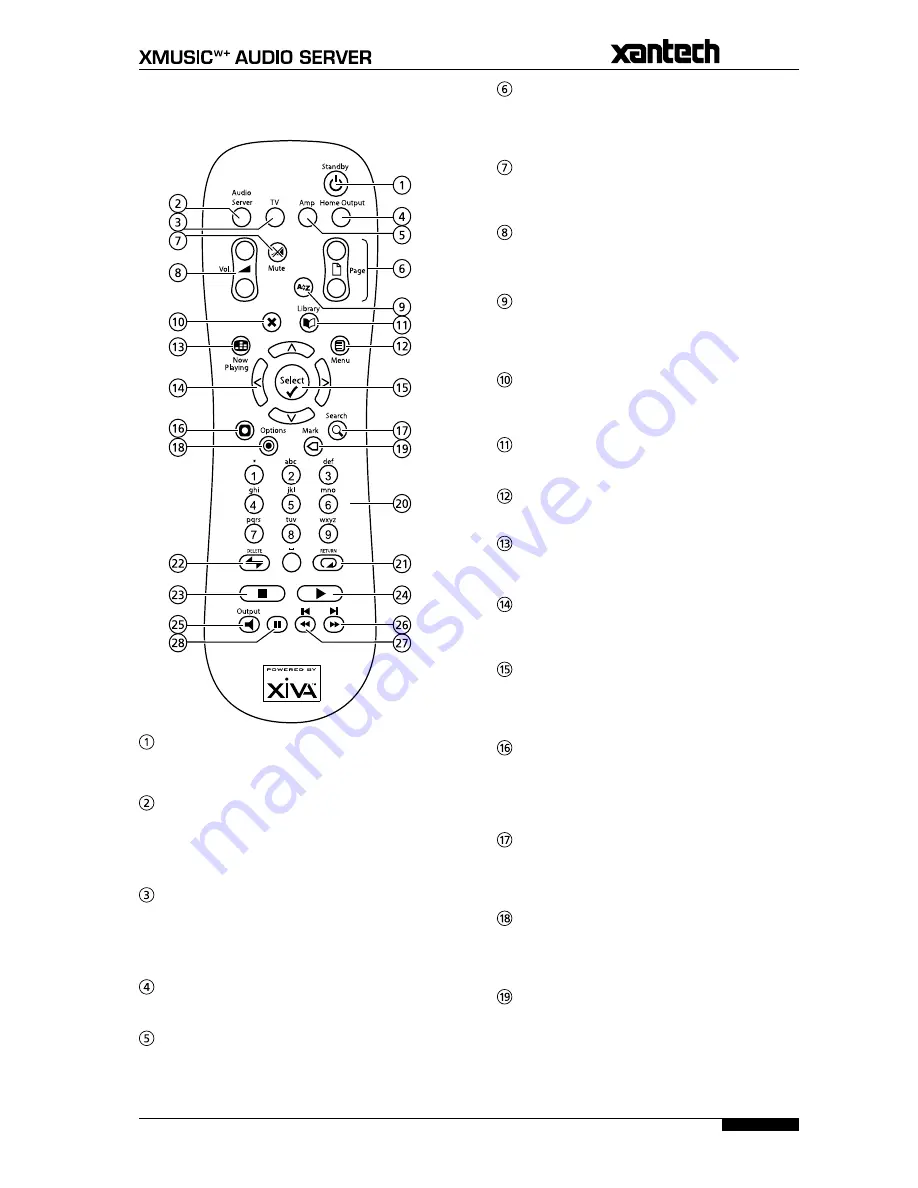
The following diagram explains the function of the keys 
on your Audio Server remote control:


;

 STANDBY key

Puts the television user interface of the Audio Server in 
to and out of Standby mode.  


Audio Server key

Press this key to select the Audio Server as the device to 
be controlled.  For more information about using this 
key, see the section titled 

Configuring Your Remote to 

Control Other Devices

 on page 10.


TV key

Press this key to select the TV as the device to be 
controlled.  For more information about using this 
key, see the section titled 

Configuring Your Remote to 

Control Other Devices

 on page 10.


HOME OUTPUT key

Press this key to select the 

Home Output

.


AMP key

Press this key to select the Amp as the device to be 
controlled.  For more information about using this 
key, see the section titled 

Configuring Your Remote to 

Control Other Devices

 on page 10.


G

 PAGE SCROLL keys

These keys are used to scroll through menus by page.  
When editing text, these keys are used to change the 
character set.


s

 MUTE key

If the TV or Amp device is selected, this key mutes the 
volume. 


r

 VOLUME keys

If the TV or Amp device is selected, these keys control 
the volume of the TV/Amp.


[


ALPHABETIC SCROLL key

Press this key to access the 

Initial Letter

 screen.  This 

screen is only available if the list currently displayed is in 
alphabetical order.


P

 CANCEL key

The 

Cancel

 key is used to cancel an operation which you 

no longer wish to continue.


à

 LIBRARY key

The 

Library

 key is used to display the 

Library

.


J

  MENU key

Press this key to display the 

Main Menu

.


 NOW PLAYING key

The 

Now Playing

 key is used to view the 

Now Playing


screen for the currently selected audio output.


NAVIGATION 

S

,

T

,

U

,

V

 keys

The navigation keys are used to move up, down, left or 
right through the menu pages.


O

 SELECT key

Select

 is used to activate the currently highlighted 

option.  When browsing the 

Library

 this key will start 

playback of the selected item.


M

 ACTION key

The 

Action

 key performs different tasks depending on 

the screen you are currently viewing.  For example, 
on the 

Albums

 screen, this key is used to add the 

highlighted selection to a playlist.


9

 SEARCH key

The 

Search

 key can be used to search for music in your


Library

.  If pressing this key has no effect, then the 

search function cannot be used on the current screen.


ä

 OPTIONS key

Press this key on any library screen to view a list of 
available options.  If pressing this key has no effect, then 
there are no options available on the current screen.


p

 MARK key

This key is used in the

 Library

 to select multiple items 

and then perform an action on them collectively.  For 
more information about using the mark function refer to 
page 20.

Summary of Contents for XMUSICWP

Page 1: ...a d c e f h g USER GUIDE...

Page 2: ...y to provide amazing features audio video text graphics and all forms of streaming new media are all brought to life through a wealth of interactive user interface options The next generation media ap...

Page 3: ...Organising Your Music Collection 23 Playlists 23 Creating a New Playlist 23 Adding Music to a Playlist 23 Editing Playlists 24 Presets 24 Storing a Preset 24 Editing the Library 25 Editing Album Infor...

Page 4: ......

Page 5: ...maintain a temperature of 35 C or less in the room where the Audio Server is located DTS Encoded Discs CAUTION when playing DTS encoded CDs excessive noise will be heard on the analog outputs jacks of...

Page 6: ...D PROTECTION Power supply cords should be protected from being walked on or pinched particularly at plugs convenience receptacles and the point where they exit from the product OUTDOOR ANTENNA GROUNDI...

Page 7: ...The use of optical instruments with this product will increase eye hazard Information to User Alteration or modifications carried out without appropriate authorization may invalidate the user s right...

Page 8: ...s Transport keys Control the playback of music on the currently selected audio output The NOutput key is used to change the currently selected audio output Library key Displays the main Library screen...

Page 9: ...he cursor to the required position Use the keys on the alphanumeric keypad to enter a letter For example to enter S press the 7 key four times because S is the fourth letter on the 7 key Press the DEL...

Page 10: ...the family or for matching the music to the occasion or mood Instant access irrespective of your music collection Whether you select a track by title album artist or genre your Audio Server locates i...

Page 11: ...N buttons The navigation buttons allow you to move up down left or right through the menus shown on the display N OUTPUT button This button is used to select the current audio output d f button When t...

Page 12: ...can be used to transmit high quality audio to a device with a digital optical input D A converter A V amplifier etc using an optical fiber cable The advantage of using the optical output is that it ha...

Page 13: ...o access the Initial Letter screen This screen is only available if the list currently displayed is in alphabetical order P CANCEL key The Cancel key is used to cancel an operation which you no longer...

Page 14: ...Server for an extended period of time you may want to switch it off To switch off press the STANDBY button on the front panel of your Audio Server Next press the action button labelled Yes below the L...

Page 15: ...ss must be completed during this time Enter the 3 digit code corresponding to the output you would like to control valid configurations are listed in Appendix A For example to set output 2 as your def...

Page 16: ...end of this cable to the AUX or CD inputs on your stereo amplifier In the same way connect the other Analog Out connectors to other stereo amplifiers as appropriate Connecting the Video Connect the ye...

Page 17: ...ser interface to be viewed on all televisions around the home A separate Infrared receiver eye is placed in each of the four rooms which transmits received infrared information to an Infrared router A...

Page 18: ...led The Now Playing Screen on page 21 Jukebox Select the Jukebox option to view the library items queued to play on the currently selected audio output For details about using the Jukebox feature see...

Page 19: ...ompression options Note The higher quality options use more space on your Audio Server hard disk so you will not be able to record as many CDs The amount of recording time left is displayed at the bot...

Page 20: ...fore give quick and easy access to your complete music collection in a number of different ways Each screen in the Library is carefully constructed to provide the most important information about the...

Page 21: ...keys to highlight the Albums option in the Library Menu Press the T key to display the Albums screen The TV screen will display the albums in your Library Press the U or V keys to step between albums...

Page 22: ...to a playlist To select a particular album in the selected genre Press the T key to display all artists within the selected genre Use the U or V keys to step between artists Press the T key again to d...

Page 23: ...in the Library Menu Press the T key to display the Presets screen The TV screen will display the presets in your Library Press the U or V keys to step between presets or press the appropriate letter o...

Page 24: ...le items within a list in the Library You can then perform a single action to be applied to all of the marked items rather than performing the same action on each item individually For example To dele...

Page 25: ...at any time by pressing the Now Playing key on your Audio Server remote control When you make this selection your Audio Server will display the Now Playing screen for the currently selected audio out...

Page 26: ...position when you release the key Shuffle and repeat playback Your Audio Server lets you play selections from the Library in a shuffled order to add variety to your music You can also play selections...

Page 27: ...the albums list Use the U or V keys to highlight the album you wish to add to a playlist Press the MAdd to key The Jukebox Any item in your Library can be selected for playback in one of two ways Pre...

Page 28: ...the Move symbol To delete a playlist From the Playlists screen use the U or V keys to highlight the playlist you wish to delete Press the Options key and choose Delete playlist Press the OYes key to...

Page 29: ...ontrol to display the Library Press the U or V keys to select Tracks and press the T key Use the U or V keys again to highlight the track you wish to edit Press the Options key and choose Edit Track D...

Page 30: ...o Server on page 35 Deleting Albums and Tracks Press the Library key on your Audio Server remote control to display the Library Press the U V and T keys to navigate to the album or track you would lik...

Page 31: ...ums in the Library The font panel user interface is also capable of displaying a list of albums present in the Library of the Audio Server Press the front panel action button corresponding to the Albu...

Page 32: ...een will appear containing letters numbers and symbols Use the U V S and T buttons on the front panel to scroll down the list selecting characters to enter Use the Select action key on the front panel...

Page 33: ...hernet Settings If you have selected Ethernet as your chosen Internet Access method you will need to choose between DHCP and Static as the Ethernet Mode Select Edit Ethernet Settings and specify DHCP...

Page 34: ...aver The Audio Server is equipped with a screensaver which will activate when the unit remains idle for a specified period of time On this screen you may choose to disable the screen saver or alter th...

Page 35: ...8k VBR High Quality WMA 128k CBR and Standard Quality WMA 96k CBR as the Default Recording Quality used by both the TV and front panel user interfaces when recording a CD The Quick Record option allow...

Page 36: ...he ability to upload important diagnostic information to Xantech to assist in the event of a technical issue It is recommended that you do not attempt to edit this setting unless you are instructed to...

Page 37: ...e Macintosh Mac OS X 10 4 2 Safari 2 0 1 On the PC Microsoft Windows XP Service Pack 2 Microsoft Internet Explorer 6 0 2 Note Other operating systems and web browsers or earlier versions of the above...

Page 38: ...key to save this setting Provided that your Audio Server is connected correctly it should now be accessible by browsing the network from your computer Alternatively open Windows Explorer and type the...

Page 39: ...e found under the Edit menu on the Windows edition of iTunes and under the iTunes menu on the Macintosh version Select the Advanced tab Ensure that the option labelled Copy files to iTunes Music folde...

Page 40: ...o access your home network The Replace Back Up option can be set to True to overwrite any existing back up information in the specified location Network Back Up Press the JMenu key on your Audio Serve...

Page 41: ...006 007 009 013 014 015 016 079 CIHAN 009 CLARIVOX 108 033 047 CLATRNIC 017 CLATRONIC 001 002 003 004 005 006 007 008 009 119 013 014 015 016 158 097 018 151 CONDOR 001 002 003 004 005 006 007 031 00...

Page 42: ...39 042 059 HINARI 098 055 111 008 017 018 HIT 146 HITACHI 062 055 157 063 031 111 042 065 081 118 010 066 120 158 125 070 040 072 HYPER 031 151 ICE 001 002 003 004 005 006 007 008 009 017 013 014 015...

Page 43: ...2 003 004 005 006 007 009 013 014 015 016 097 ONCEAS 031 ONWA 008 017 151 ORAVA 001 002 003 004 005 006 007 009 013 014 015 016 ORBITER 086 ORION 098 001 002 003 004 005 036 006 007 111 008 009 010 01...

Page 44: ...014 015 016 077 SINUDYNE 098 003 146 081 SMARAGD 130 SOLAVOX 010 SONOLOR 166 010 SONOKO 007 018 SONTEC 001 002 003 004 005 007 009 013 014 015 016 SONY 052 053 054 055 056 057 058 SPECTRA 079 STARLIT...

Page 45: ...E 038 B K 045 046 CARVER 053 011 037 038 052 031 032 010 054 CINEMA SOUND 084 026 CLARION 090 DENON 083 084 085 095 096 091 092 097 089 FISHER 022 031 FOSGATE 005 GE 036 GOLDSTAR 035 HAFLER 039 HARMAN...

Page 46: ...efect delay in operation or transmission computer virus or line or system failure even if Imerge or its employees or agents are advised of the possibility of such damages losses or expenses Limitation...

Page 47: ...lity changes and enhancements to the Service i e feature upgrades or changes to our terms and conditions of use Will Imerge share any of your personal information Personal data will be collected proce...

Page 48: ...such activity is expressly permitted by applicable law notwithstanding this limitation SOFTWARE as a Component of the DEVICE Transfer This license may not be shared transferred to or used concurrentl...

Page 49: ...eans of the intended End User functions of this device You agree that you will use Gracenote Data the Gracenote Software and Gracenote Servers for your own personal non commercial use only You agree n...

Page 50: ......

Page 51: ......

Page 52: ...Part No PK00374 01 Copyright 2007 ImergeLtd XANTECH CORPORATION 13100 Telfair Avenue Sylmar CA 91342 3573 Phone 818 362 0353 Fax 818 362 9506 www xantech com...

Reviews: