


5
Remote Control Switchers
INSTALLATION – DEDICATED IR BUS SYSTEMS
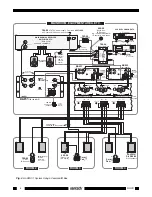
Fig. 4 illustrates an installation where each remote room has a
Dedicated IR Bus going to the RGC11 that
controls it. The IR bus is not connected in common as it is in Fig. 3. This eliminates the need for dedicated
remotes,
allowing you to carry the same remote(s) from room-to-room
.
It is configured as follows:
1. Again, for simplicity, only three RGC11's are shown. A practical limit would be six RGC11's "daisy-
chained" using the "LOOP THROUGH" jacks as shown. This places a load of 7.5k Ohms (45k Ohms
÷
6) on the REC OUT jacks (or other driving source) of the main room receiver, etc. Use a Xantech
AV-61 Distribution Amplifier when driving more than six. Each output of an AV-61 will drive as many
as six RGC11's.
2. Each of the remote rooms has a Dedicated IR Bus that connects to its own RGC11 for independent
volume control. Note that only the S (IR signal) and G (gnd) leads of the 4-conductor bus connect to
the RGC11's IR IN & G terminals and the 793 Serial Combiner. The remaining leads, ST (status), G
(gnd) and V (+12VDC) go on to the 789-44 for STATUS and +12VDC power.
3. In order to control the common source components in a Dedicated IR Bus system, it is necessary to
use a 793-00 Serial Control Combiner, connected as shown in Figs. 4 & 5. The 793 provides diode
isolation between the dedicated IR signal lines but allows common operation of the source equipment
through the 789-44 Connecting Block, as shown.
Set the LOGIC POLARITY SELECTOR DIP switches on the 793 for "active high" operation - that is
- all even numbered switches to "ON" - all odd numbered switches to "OFF".
4. The input and output ports on the 793 are 3.5mm mono mini jacks. Use matching mini plug cables
with stripped ends when connecting. Polarity must be observed as shown in Fig. 4 & 5.
For systems using more than five RGC11's, you will need additional 793-00's. These can be easily
"daisy chained" as shown in Fig. 5.
5. Since a Dedicated IR Bus system is used, each of the RGC11's can operate with the same IR Code
Group number. In this case, the Code Group number, as received from the factory, should be used.
NOTE: When shipped from the factory, the RGC11 (and MIRV1's) are set to code group number
30. Be sure to set the RC68+ (or RC68) to the same number!
If a particular system requires a code group number change, refer to the RC68+ Programmer
Instructions for code group setting procedures.
6. The desired volume commands from the RC68+ Programmer (see Fig. 2) need to be "taught" into
learning remote controls and keypads used in the system. You may use the Xantech URC-1 or URC-
2 learning remote controllers for this purpose.
7. A 490-30 "Micro Link" IR Receiver plugs into the 789-44 for local control of the source equipment.
8. As in Fig. 3, a "STATUS" system is included. See items 6 and 7 under: Installation - Common IR Bus.
NOTE:
When connecting system devices, be sure to carefully match up the terminals according to their
markings as follows:
IR IN or OUT (IR Signal), ST (Status), G (GND) and V (+12V DC).
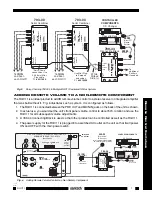
Daisy-Chaining 793-00 Serial Control Combiners for Control of Common Components
Fig. 5 illustrates how two 793-00 Serial Control Combiners are "Daisy-Chained" to accommodate additional
RGC11's in a dedicated IR Bus System. This process can be repeated as necessary to accommodate the
number of RGC11's needed in the system. Simply plug the "B" CONTROL OUTPUTS port of the added
793 into the "A" CONTROL OUTPUTS port on the preceding 793 with a 3.5-to-3.5mm mono-mini cable as
shown.
NOTE: Be sure that all ten LOGIC POLARITY SELECTOR DIP switches on each 793 are set correctly. In
this case, set them for "active high" operation - that is - all even numbered switches to "ON" - all odd
numbered switches to "OFF".
RGC11


