background image

21

• Arrange for defective power plugs and/or cables

to be replaced at once by qualified technicians
or our Customer Service Department.

• Get customer service to repair or replace con-

necting cables and/or devices that are not 
functioning properly or have been damaged.

• Only use the device in dry rooms.

NEVER submerse the device in water.
Wipe it only with a slightly damp cloth.

•  Make sure that liquids or objects are never able

to enter into the device.

• Do not place water-filled receptacles (e.g. flower

vases) on the device.

• Position the device close to an electrical wallsocket.

Make sure that the wall socket is easily accessible

• To avoid the risks of tripping, do not use an ex-

tension cable. In the event of danger, the plug
must be quickly and easily accessible.

• Do not open the housing or attempt to repair the

device yourself. Should you do so, device safety
can no longer be assured and the warranty will
become void. 
Repairs are to be carried out exclusively by a
specialist firm or the service centre.

Notice regarding separation from
mains-power

The 

POWER

switch does not completely disconnect

the device from the power network. Additionally,
the device consumes power when in standby-
mode. To completely separate the device from
mains-power, the power plug MUST be removed
from the wall socket.

Information regarding the handling
of batteries

The remote control requires batteries. For the handling
of batteries please observe the following:

Risk of explosion!

Do not throw batteries into a fire. Do not 
recharge batteries.

NEVER open batteries, NEVER solder or weld
batteries. 
The risk of explosions and injuries exists!

Regularly check the condition of the batteries.
Leaking batteries can cause damage to the 
device.

If you do not intend to use the device for an 
extended period, remove the batteries.

In the event of the batteries leaking acids, wear
protective gloves.

Clean the battery compartment and the battery
contacts with a dry cloth.

To avoid the risks of fire or injury:

• Do not place candles or other open fire sources

on the device.

• Do not use the device near hot surfaces.
• Do not place the device in locations exposed to 

direct sunlight. If you do, it may overheat and be-
come irreparably damaged. 

• To prevent heat build up, place the device at 

a location with adequate ventilation .

• Never cover the ventilation openings!
• Avoid any additional heat build up, e.g. direct

sunlight, heaters, other devices, etc.

• Keep children away from the connecting cable

and the device. Children frequently underestimate
the danger from electrical devices.

• Provide for a safe location for the device.
• Do not operate the device if it has sustained a

fall or is damaged. Arrange for the device to be
checked and/or repaired by qualified technicians.

Summary of Contents for MCD-4030

Page 1: ...Bedienungsanleitung Deutsch Seite 2 18 Instruction manual English Page 19 35...

Page 2: ...46 CD Betrieb 46 MP3 Betrieb 48 USB und Speicherkarten Funktionen 50 Reinigung 50 Entsorgen 50 Garantie und Service 51 Importeur 51 Lesen Sie die Bedienungsanleitung vor der ersten Verwendung aufmerk...

Page 3: ...nzbereiche Radio Radio MW AM 522 1620 KHz UKW FM 87 5 108 MHz USB Steckplatz Lesbare USB Speichersticks USB1 1 und 2 0 bis zu einer Kapazit t von 2 GB Speicherkartenfach Lesbare Speicherkarten SD 2 GB...

Page 4: ...se zum Umgang mit Batterien Die Fernbedienung verwendet Batterien F r den Umgang mit Batterien beachten Sie bitte Folgendes Explosionsgefahr Werfen Sie keine Batterien ins Feuer Laden Sie Batterien ni...

Page 5: ...ie gegebenenfalls eine rutschfeste Unterla ge unter die F e des Ger tes Gefahr Laserstrahlung Das Ger t verf gt ber einen Klasse 1 Laser ffnen Sie niemals das Ger t Versuchen Sie nicht das Ger t zu re...

Page 6: ...6 w q l 2 2 i u y t d s g 2 2 a f h j k o r e A B C D...

Page 7: ...7 E F G H I q w e r t y u i o s d f g j k h a...

Page 8: ...r I Konsolen Inbetriebnahme Ger t auspacken Entfernen Sie s mtliches Verpackungsmaterial Ent fernen Sie auch die Transportsicherung aus dem CD Fach Achtung Lassen Sie kleine Kinder nicht mit Folie spi...

Page 9: ...Befestigen Sie die Schrauben je nach Wand beschaffenheit mit Hilfe von D beln in der Wand 4 H ngen Sie die Mikroanlage Lautsprecher mit den Schl ssell chern an den Schrauben auf Batterien in die Fern...

Page 10: ...ne k nnen Sie die Mikroanlage mit einer Hausantenne verbinden Stecken Sie den Antennen Stecker der Hausan tenne in die Anschlussbuchse 75 OHM JACK an der Mikroanlage Kopfh rer anschlie en Sie k nnen a...

Page 11: ...htung anpassen Sie k nnen aus folgenden Einstellungen w hlen POP JAZZ FLAT CLASSIC ROCK Dr cken Sie so oft die Taste EQ bis im Display die gew nschte Klangeinstellung angezeigt wird Wenn Sie w hrend d...

Page 12: ...uge ben dr cken Sie die Taste TIMER Auf dem Dis play erscheint OFF und es blinkt die Stunden anzeige 10 Um die Stunden einzustellen dr cken Sie die Taste SKIP oder SKIP 11 Um die Einstellung zu speich...

Page 13: ...ie Taste SKIP Um die Empfangsfrequenz zu verringern dr cken Sie kurz die Taste SKIP Sender speichern Memory Sie k nnen Sender auf bis zu 45 Programmpl tzen 30 x UKW und 15 x MW speichern W hlen Sie ei...

Page 14: ...dem Display wird REPEAT1 angezeigt Um alle Titel einer CD zu wiederholen dr cken Sie die Taste REPEAT zweimal Auf dem Display wird REPEAT ALL angezeigt Um das Wiederholen zu beenden dr cken Sie die T...

Page 15: ...er CD wiederzugeben dr cken Sie zweimal nachein ander die Taste SKIP Titel Vorlauf und R cklauf Sie k nnen bestimmte Stellen innerhalb eines MP3 Titels wiedergeben Halten Sie w hrend der Wiedergabe di...

Page 16: ...r Taste SKIP oder SKIP den gew nschten Titel f r den Programmplatz 4 Um die Einstellung zu speichern dr cken Sie die Taste MEM CLK ADJ oder PROG MEM erneut Hinweis Um weitere Titel zu programmieren wi...

Page 17: ...use ausschlie lich mit ei nem leicht feuchten Tuch und einem milden Sp lmittel Achten Sie darauf dass bei der Rei nigung keine Feuchtigkeit in das Ger t gelangt S ubern Sie das Innere des Disk Fachs...

Page 18: ...unter http www x4 tech de Der Inhalt dieser Bedienungsanleitung kann ohne vorhergehende Ank ndigung ge ndert werden Alle genannten Marken sind Eigentum von X4 TECH oder der jeweiligen Rechtsinhaber X...

Page 19: ...MP3 Operation 30 USB and memory card functions 32 Cleaning 32 Disposal 32 Warranty and Service 33 Importer 33 Read the operating instructions carefully before using the appliance for the first time a...

Page 20: ...mV CD player Playback formats CD CD R CD RW Radio frequency ranges Radio MW AM 522 1620 KHz VHF FM 87 5 108 MHZ USB slot Readable USB memory sticks USB 1 1 and 2 0 up to a capacity of 2 GB Memory car...

Page 21: ...ST be removed from the wall socket Information regarding the handling of batteries The remote control requires batteries For the handling of batteries please observe the following Risk of explosion Do...

Page 22: ...n them If possible place an anti slip material under the feet of the device Danger Laser Beams This device is fitted with a Class 1 Laser Never open the device Never attempt to repair the device There...

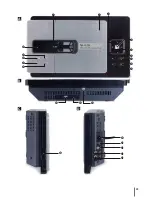
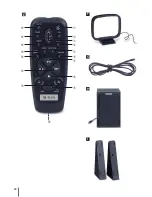
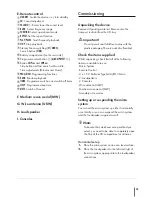
Page 23: ...23 w q l 2 2 i u y t d s g 2 2 a f h j k o r e A B C D...

Page 24: ...24 E F G H I q w e r t y u i o s d f g j k h a...

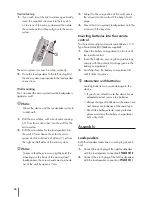
Page 25: ...cking the device Remove all packing material Remove also the transport restraint from the CD tray Important Do not permit small children to play with the plastic packaging There is a risk of suffocati...

Page 26: ...m 3 Subject to the composition of the wall secure the screws into the wall with the help of wall plugs 4 Mount the micro system loudspeakers onto the screws with the key slots Inserting batteries into...

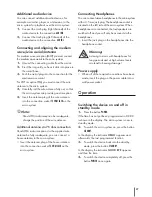
Page 27: ...ire antenna be fully inadequate you can connect a house antenna to the micro system Insert the antenna plug of the house antenna into the connection socket 75 OHM JACK on the micro system Connecting H...

Page 28: ...e sound setting You can choose between the following settings POP JAZZ FLAT CLASSIC ROCK Press the button EQ repeatedly until the required sound adjustment is indicated in the display If you adjust th...

Page 29: ...ton TIMER In the display appears OFF and the hour indicator blinks 10 To set the hour press the buttons SKIP or SKIP 11 To save the setting press the button TIMER once again The minute indicator for t...

Page 30: ...riefly press the button SKIP To lower the reception frequency briefly press the button SKIP Storing the stations memory You can save stations in up to 45 programme locations 30 x UKW and 15 x MW Selec...

Page 31: ...tton REPEAT In the display REPEAT1 is shown To repeat all the titles on a CD press the button REPEAT twice In the display REPEAT ALL will appear To end the repeats press the button REPEAT conti nuousl...

Page 32: ...title on the CD again double press the button SKIP Title forward reverse You can playback specific segments within an MP3 title During playback hold the button SKIP or SKIP pressed down until the spec...

Page 33: ...th the button SKIP or SKIP select the preferred title for the programme location 4 To save the programming press the button MEM CLK ADJ or PROG MEM once again Note To programme further titles repeat t...

Page 34: ...ousing only with a slightly moist cloth and a mild detergent Ensure that moisture cannot permeate into the device during cleaning If necessary clean the inside of the disc tray exclusively with a clea...

Page 35: ...4 tech de We reserve the right to alter specifications and information contained in this manual without notice All brands mentioned are property of X4 TECH or of their respective owners X4 TECH assume...

Page 36: ...36 www x4 tech de Version 1 0 7 2009...

Reviews: