16
Cordless Lawn Mower
EN
ASSEMBLY AND OPERATION
ACTION
FIGURE
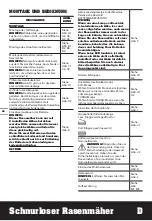
ASSEMBLY
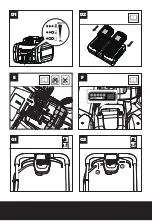
Assembling the handle bar
NOTE:
Choose one of the two holes in the
lower handle for desired handle’s height.
See Fig.
A1, A2,
A3, A4,
A5
Assembling the grass collection bag
See Fig.
B1, B2,
B3, B4
Fitting the grass collection bag to the lawn
mower
NOTE:
Take the mulching insert out of the
lawn mower before fitting the grass collection
bag.
NOTE:
Depress the grass collection bag
slightly to ensure that it is completely
installed.
See Fig.
C1, C2,
C3
Checking the battery charge condition
NOTE:
Fig. D1 only applies for the battery
pack with battery indicator light.
See Fig.
D1
Charging the battery pack
NOTE:
The batteries are shipped
uncharged. Each battery must be fully
charged before the first mow.
Always fully charge the two batteries at
same time. More details can be found in
charger’s manual.
See Fig.
D2
Fitting/Removing Battery
NOTE:
• This machine will only run when 2 bat-
teries are installed. Please always use
two batteries with the same capacity and
fully charge the two batteries.
• When you use two batteries with differ-
ent power, the machine will only run to
the lower common denominator.
See
Fig. E
OPERATION
Battery power indicator on the machine
See details in BATTERY STATUS part
IMPORTANT
When only one light is illuminated, at
least one battery is almost depleted
and needs to be charged, even though
the mower may still be capable of
cutting grass. Continuing to operate
your lawnmower with the battery in this
discharged condition may reduce the life
and performance of your battery.
When no light is illuminated, at least
one battery is not fully installed or
battery may be defective, please double
check the batteries are fully seated into
position.
See
Fig. F
Starting & Stopping
See Fig.
G1, G2
Selecting the INTELLICUT DIAL
ECO MODE
Set the Intellicut Dial to ECO mode when
mowing in everyday conditions, removing
approximately 25mm of grass at a time.
TURBO MODE
Set the Intellicut Dial to POWER mode when
cutting dense or overgrown grass.
See Fig.
H1, H2
Adjusting the Cutting Height
See
Fig. I
Grass Bag Filling Indicator
Empty status: flap floats (a)
Fully status: flap falls down (b)
See Fig.
J1
Removing/Emptying Grass Collection Bag
Warning!
Always check the safety
flap close the discharge outlet
before using. Never lift the safety
flap when the lawn mower is being used
without fitted grass collection bag.
See Fig.
J2
Installing the mulching insert
See
Fig. K
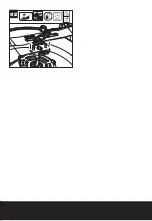
Rear Discharge
Note:
Remove the mulching insert firstly.
See
Fig. L
Storage
See Fig.
M1, M2
BATTERY STATUS (SEE FIG. F)
Before starting or after use, press the button beside
the power indicator light on the machine to check
the battery capacity. During operation, the battery
capacity will be indicated automatically by the battery
power indicator.
The indicator constantly senses and displays the bat-
tery condition as follows.
For the machine with 2 battery packs with different
power, the power indicator light displays the battery
condition with the lower one of the two batteries.
Battery power
indicator status
Battery condition
Five green lights
(
) are
illuminated.
The two batteries are in a
highly charged condition.
Two, three or four
green lights are
illuminated.
The two batteries have a
remaining charge. The more
lights are illuminated, the
more battery capacity.
Only one green
light (
) is
illuminated.
At least one battery is almost
depleted and needs to be
charged.
Summary of Contents for WG744E
Page 3: ...16 7 8 1 2 3 4 5 6 15 13 12 11 10 9 14...
Page 4: ...1 1 2 A5 B1 A1 A2 A4 A3...
Page 5: ...C2 B2 B3 C1 B4 C3 1 2 1 2 15 1 2 3...
Page 6: ...100 0 D1 F 17 E D2 G1 G2 1 2...
Page 8: ...N1 1 N1 2 N1 3 N2 1 N2 2 N2 3 19 18 M2 N2 O1 N1 L M1...
Page 9: ...O2...
Page 175: ......
Page 176: ...Copyright 2018 Positec All Rights Reserved AR01341001 www worx com www worx com...

