XP1010ST-BT(076-2934-6)
ASSEMBLY INSTRUCTIONS
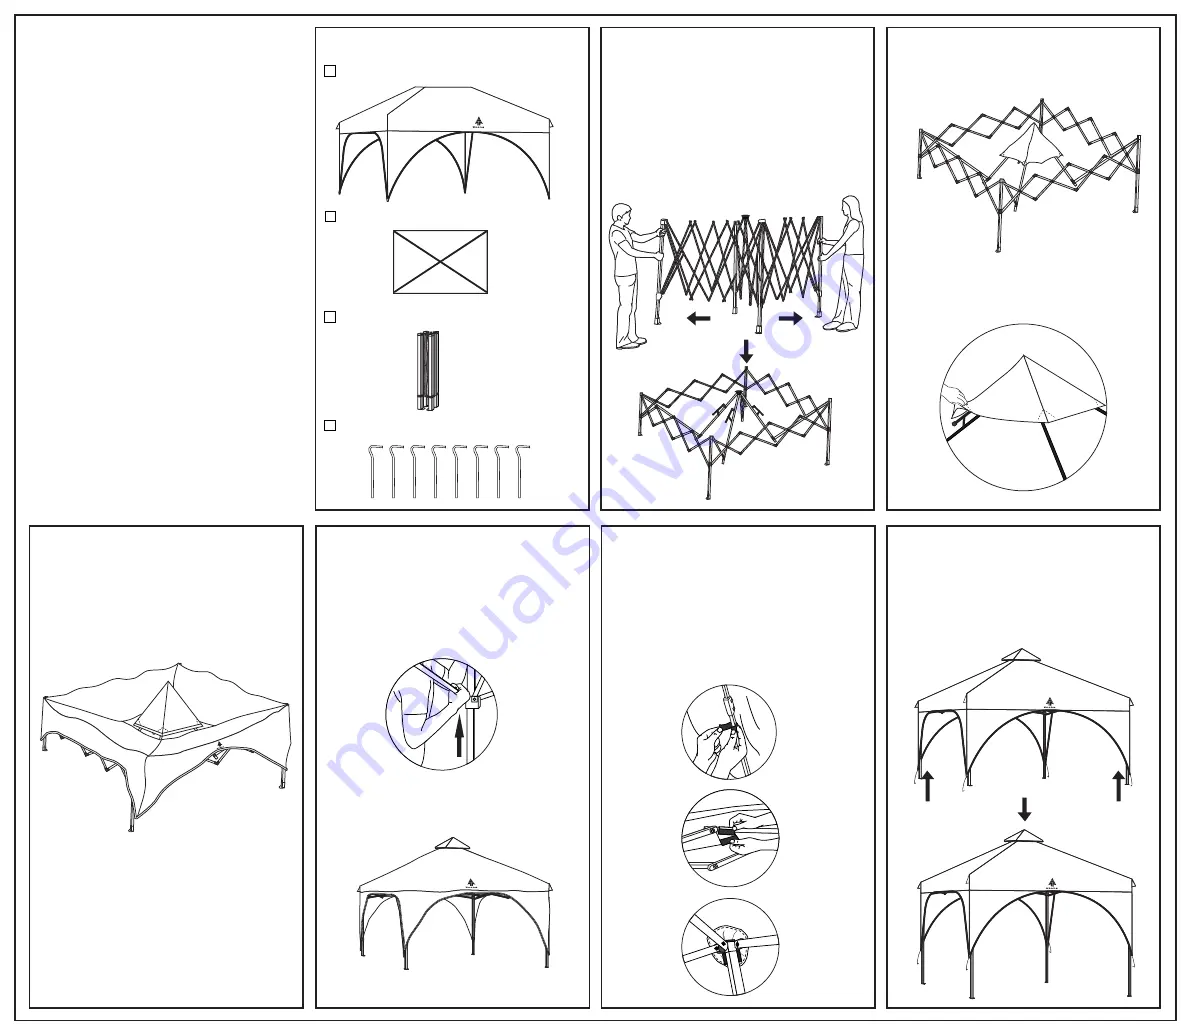
Step 1: Verify package contents
Canopy Main : 1 each
Step 2: Partially extend the gazebo frame
1) With two persons standing at diagonal
corners of the structure, grab a leg and
have one person stand in place with
the other walks the frame out partially.
2) Do not extend the legs at this time to allow
for ease of canopy placement.
Tent Stakes : 8 each
Frame : 1 each
Step 5: Fully extend frame
1) From opposite corners continue to fully
extend the gazebo frame.
IMPORTANT NOTES:
* THIS RECREATIONAL PRODUCT REQUIRES A
MINIMUM OF TWO PEOPLE TO ASSEMBLE.
* Avoid pinch points when opening and closing
the gazebo frame.
* Do not drop carry bag.
* Do not bounce bag on its end to remove
product, as these actions may damage the
frame.
* Select a level site clear of rocks, branches,
and other hard or sharp objects.
* Secure with all stakes and guylines provided
to prevent property damage or personal
injury.
* For best results in windy conditions, position
corner of gazebo into the wind.
1) On the underside of the canopy check
that roof frame is locked in place and attach
hook and loop fasteners.
1) On one side of the canopy then the other
extend the bottom leg poles downward
from the upper leg until silver button
clicks into place.
2) Check that all legs are locked in place.
Step 4: Attach main canopy
1) Place the main canopy over the roof frame.
2) Position the inner perimeter of the main
canopy under the small canopy frame.
Step 3: Attach small canopy
1) Position the small canopy over the centre
roof hub.
2) Place the reinforced pockets on the
underside of the canopy over the capped
ends of the arms.
XP1010ST-BT 10/16
Canopy Small : 1 each
IMPORTANT NOTES:
* THIS RECREATIONAL PRODUCT REQUIRES A
MINIMUM OF TWO PEOPLE TO ASSEMBLE.
* Avoid pinch points when opening and closing
the gazebo frame.
* Do not drop carry bag.
* Do not bounce bag on its end to remove
product, as these actions may damage the
frame.
* Select a level site clear of rocks, branches,
and other hard or sharp objects.
* Secure with all stakes and guylines provided
to prevent property damage or personal
injury.
* For best results in windy conditions, position
corner of gazebo into the wind.
2) On each leg, lift the sliding hub upward
locking the hub into place. Listen
for the “click”.
3) Position canopy corners over the top of
the legs.
2) Attach hook and loop fasteners along the
side walls.
3) Attach hook and loop fasteners around the
top of the leg poles.
Step 6: Fasten hook and loop fasteners
Step 7: Extend legs


