background image


20 


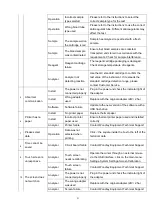
Operation 

The reagent 

cartridge is 

contaminated 

Verify that the sample type is correct. 

If the reagent cartridge or sample is taken out of 

the refrigerator, please leave to warm to room 

temperature before testing. 

Operation 

Wrong buffer tube 

is used 

Confirm the buffer tube is from the correct kit. 

Check buffer volume is correct. Check correct 

sample volume used. 

Operation 

Wrong blood tube 

type 

Please refer to the instructions to use the correct 

anticoagulant tube. Different anticoagulants may 

affect the test. 

Sample 

The sample well on 

the cartridge is red 

Sample haemolysed, repeat with a fresh sample 

Sample 

The blood sample 

was contaminated 

Ensure that blood samples are collected, 

transported and stored in accordance with the 

requirements. Check for sample interference. 

Reagent 

Reagent cartridge 

failure 

The reagent cartridge is damaged. Check 

temperature of reagents. 

Analyser 

Analyser not 

detecting C-line 

Use the QC standard cartridge to confirm the 

test value of the analyser. If it exceeds the 

standard cartridge detection range, please 

contact Customer Service. 


The test results 

are not accurate 

Operation 

The reagent 

cartridge was 

placed in the 

analyser too long 

after the sample 

was added 

There was a delay inserting the test cartridge 

into the analyser. 

Operation 

The reaction time 

after adding the 

reagent cartridge 

was too short 

If tested in instant mode, the sample was not 

incubated for long enough and the test result is 

abnormal. Please repeat and follow the correct 

test method. 

Operation 

The corresponding 

batch chip card 

was not read 

correctly 

Please ensure correct ID chip is used 

Operation 

Incorrect buffer 

used 

Please confirm the protocol for running a test in 

the reagent instructions. 

Check the buffer tube is from the correct kit. 

Buffer tubes of different tests should not be 

mixed. 

Is the buffer sample quantity correct? 

Is the buffer well mixed? 

Summary of Contents for InSight V-IA

Page 1: ...Veterinary Immunoassay Analyser User Manual...

Page 2: ...Testing 7 IV 4 Results Record Interface 8 IV 5 Item Interface 9 IV 6 Settings 10 V Quality Control 13 VI Further Product Information 13 VI 1 Security Classification of Medical Electrical Equipment 13...

Page 3: ...s I 3 Technical Specifications I 3 1 Main Parameters Software Version Version 1 LED or Diode laser Outputs 1 USB interface 4 2 Ethernet interface 1 3 Double serial port 3 1 Serial Port 1 Automatic LIS...

Page 4: ...Specifications Repeatability CV 10 Stability 8 Linear Correlation r 0 97 Accuracy n 15 II Contents No Accessories Quantity Remark 1 Power Adaptor 1 Included 2 Instruction for Use 1 Included 3 Etherne...

Page 5: ...st 5cm of clearance around the analyser 3 Connect the power adapter to the power interface of the analyser and turn on the power 4 Do not place any items on top of the analyser III 2 Instructions Plea...

Page 6: ...t touch the cartridge holder when it s moving Do not interfere with the software during testing III 3 2 After analysis 1 The test cartridge will be released from the analyser once the test is complete...

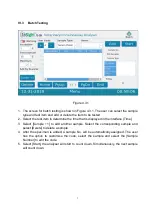
Page 7: ...re 4 1 there is a home Menu key at the bottom of all screens Click the Menu key and the screen in Figure 4 1 will display From left to right the screen will display Test Batch Testing History Record P...

Page 8: ...is recommended for routine testing Instant Test means the user needs to use a timer to countdown the reaction time before putting the cartridge in the analyser Once the timer has completed the user i...

Page 9: ...t is displayed in the interface Time 3 Select Sample 1 to add another sample Select the corresponding sample and select Delete to delete a sample 4 After the specimen is added a sample No will be auto...

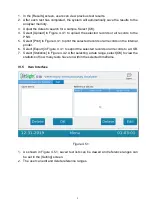
Page 10: ...8 IV 4 Results Records Interface Figure 4 4 1 Figure 4 4 2...

Page 11: ...in Figure 4 4 1 to print the selected records or all records on the internal printer 6 Select Export in Figure 4 4 1 to export the selected records or all records to a USB 7 Select Statistics in Figu...

Page 12: ...10 IV 6 Settings Figure 4 6 1 Figure 4 6 2...

Page 13: ...11 Figure 4 6 3 Figure 4 6 4...

Page 14: ...rt analysis once the system detects any test cartridge has been inserted 6 In Figure 4 6 3 to set the LIS settings the user first needs to input the correct IP address Please refer to document LIS Pro...

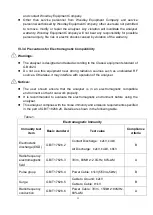
Page 15: ...s Class I Pollution grade is Class 2 Facility category overvoltage category is Class II VI 2 Contraindications No VI 3 Warnings Precautions and Limitations Notices For veterinary use only VI 3 1 Preca...

Page 16: ...e analyser cannot be used near instruments such as microwaves and any other high frequency equipment in order to avoid electromagnetic interference that may cause errors in operation VI 3 2 Precaution...

Page 17: ...rwise it may interfere with operation of the analyser Notices The user should ensure that the analyser is in an electromagnetic compatible environment so that it can work properly It is recommended to...

Page 18: ...rd limiting value B Function or performance is temporarily reduced or lost but can be self recovered C Function or performance is temporarily reduced or lost but requires operator intervention or syst...

Page 19: ...enerally refers to products with the specifications less than or equal to 4mm3 Table 4 Limitation Requirements for Toxic and Hazardous Substances Unit Mass fraction Classification Limitation Requireme...

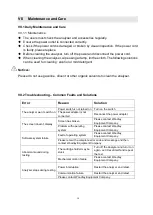
Page 20: ...The analyser won t switch on Power switch is not turned on Turn on the switch The power adapter is not connected Reconnect the power adapter The screen doesn t display Screen has broken Please contac...

Page 21: ...reagent cartridge is inserted into the cartridge holder correctly Reagent Reagent cartridge barcode unclear contaminated Barcode contaminated or damaged Repeat with new cartridge Analyser The analyse...

Page 22: ...damaged Check temperature of reagents Analyser Analyser not detecting C line Use the QC standard cartridge to confirm the test value of the analyser If it exceeds the standard cartridge detection ran...

Page 23: ...stall Wrong adapter used Replace with the original adapter 24V 2 5a Software Software failure Update to the new version of the software with a USB flash drive 6 Printer has no paper Install No printer...

Page 24: ...ey Equipment Technical Support 12 Analyser stopped during testing Analyser Power connection failure Check power connection and restart analyser Analyser Analyser failure Contact Woodley Equipment Tech...

Page 25: ...ing loading and transportation 3 Keep away from damp 4 Do not transport with flammable and corrosive substances Product trademark of InSight V IA Biological Hazards Avoid direct contact Attention plea...

Page 26: ...24 Old Station Park Buildings St John Street Horwich Bolton BL6 7NY UK Tel 44 0 1204 669033 Fax 44 0 1204 669034 Email sales woodleyequipment com Web www woodleyequipment com...

Reviews: