


-11-
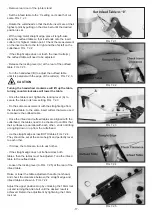
FIG.5.4.1
FIG.5.4.2
FIG.5.4.3
FIG.5.4.4
FIG.5.4.5
5.4 INSTALLING THE FENCE
Locate the Fence Mounting Bracket and four M8 x 45mm
Allen bolts.
The Fence Mounting Bracket attaches over the cut-
terhead pulley at the rear of the jointer top.
- Hold the Fence Mounting Bracket (A) over the
cutterhead pulley and align the mounting holes (B) to the
jointer base. FIG. 5.4.1
- Attach the Fence Mounting Bracket to the rear of the
jointer body by using the four M8 x 45mm Allen bolts.
FIG.5.4.2.
- Next locate the Fence Slide Bracket Assembly and rest it
on top of the Fence Mounting Bracket.
Secure using two M8 x 20mm Allen bolts and two 8mm
flat washers. FIG. 5.4.3
- Mount the Fence Angle Bracket (A- Fig. 5.4.3) to the
Fence Slide Bracket Assembly by using two M8 x 25mm
Allen bolts and two 8mm flat washers (B-Fig. 5.4.3).
The two M8 x 25mm Allen bolts and two 8mm flat
washers are pre-installed in the Fence Angle Bracket.
- Mount the Fence to the Fence Angle Bracket Assembly
by using two M6 x 20mm Allen bolts. FIG. 5.4.4
- Thread the Fence Tilt Handle on the rear of the Fence.
FIG. 5.4.5.
There are two threaded holes on the rear of the
Fence. Install the Fence Tilt Handle in the threaded
hole that is most comfortable and convenient for you.
CAUTION
CAUTION
A
B
8MM x 45mm Allen
Bolt (x4)


