background image

Continued

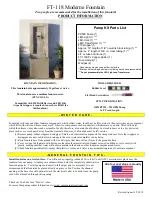
APPROVED LEAK TESTING METHOD 

You may check for gas leaks with the following methods only:

• Soap and water solution
• An approved leak testing spray
• Electronic sniffer

NOTE: Remove any excessive pipe compound from 
the connections. Excessive pipe compound can set 
off electronic sniffers. 


  OPERATING INSTRUCTIONS

Check for gas leaks in each of the following locations:

• Pipe from the gas supply line connection to the gas valve

Burner connections, pilot

Field made joints / gas shutoff valve

All joints on valve and control body

Factory made joints, each joint and connection

If  using  a  soap  and  water  solution  to  test 
for  leaks,  DO  NOT  spray  solution  onto 

electronic parts

.

WARNING

Never use an open flame to check for gas leak.

DANGER

1.

STOP! Read the safety information on previous page.

2. Turn off all electric power to the appliance.

3. Do not attempt to light the pilot by hand.

If you don't smell gas, go to the next step.

WARNING

7. Turn the gas control manual valve to the ON position.


8. Plug supplied 7V DC adapter into 110V power outlet.


LIGHTING  FOR  THE  FIRST  TIME 


5. Turn the gas control manual valve to the full OFF position.

6. Wait five (5) minutes to clear out any gas. Then smell for gas, including near the floor.

If you smell gas, STOP! Follow "B" in the safety information (see page 7).

9. Connect the wire to the DC input plug at the unit.


9

4. Remove an access cover from the appliance 

(

if applicable

).

Manual Shutoff Valve

in “ON” position 

Summary of Contents for SRP-N

Page 1: ...ation ope rating and maintenance instructions thoroughlybefore installing or servicing this equipment Do not store or use gasoline or other flammable vapors and liquids in the vicinity of this or any...

Page 2: ...hould be should not be hung from the appliance or placed on or near the appliance 6 Clothing or other flammable high surface temperatures and should stay away to avoid burns or clothing ignition trica...

Page 3: ...0 W C Max 13 0 W C Never light the appliance without CAUTION Do not remove the metal data plates attached to the Burner These plates contain important information 2 Install the Burner Assembly inside...

Page 4: ...t the clearances are met An enclosure with walls on all sides but at least one permanent opening at ground level and no overhead cover Within a partial enclosure that includes an overhead cover and no...

Page 5: ...FIREPLACE STANDARD ENCLOSURE ACCESSING FIREPLACE CONTROLS AND CERTIFICATION TAGS 5 Lift cover off the base and set aside providing access to the wiring harness remote receiver battery pack certificati...

Page 6: ...on all joints Bubbles forming show a leak Correct all leaks at once From Gas Meter 5 W C to 10 5 W C pressure The appliance and its individual shutoff valve must be discon nected from the gas supply...

Page 7: ...BTU h GAS TYPE NATURAL PROPANE ORIFICE SIZE BURNER PORTS PORT SIZE 1 8 1 8 MODEL TOP VIEW SRP N SRP P 46 46 14 24 3 25 9 5 SIDE VIEW FRONT VIEW 14 45 45 7 80 000 10 80 000 35 Specifications SERPENTINE...

Page 8: ...lectronic devices do not try to repair or modify the valve as it may result in a fire or explosion Call a qualified service technician if you have any safety concerns D Do not use this appliance if an...

Page 9: ...t for leaks DO NOT spray solution onto electronic parts WARNING Never use an open flame to check for gas leak DANGER 1 STOP Read the safety information on previous page 2 Turn off all electric power t...

Page 10: ...LATION AND OPERATING INSTRUCTIONS FOR SKYTECH MODEL 1001 T LCD A your service technician or gas supplier of the Receiver is in REMOTE 10 Locate Remote Receiver inside of the unit see Illustrated Parts...

Page 11: ...lycheckedassoonasthe unitis installed andperiodicallyduringnormaloperation The pilot flame must always be present when the fireplace is in operation or connected to the gas line with main shutoff Insp...

Page 12: ...to produce moderate levels of carbon soot where flames Burner is excessively noisy Note The movement and combustion of gas will create low unavoidable levels of noise Burner flame is too low or too hi...

Page 13: ...ce diameter is too small 4 Flame sensor leads disconnected 1 Pilot flame needs adjusting 1 Gas leak See Warning statement above 1 Gas leak See Warning statement above IMPORTANT Operating unit where im...

Page 14: ...FOR PART DESCRIPTION SEE NEXT PAGE ILLUSTRATED PARTS LIST 1 4 1 2 3 4 5 6 7 8 9 10 11 12 13 14 14 15 16...

Page 15: ...FOR PART DESCRIPTION SEE NEXT PAGE ILLUSTRATED PARTS LIST Continued BURNER GLASS MEDIA OPTIONAL STONES 17 18 TOPPING GLASS MEDIA optional LAVAROCK optional 20 19...

Page 16: ...Pilot Assembly 6 Volt Battery Backup uses 4 pcs AA Batteries 16 optional...

Page 17: ...arts used in your Serpentine All replacement parts should be ordered from your retailer or from Woodbridge Fireplace Inc at 1 905 799 5953 or on line at www woodbridgefp com 7 Gas Supply Flex Connecto...

Page 18: ...NOTES...

Page 19: ...NOTES...

Page 20: ...the defective components at no charge to the origi nal owner Woodbridge Fireplace will also pay for reasonable labor cost incurred in replacing or repairing such com Woodbridge Fireplace Inc 18A Stra...

Reviews: