background image


Step #3

: Open up the SIM holder (5) from right-to-left and insert an activate SIM card 

(which uses APN). Take care to the direction, the SIM card must be inserted from right 

side to the direction of the battery, and the SIM chip looks down, the cutted edge of 

the SIM is oriented to the Telit internet module. 

Close back the SIM holder’s cover.


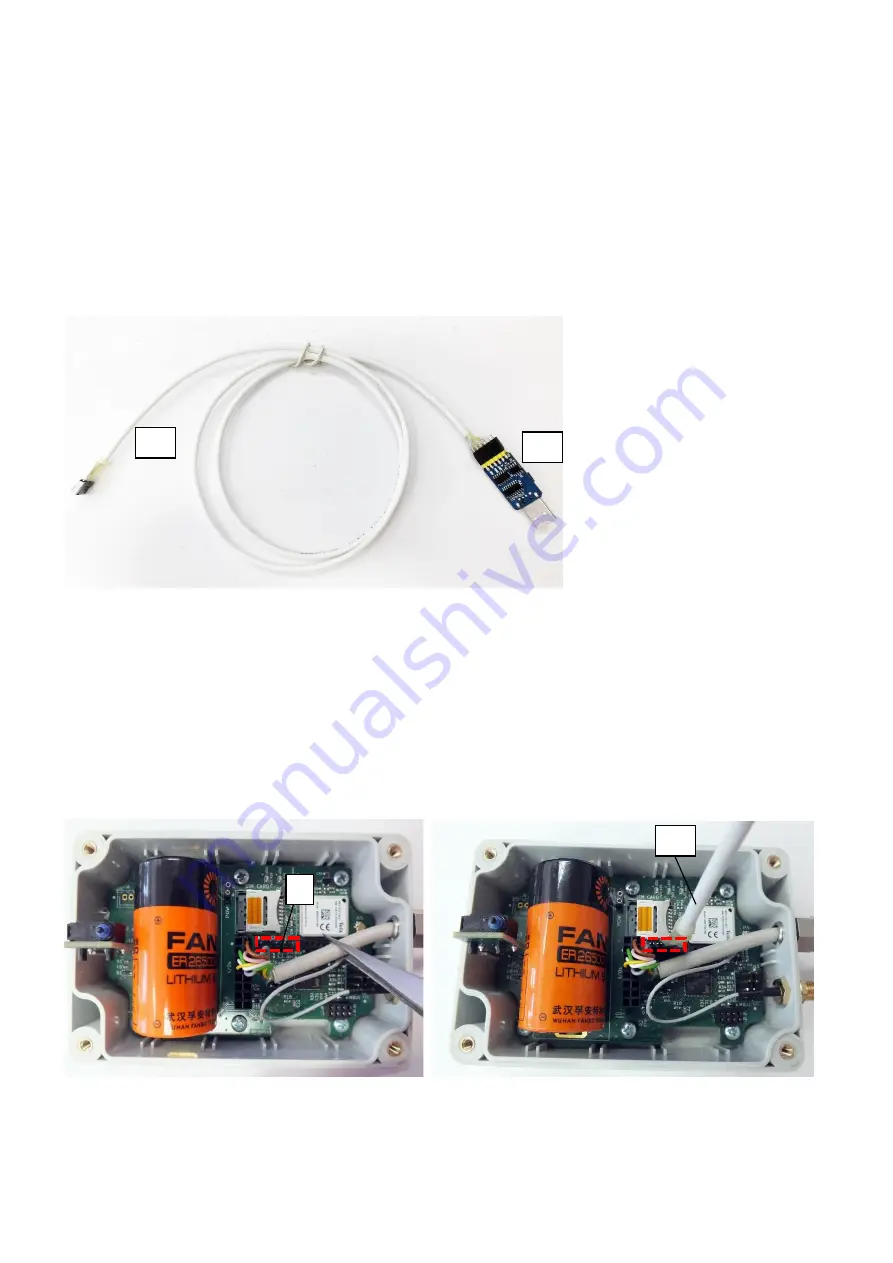
Step #4:

 The J12 interface connection can be used for local configuration and firmware 

refresh by using the configuration cable (17). 


Step #5: 

The configuration cable’s (17) black connector must be placed to

 the WM-I3 

mainboard’s 

J17 Connection interface (5-pins), according to the next photos. The black 

connector’s 1st pin is signed by a white mark, this side of the connector must be placed 

closer to the battery (oriented left on the photo). 


Step #6:

 For the serial connection to a computer you have to connect the 

USB UART 

Converter

 adapter (16) of the configuration cable to a PC.  

17


A


16 

17


A


7


A


Summary of Contents for WM-I3

Page 1: ...User manual for WM I3 metering modem v1 70 ___________________________________________________ 2022 08 17...

Page 2: ...se counter MBUS data collector and transmitter device Document Version REV 1 70 Hardware Type Version User Manual WM I3 metering modem Hardware Version V 3 1 Bootloader Version V 1 80 Firmware Version...

Page 3: ...on via pulse input S0 type or M bus order option of the connected meter Data is sent through LTE Cat M Cat M cellular networks to a central server or HES Head end System This smart water metering devi...

Page 4: ...bile network to a server IP address Therefore the collected and counted signals can be transmitted to the data center The device provides a SIM card independent and mobile operator independent solutio...

Page 5: ...configurable by local due to serial link and wiring or by remotely through the wireless network via TCP after configuring the APN username and password parameters by the hints of your mobile operator...

Page 6: ...ootstrap server Please consider this when you will install the LwM2M server for the WM I3 usage The description of the LwM2M protocol usage on the WM I3 can be configured by this LwM2M settings descri...

Page 7: ...ock by using the internal silicone ring inside of the cover 2 Enclosure top part can be fastened by 4 screws 3 Fixation screws of the enclosure to close and lock the top cover of the enclosure 6b Seal...

Page 8: ...b Sealed input cable Pulse MBUS with insulated wires 9 External SMA antenna connector 50 Ohm 14 Fastening point The enclosure can be fastened and fixed by screws here to mount the enclosure to a wall...

Page 9: ...type 5 SIM card slot for micro SIM 3FF type 6a Input cable connector to J11 for meter pulse output s S0 type 7 Connection interface for MBus additional board 5 pins marked by J17 8 Power ON pins 2 pin...

Page 10: ...cable nr 6a nr 5 PULS0_0 for signals of the 1 pulse input nr 2 PULS0_1 counting direction connect to use as normal Pinout for reverse measuring Active pins nr 5 PULS0_0 for signals of the 1 pulse inp...

Page 11: ...nnectors by the right direction as you can see on the next photo The MBUS add on board provides 36V capable MBUS port 13 where you can connect any MBus capable meter 2 8 Installation steps Step 1 Remo...

Page 12: ...connection can be used for local configuration and firmware refresh by using the configuration cable 17 Step 5 The configuration cable s 17 black connector must be placed to the WM I3 mainboard s J17...

Page 13: ...antenna to the external antenna connector 9 of the device Step 11 Install the device and fasten mount to wall near to the meter or mount to the wall of the water pit or the water pipe pipeline in a f...

Page 14: ...ellular network connection requesting network s signal strength value life signal or a failure LED1 CONNECTION GREEN LED2 SIGNAL STRENGTH BLUE LED3 FAILURE RED 2 10 Starting the device In case of addi...

Page 15: ...dule will be started and the SIM seems to be okay and the APN settings are properly configured the device will be able to connect to the Cat M Cat M NB IoT network and send the counted consumption dat...

Page 16: ...device you have to configure the APN settings of the active micro SIM card as PIN code APN APN username and password and the data storage periods NB IoT data transmitting interval and mode of data se...

Page 17: ...milar entry Push a right mouse click on the entry and choose the Refresh driver option Browse the directory of the extracted driver zip file and choose the directory and push to the OK Then the driver...

Page 18: ...WM ETerm exe file to start the configuration software Step 7 The configuration software will be started Push to the Login button Leave the Username and Password fields as they are filled Step 8 Then c...

Page 19: ...3 3 Setup the device connection Serial link Local configuration 1 Make serial connection with the USB UART Converter between WM I3 PC...

Page 20: ...ll appear There choose the right COM port according to the available USB serial port number 5 Click on the Save button to save the connection profile 3 3 Setup the device connection Remote configurati...

Page 21: ...ppears with the connection settings 4 Add the IP address of the LwM2M server that you already installed For the address server name can be also used instead of IP address 5 Also add the Port number of...

Page 22: ...t the Leshan server It is suitable for using it and communicate through this as a proxy Note that if you want to use this you have to add the LeshanSupervisor s address and its port number and the WM...

Page 23: ...mputer connects through the serial link to the WM I3 device 2 Open the Parameters read icon from the top menu of the screen to read out the operation parameters of the device 3 You can check the conne...

Page 24: ...ll load the listed and read out parameter values 7 Confirm the readout process by pushing the OK button on the left 3 5 Parameter modification of the WM I3 device 1 After the parameter readout now you...

Page 25: ...parameters as you want and push to the OK button Then select another Parameter group push to its Edit values and configure the parameters Repeat this until you will finish the configuration 4 You can...

Page 26: ...ilable again in the WM E Term 3 7 Cellular network settings You must configure the following fields for the proper operation at the Cellular network settings parameter group APN APN username APN passw...

Page 27: ...ept MO sleep period if the parameter above is enabled the cellular module accepts sleep and wake up switching on on the Narrow Band network from the Mobile Operator Module sleep tolerance min if we wa...

Page 28: ...ll be retrying 3 times to send the data to the destination address because the Narrow Band network is not available all the time Destination server protocol You can choose from GRF Grafana server TCP...

Page 29: ...can help you test the settings cabling data reception and data transmission We don t recommend to set too long interval because a long interval of LED operation would unnecessarily exhaust the batter...

Page 30: ...erval You can also monitor for the MIN limit by configuring the next parameters Min pulse amount value to alarm What is the low level of the min pulse number during the interval if it was not exceeded...

Page 31: ...r every 100 pulse when it will be exceeded the modem will send the current consumption value immediately Set the desired parameters and press the OK button 3 10 MBUS settings You can configure the fol...

Page 32: ...OK button 3 11 Alarm report settings You can configure the device s alarm report details in the Alarm report settings parameter group Battery status sending frequency you can define the frequency of...

Page 33: ...of detections if an alarm event will be detected it will be signaled immediately to the destination IP Detection event types can be Battery status alarm for tracking the battery status Digital input...

Page 34: ...he Tools menum Firmware update LwM2M item Then the following window appears Important Note that the LwM2M Leshan server must be running and connected to the network 2 Click on the Connect button and t...

Page 35: ...the priority 5 The maximum defer period means the delay of the firmware installation 6 Change the settings and click on the Upload the parameters button 7 Begin the firmware update by pushing the Sta...

Page 36: ...e router sticker and its information which contains important information for the call center Due to the support questions the product identifier is important for resolve your problem Please when you...

Page 37: ...he pictures in the user guide are only for illustration purposes WM Systems LLC does not confirm or accept responsibility for any mistakes in the information contained in the user guide The published...

Reviews: