10/16
ProphyCair & Pro
Version: 01
ENGLISH
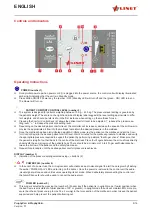
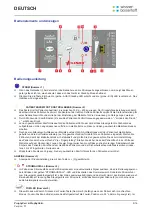
AUTO FOWLER. When the head section of the bed frame is articulated to greater than 35°, the unit will automatically enter
into fowler boost mode, without the caregiver’s or the patient’s intervention. Its activation is signified by the illumination of
the green LED adjacent to key number 5. In this mode the unit will maintain 80% more pressure than the set pressure (up
to max to 32 ± 5 mmHg) in the torso section of the mattress in order to keep the patient supported without the patient being
bottomed out. This is achieved by a low power wireless sensor in the mattress. The Auto Fowler is factory programmed to
a 35° angle. It uses a +3.6V Lithium battery that can be replaced using LINET part number 100622-S.
Should the Auto Fowler Boost function not be desired, it can be toggled ON/OFF by pressing the Fowler Key (number
5). Also, in the unlikely event that the sensor fails, this mode can be manually selected by pressing the (number 5)
Fowler key for when the patient is in any position.
MAX INFLATE (number 6)
Press MAX Inflate (6) key, the (green) LED will turn on. This mode is used to rapidly inflate the mattress. During this mode
a series of beeps will sound every 3 minutes as a reminder that MAX Inflate mode has been activated. During this mode,
the entire mattress will be pressurized to a pressure greater than Level 9. The mattress will inflate to its normal size within
120 seconds. MAX Inflate mode will deactivate after 15 minutes.
For rapid inflation of the mattress, press (number 6) “MAX Inflate” key (green LED turns on).
For extra firm support during patient ingress or egress, patient wound care, patient turning or patient cleaning it is reco
-
mmended to set the mattress pressure to maximum pressure by pressing (number 6) “MAX Inflate” key.
PROGRAM (number 7)
LOW AIR LOSS (LAL)
To set LAL mode, press Select key (number 7) until the “THERAPY” LED (LAL) lights up.
In LAL mode all the air cushions in the mattress will be maintained at the same pressure and can be adjusted to the
desired patient comfort control level.
PULSE (PT)
To set PULSE mode, press the Select key (number 7) until the “PULSE” LED (PT) lights up.
During Pulse mode, the pressure in each air cell will be decreased by 20% for 5 seconds and then increase to the prior
pressure setting for 30 seconds.
ALARM SILENCE (number 8)
Mutes the audio alarm. The green indicator will come on to remind the user that an audio alarm has been muted. This
indicator will go off if the mute is canceled by pressing the key a second time.
LOCK OUT (number 9)
Control unit functions (including power switch) can be completely locked out to prevent tampering of settings by simply
pressing and holding the Lock key until the light comes on (approximately 5 seconds). To deactivate, simply press and hold
the lock key until the light turns off. Activation and deactivation will be confirmed by a double audio tone.
Max Inflate mode is still functional in Lock Out mode.
LOW PRESSURE (number 10)
In the event of hose disconnection or other problem that causes major air leakage, this will activate an audio-visual signal to
alert the caregiver by flashing the amber “LOW PRESSURE” LED and turning on the audio alarm. Once the low-pressure pro
-
blem is fixed, the audio-visual signal will cease and the unit will resume its operating set mode. The audio alarm can be muted
using the Alarm silence key.
CPR
To deflate the mattress for a CPR procedure, hold down the grey connector latch and pull the hose from the control unit
connector. The audio and low pressure visual alarms will start. If required the audio alarm can be muted using the Alarm
silence key.
1
2


