2
XRN-1610/1610S/1610A/1610SA
USB
NETWORK VIDEO RECORDER
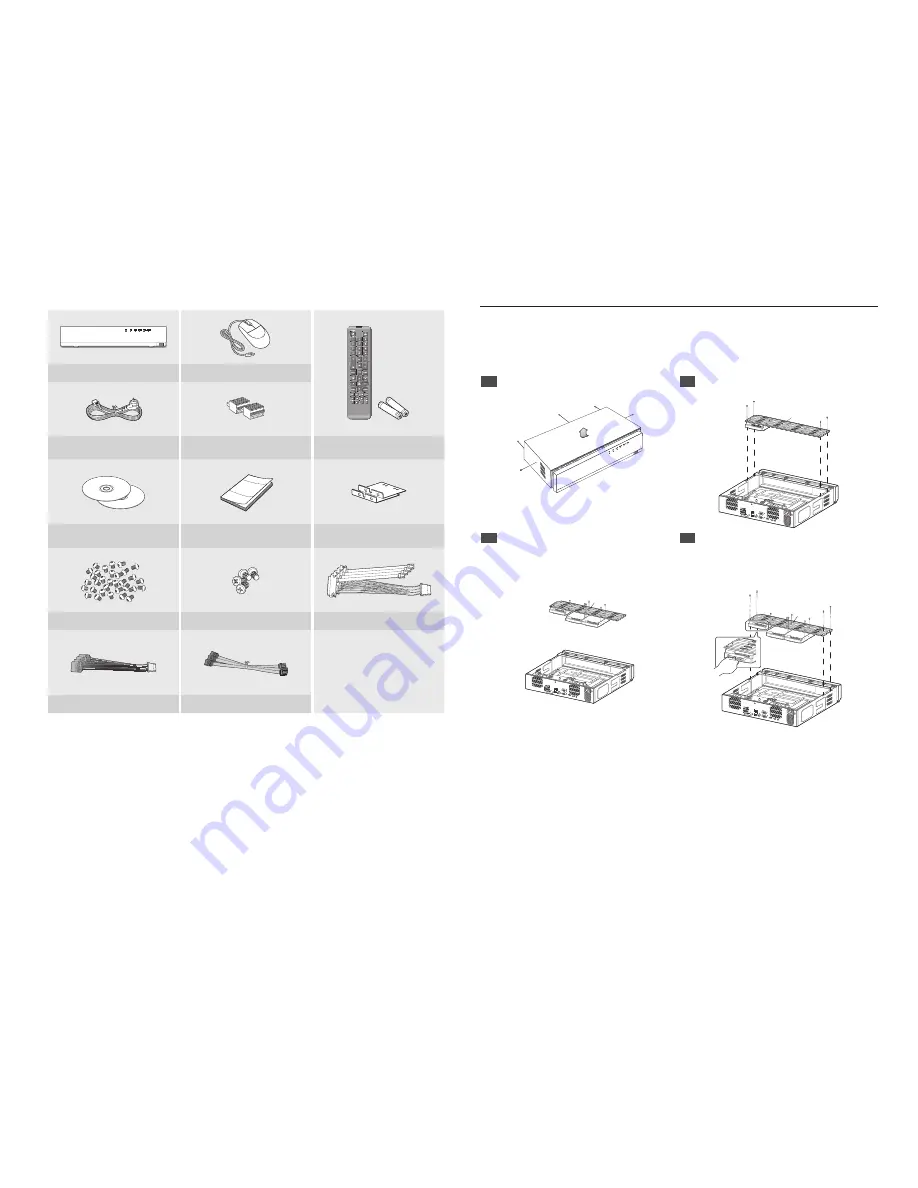
NVR
Mouse
Power Cable
Terminal block
Remote Control /
Remote Control Battery (AAA)
Network Viewer Software /
User Manual CD
User Manual or Quick Manual
Bracket Rack
HDD Fixing Screw
Bracket Fixing Screw
HDD SATA/Power cable (XRN-1610/1610A)
SATA Power Cable (XRN-1610S/1610SA)
SATA Data Cable (XRN-1610S/1610SA)
HDD Installation
J
`
If you are adding a new or previously used HDD to this product in addition to the HDD(s) originally installed, format the new
HDD manually in the set before use.
To learn how to format, see “
Device/Format
” in the Wisenet NVR User Manual.
XRN-2010/2010A/3010/3010A/1610/1610A/1610S/1610SA
1
Remove the screws located on the left/right side
and on the back side first, then remove the cover.
2
Remove the screws on the left/right side (4 screws)
and remove the bracket.
USB
HDMI
USB
eSATA
VGA OUT
RS-232C
AUDIO OUT
NETWORK
2
NETWORK
1
CONSOLE
1 2 3 4 5 6
7 8
NO
COM COM
COM COM
NC NO NO
NO
1
2
3
4
ALARM
IN
ALARM OUT
G
G
ALARM
RESET
Bracket
3
Mount HDDs to the bracket and fix it with screws.
4
Connect the cable to the HDD by matching the HDD
SATA/power cable number to the HDD position
number on the bracket.
`
For the HDD location number on the bracket, please refer to
the figure below.
HDMI
USB
eSATA
VGA OUT
RS-232C
AUDIO OUT
NETWORK
2
NETWORK 1
CONSOLE
1 2 3 4 5 6
7 8
NO
COM COM
COM COM
NC NO NO
NO
1
2
3
4
ALARM IN
ALARM OUT
G
G
ALARM
RESET
Bracket
HDMI
USB
eSATA
VGA OUT
RS-232C
AUDIO OUT
NETWORK
2
NETWORK
1
CONSOLE
1 2 3 4 5 6
7 8
NO
COM COM
COM COM
NC NO NO
NO
1
2
3
4
ALARM IN
ALARM OUT
G
G
ALARM
RESET
Bracket


