background image

4

Install Wizard

Select the language

Select your preferred language.

Set Password

Set a password.  

 Click   icon to see the password rule. Check the password setting rules.

2-1. Setting Camera Password

You can change the password of the camera one step.
If the password of the camera is the default password set in the factory, enter a new password to change it. The 

password will be changed, and the new password will be registered.
If the password of the camera is not the default password set in the factory, enter the current camera password. 

The current camera password will be registered.
- New Password : Input a new password according to the password setting rules.
- Confirm Password : Input the new password again.


`

A camera password registered with ONVIF and RTSP cannot be changed.

Set up Network


• DHCP server : If the DHCP server is set to enable, an IP is automatically assigned to the camera. 


• Network 1 (Camera) : Connects to the camera and receives the video feed from the camera.


• Network 2 (All) : Network for a remote viewer (SSM, Smart Viewer, Webviewer)


• Network 1 / Network 2 Setup 

- IP Type : Choose the network connection method. 

- IP Address, Subnet Mask, Gateway, DNS

 For more details on network settings, refer to the User manual.

► To use a simple intranet, click <

Next

>.


• Switch Mode : Set the camera registration method. This function is only available for products with PoE 

support. 

For products with PoE support, see “

NVR products supporting each feature

”. (Page 4)

 - PnP Mode : Camera connected to the PoE port of the product will be registered automatically on each 

channel in the order of the port number. 

This works only when camera is in factory reset state.

 - Manual Setup Mode : Automatically scans and registers camera connected to the product’s PoE and 

camera with separate switch.
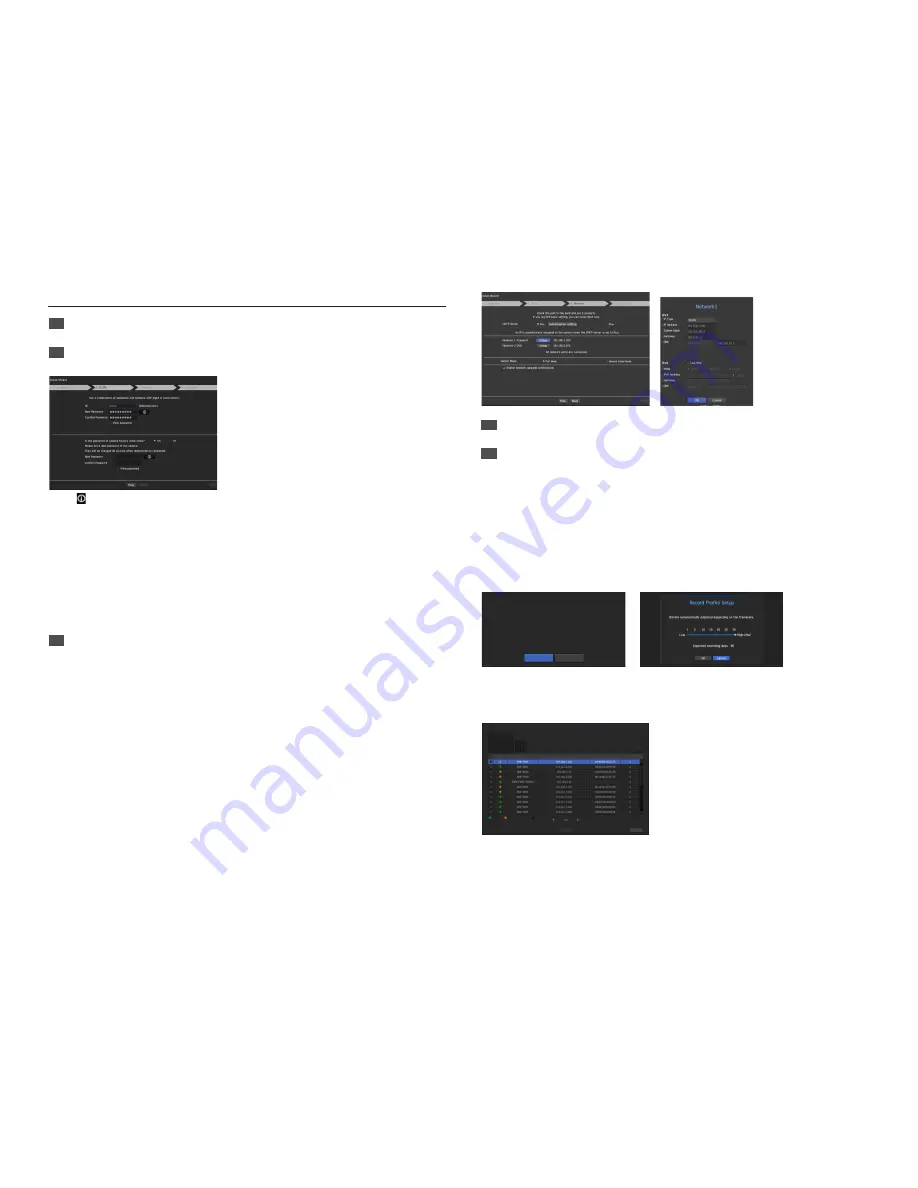
        

Set Date & Time

Set the time and date and click the <

Finish

> button, and the installation will be completed.

5

Camera Registration

When the installation wizard finishes, the camera is automatically registered.

5-1.  

When detected cameras are less than or equal to the number of channels supported by NVR, all the detected 

cameras are automatically registered and the registered camera information (fps and recording days) is 

displayed.

►  Select <

OK

> and the frame rate of all cameras registered is set to 30fps and the installation session is 

completed.

►  When you select <

Manual Setting

>, the frame rate of all cameras registered can be set to a value selected 

by the user (move to 5-2).

5-2. Adjust the recording framerate

Changes the recording frame rate for all cameras at once.  

Please note that the estimated recording days vary depending on the frame rate.

< Figure 5-2 >

< Figure 5-1 >

The number of camera registered is N.

Recording profile's framerate is changed to 30fps.

[Expected recording days : About 39 days]

Will you apply settings?

OK

Manual Setup

5-3.  

 If the detected cameras exceed the number of channels supported by NVR, select cameras to register 

manually and register them.
Select a camera to register and click the <

Register

> button. Once camera registration is finished, proceed in 5-1.

< Figure 5-3 >

After selecting a camera, press the register button.

Searched Cameras

Refresh

Status  

|


Model  

|


IP  

|


MAC  

|


Network  

|

Connected  Authentication errors 

Disconnected

Exit

Register

0/32

Camera Register

Summary of Contents for XRN-1610

Page 1: ...NETWORK VIDEO RECORDER Quick Manual XRN 2010 2011 2010A 2011A XRN 3010 3010A XRN 1610 1610S 1610A 1610SA ...

Page 2: ...k from the hard disk It also provides remote monitoring environment for video and audio over the network using a remote computer User friendly UI Supports a range of 4K camera resolutions 3840X2160 4096X2160 4000X3000 Outputs a 4K high definition image using HDMI Record and play video Record and play audio Supports ONVIF Profile S standard and RTP RTSP protocols Display the HDD operation status by...

Page 3: ...the left right side and on the back side first then remove the cover 2 Remove the screws on the left right side 4 screws and remove the bracket USB HDMI USB eSATA VGA OUT RS 232C AUDIO OUT NETWORK 2 NETWORK 1 CONSOLE 1 2 3 4 5 6 7 8 NO COM COM COM COM NC NO NO NO 1 2 3 4 ALARM IN ALARM OUT G G ALARM RESET Bracket 3 Mount HDDs to the bracket and fix it with screws 4 Connect the cable to the HDD by ...

Page 4: ... the HDD 2 Open the other bracket wide and remove it from the holder M M The procedure after HDD exchange is the same as the procedure for Installing the HDD 5 Mount the bracket on which an additional HDD is mounted on the NVR secure it with screws and connect the SATA power cable to the connector on the main board by matching the number For the connector numbers please refer to the figure below H...

Page 5: ...red automatically on each channel in the order of the port number This works only when camera is in factory reset state Manual Setup Mode Automatically scans and registers camera connected to the product s PoE and camera with separate switch 4 Set Date Time Set the time and date and click the Finish button and the installation will be completed 5 Camera Registration When the installation wizard fi...

Page 6: ...ign the IP manually Configuring the Recording This section outlines how to configure and view the recording settings for each channel a b c FULL NO SCSI Recording Restriction Record data size exceeded limitation Only key frames are recorded Please check the record settings Do not show this message again OK Record Status d a Shows the standard and event recording method for each channel FULL Record...

Page 7: ...hannel Bitrate Control You can change the bitrate of the selected channel Setting Up a Channel From the channel setup menu you can change the camera name shown in live mode Menu Device Camera Channel setup Parking lot Configure and run layout You can use the same layout set on the live screen for the Search Time function in order to perform a search using the channel sequence and combination confi...

Page 8: ...lick on the live screen and select Backup a Select a layout b Select a channel c Set the time device and format to back up d Click the Check capacity button to check if backup is possible e Click the Start button to proceed with the backup Use the basic guide Show shortcut menu Right click on the live screen and you can access various functions that NVR provides Hover over an icon and a brief defi...

Page 9: ...o the NVR products supporting each feature in the Wisenet NVR manual When using P2P service NVR can be used by connecting to mobile web viewer a When Enable P2P is checked the connection test runs to check if it can be remotely connected from the current NVR b When the connection is successful search for WiseNet Mobile from the smart phone and then install and run it When Add a device QR code is s...

Page 10: ...e in the European Union and other European countries with separate battery return systems This marking on the battery manual or packaging indicates that the batteries in this product should not be disposed of with other household waste at the end of their working life Where marked the chemical symbols Hg Cd or Pb indicate that the battery contains mercury cadmium or lead above the reference levels...

Page 11: ... 373 0124 www hanwhasecurity com Hanwha Techwin Europe Heriot House Heriot Road Chertsey Surrey KT16 9DT United Kingdom Tel 44 1932 57 8100 Fax 44 1932 57 8101 www hanwha security eu Hanwha Techwin Tianjin Co Ltd No 11 Weiliu Rd Micro Electronic Industrial Park Jingang Road Tianjin 300385 China Tel 86 22 2388 7788 www hanwha security cn Hanwha Techwin Middle East FZE JAFZA View 18 20th floor offic...

Reviews: