background image


8.4/ 10.4" Ultra-Rugged Tablet User Guide 

1.3 Handling and Maintenance 


General Guideline 

Guide Général


Keep the product at least 13 cm (5 inches) 
away from electrical appliances that can 
generate a strong magnetic field such as TV, 
refrigerator, motor, or a large audio speaker. 

[FR] Garder le produit au moins à 13 cm (5 
pouces) de distance des appareils électriques 
qui peuvent générer un fort champ magnétique 
comme une télévision, un réfrigérateur, un 
moteur, ou un important haut-parleur. 

Do not place heavy objects on top of the tablet 
computer as this may damage the display. 

[FR] Ne pas placer d'objets lourds sur le 
dessus de l'ordinateur tablette cela peut 
endommager l'écran. 

The screen surface can be easily scratched. 
Use with care. Do not use paper towels to 
clean the display but use the included cleaning 
cloth. Avoid touching it with a pen or pencil. 

[FR] La surface de l'écran peut être facilement 
rayée.  Utiliser avec précaution. Ne pas utiliser 
de serviette en papier pour nettoyer l'écran 
mais utiliser le chiffon de nettoyage inclus. 
Éviter de toucher avec un stylo ou un crayon.


To maximize the life of the backlight in the 
display, allow backlight to automatically turn off 
as a result of power management. Avoid using 
a screen saver or other software that prevents 
the power management from working. 

[FR] Pour maximiser la durée de vie du 
rétroéclairage de l'écran, autoriser le 
rétroéclairage résultant de la gestion de 
l'alimentation. Éviter d'utiliser un économiseur 
d'écran ou un autre logiciel empêchant la 
gestion de l'alimentation de fonctionner. 


Cleaning Guideline 

Guide de nettoyage


Use a soft cloth moistened with water or a non-
alkaline detergent to wipe the exterior of the 
product. 

[FR] Utiliser un chiffon doux humidifié avec de 
l’eau ou un détergeant non alcalin pour 
essuyer l'extérieur du produit. 

Gently wipe the display with a soft, lint-free 
cloth. Do not use alcohol or detergent on the 
product. 

[FR] Essuyer délicatement l'écran avec un 

chiffon doux non pelucheux. Ne pas utiliser 
d'alcool ou un détergent sur le produit.


Touchscreen Guideline 

Guide de l'écran tactile


Use your finger or the stylus on the display. 
Using sharp or metallic object may cause 
scratches and damage the display, thereby 
causing errors. 

[FR]Utiliser votre doigt ou le stylet sur l'écran. 
L'utilisation d'un objet pointu ou métallique 
peut provoquer des rayures. 

Use a soft cloth to remove dirt on the display. 
The touchscreen surface has a special 
protective coating that prevents dirt from 
sticking to it. Not using a soft cloth may cause 
damage to the special protective coating on 
the touchscreen surface. To clean off hard to 
remove dirt, blow some steam on the particular 
area and gently wipe away using a soft cloth. 

[FR]Utiliser un chiffon doux pour enlever la 
poussière sur l'écran. La surface de l'écran 
tactile a un revêtement protecteur spécial 
empêchant la saleté de se coller à lui. Ne pas 
utiliser un chiffon doux peut endommager le 
revêtement spécial sur la surface de l'écran 
tactile. Pour nettoyer les saletés plus difficiles 
à enlever, souffler de la buée sur la zone 
particulière et essuyer doucement avec un 
chiffon doux. 

Do not use excessive force on the display. 
Avoid placing objects on top of the display as 
this may cause the glass to break. 

[FR]Ne pas utiliser une force excessive sur 
l'écran. Éviter de placer des objets au dessus 
de 

l’écran cela pourrait provoquer une cassure 

du verre. 

When there is a noticeable discrepancy in the 
operation of the touchscreen function (your 
touch does not correlate to the proper location 
on the screen), recalibrate the touchscreen 
display. 

[FR]Lorsqu'il y a un écart sensible dans le 
fonctionnement de l'écran tactile (votre contact 
ne correspond pas à la bonne position sur 
l'écran), recalibrer l'écran tactile. 


Summary of Contents for R08IK8M-RTU1GP

Page 1: ...ons before operating the device and retain them for future reference 8 4 10 4 Ultra Rugged Tablet R08IK8M RTU1GP R10IK8M RTT2GP 7th Gen Intel Core i5 7200U Kaby Lake 2 5 GHz turbo up to 3 1 GHz User G...

Page 2: ...21 4 2 Shortcuts 22 4 3 Camera 22 4 3 1 Using Camera Features 22 4 3 2 Description of Camera User Interface Buttons 23 4 4 Device On Off 24 4 5 Using the Wireless LAN Wi Fi 24 4 6 Using the Wireless...

Page 3: ...y Note A note is used to emphasize helpful information Important An important note indicates information that is important for you to know Caution Attention A Caution alert indicates potential damage...

Page 4: ...y Pack Has Deteriorated Replace It with a New Battery Continued use of a damaged battery pack may result in heat generation ignition or battery rupture FR Lorsque la pile est d t rior e la remplacer p...

Page 5: ...ise de terre poss de deux lames et une troisi me qui est la terre Si la fiche principale fournie ne peut tre ins r e dans votre prise consultez un lectricien pour remplacer votre prise obsol te Use on...

Page 6: ...alin pour essuyer l ext rieur du produit Gently wipe the display with a soft lint free cloth Do not use alcohol or detergent on the product FR Essuyer d licatement l cran avec un chiffon doux non pelu...

Page 7: ...y energy and if not installed and used in accordance with the instruction manual may cause harmful interference to radio communications Operation of this equipment in a residential area is likely to c...

Page 8: ...sistive touch screen may be operated with ease by either a plastic stylus of fingertip The Ultra Rigged Tablet Computer packs WLAN Bluetooth GPS and WWAN function all into a single device The ultra ru...

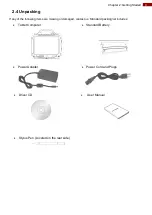
Page 9: ...Unpacking If any of the following items are missing or damaged contact us Standard packing list includes Tablet Computer Standard Battery Power Adapter Power Cord and Plugs Driver CD User Manual Styl...

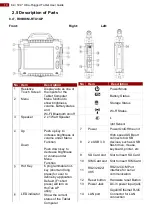
Page 10: ...utton Hardware reset Button 13 Power Jack DC in power input jack 14 LAN port Gigabit Ethernet RJ45 Connector for LAN connection No Item Description Resistive Touch Screen Display acts as one of the in...

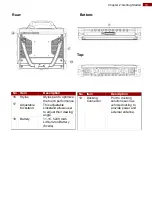
Page 11: ...rmance 16 Adjustable Kickstand This adjustable kickstand allows user to adjust their viewing angle 17 Battery 11 1V 5200 mAh Lithium Ion Battery 6cells No Item Description 18 Docking Connector Port to...

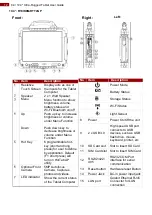
Page 12: ...in power input jack 15 LAN port Gigabit Ethernet RJ45 Connector for LAN connection No Item Description Resistive Touch Screen Display acts as one of the inputs for the Tablet Computer Speaker 2 x 1 Wa...

Page 13: ...rmance 17 Adjustable Kickstand This adjustable kickstand allows user to adjust their viewing angle 18 Battery 11 1V 5200 mAh Lithium Ion Battery 6cells No Item Description 19 Docking Connector Port to...

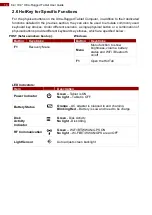
Page 14: ...hich are specified below POST before windows boot up Button Keystroke F1 Recovery Menu LED Indicators Windows Button Keystroke Menu Menu function to show brightness volume battery status and WiFi Blue...

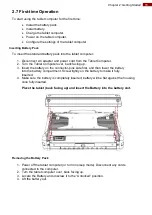
Page 15: ...ver back facing up 3 Insert the battery on the connector pins side first and then lower the battery into the battery compartment Screw tightly on the battery to make it fully inserted 4 Make sure the...

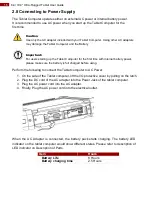
Page 16: ...ower please make sure the battery is full charged before using Perform the following to connect the Tablet computer to AC Power 1 On the side of the Tablet computer lift the I O protective cover by pu...

Page 17: ...ons screen or external keyboard mouse Powering Off Perform the following procedure to power off the Tablet Computer 1 Make sure you have closed any programs that are open on the Desktop Start Screen a...

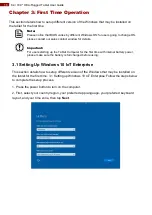
Page 18: ...ng up the Tablet Computer for the first time with internal battery power please make sure the battery is full charged before using 3 1 Setting Up Windows 10 IoT Enterprise This section details how to...

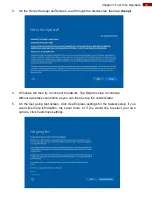
Page 19: ...hen try to connect to network Tap Skip this step to continue without a wireless connection as you can then set up the network later 5 On the Get going fast screen click Use Express settings for the fa...

Page 20: ...me password and Password hint in the fields provided then tap Next 7 The initial setup screens are complete and the desktop is displayed 8 Read any introductory screens describing features of your com...

Page 21: ...Button on the Front Panel Hottab Utility Icon The main user interface is located on the right side of the screen There are 4 main menu options Shortcuts Camera Device ON OFF and Settings Operations an...

Page 22: ...button of any saved slot to remove 10 Shortcut will be removed and once again show Empty to indicate slot is empty Tap on the button will hide the Hottab Utility Menu Using the Hottab shortcuts 1 Lau...

Page 23: ...n when taking pictures LED Flash fires automatically in low light condition when taking pictures 4 Resolution Pictures will be saved at resolution of 640 x 480 Pictures will be saved at resolution of...

Page 24: ...of the Wi Fi icon Item Status Color Description Wi Fi Orange Wi Fi is enabled White Wi Fi is disabled 4 If the Wi Fi feature is disabled white tap on the Wi Fi icon to enable it orange 5 Click the wi...

Page 25: ...the following procedures to insert the SIM Card into your Tablet 1 Power off the Tablet Computer 2 Open the I O Cover 3 Insert the SIM card in to the SIM Card slot located under SD Card Slot 4 6 2 Us...

Page 26: ...application 2 Tap on the Device ON OFF button 3 Check the status color of the GPS icon Item Status Color Description GPS Orange GPS is enabled White GPS is disabled 4 If the GPS feature is disabled wh...

Page 27: ...Settings button 3 Below show the items listed in Settings Menu 4 9 1 PC Information This section provides user device information in regards to BIOS Version EC Versions Hottab Versions OS Versions as...

Page 28: ...Long Press icon at the bottom of the utility window 6 Pick from list of preset applications by tapping on the application icons OR customize which application to execute using the picker Using the Cu...

Page 29: ...mended method because it has the effect of adjusting user interface element without having to move away from the optimal resolution setting Note Winmate recommends the users set the scaling to this se...

Page 30: ...e storage space and comes built in to each tablet computer Important Before starting the recovery process be sure to backup all user data as all data will be lost after the recovery process Follow the...

Page 31: ...ure data is backed up before recovery and click on Yes to continue 5 Wait till the recovery process to complete During the recovery process a command prompt will show up to indicate the percent of rec...

Page 32: ...e tablet computer closer to the access point or another wireless LAN device associated with it Check if your surroundings have interferences such as microwave ovens cordless phones Move the tablet com...

Page 33: ...et computer display to another monitor Make sure the VGA driver is installed Make sure the output setting selected is correct Barcode scanner does not emit laser beam and does not seem to work Make su...

Page 34: ...l Power Requirements Power Input 19V DC 19V DC Power Consumption 15W 15W Battery 11 1V 5200 mAh Lithium Ion 6cells 11 1V 5200 mAh Lithium Ion 6cells Operating Time Up to 8 hours Battery Mark V 4 0 1 U...

Page 35: ...Appendix B Dimensions and Schematics 8 4 R08IK8M RTU1GP Default Configuration 10 4 R10IK8M RTT2GP Default Configuration...

Page 36: ...Winmate Inc 9F No 111 6 Shing De Rd San Chung District New Taipei City 24158 Taiwan R O C www winmate com Copyright 2018 Winmate Inc All rights reserved...

Reviews: