9
REV A
OPM-136
PRE-START CHECKS
WARNING: PERSONAL INJURY
When working on or around these generators, do not wear loose fitting
clothing or any articles that may get caught in moving parts.
1. Visually inspect the generator. Check for:
A. Correct mounting
B. Physical damage
C. Debris in cooling vents and screens (could cause generator to
overheat)
IMPORTANT: The manufacturer recommends that, if the generator
has been stored for any length of time, before using it, the operator
removes the control box cover and cooling fan screen. Then inspect
the generator for rodent nests or other objects that could cause the
generator binding and/or overheating. See “cleaning portion of the
Maintenance section.
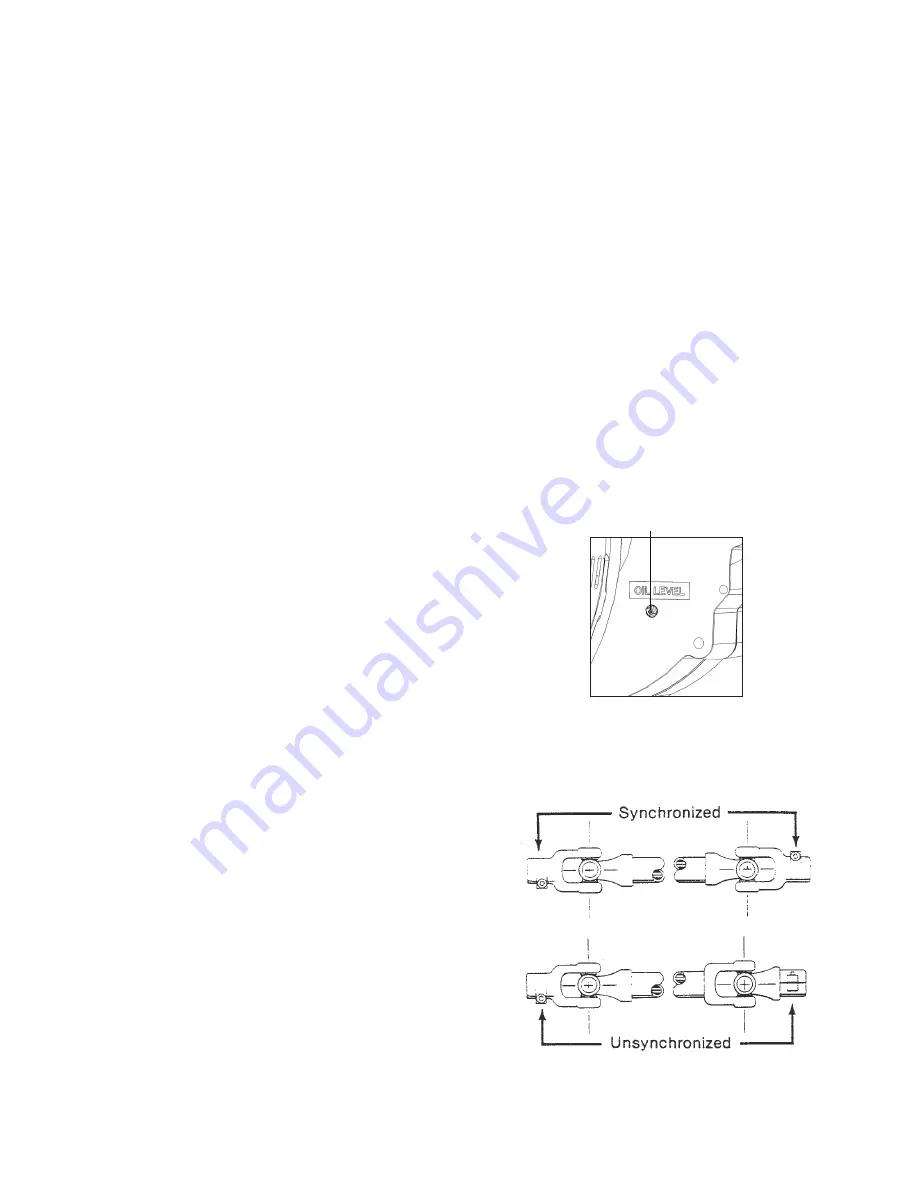
2. Check gearcase oil level by removing the plug located on the
backside of the gearcase marked “OIL LEVEL”. To refill oil, see
LUBRICATION in the MAINTENANCE section in this manual.
NOTE:
Either too little or too much oil can harm the equipment.
3. Make sure the drive shaft (tumbling bar) is assembled with its
universal joint knuckles “synchronized”. If the knuckles are not
synchronized, the bar will chatter when rotating, which will cause the
generator output voltage to flicker.
0" --
1
Oil Level Plug
Page 6
60706-199
1005-00
7. Check all electrical connections in the system to be ener-
gized by the generator. Make sure the connections are cor-
rect and are tight.
8. Make sure all loads are turned off. Do not start the genera-
tor under load.
GENERATOR STARTING PROCEDURE
1. With the power take-off drive disengaged, start the engine
which will drive the generator. Run the engine long enough
to warm it up before proceeding, so that it will run smoothly
and achieve full power under generator load.
2. With engine idling, engage the power take-off drive.
3. Watch the voltmeter on the generator and slowly increase
engine speed until the output reaches approximately 260
volts, in green portion of voltmeter scale.
4. With engine and generator running smoothly, switch on
the electrical load while watching the voltmeter.
NOTE: Equipment Damage
If the load includes motors turn them on one at a time, highest
starting current motor first, next highest second, etc.
Readjust engine throttle to keep generator output under load
at 240V (in green portion of voltmeter scale). If engine is
equipped with speed governor, it may automatically readjust
the throttle as the load changes and keep the generator output
at the proper level. However, some governors are not sensitive
enough to maintain proper output under changing load, and in
such cases the throttle will have to be manually readjusted .
GENERATOR SHUTDOWN PROCEDURE
1. Switch off electrical load.
2. Reduce speed of engine driving generator to idle.
3. Disengage power take-off drive, and allow generator to
coast to a stop.
WARNING: Personal Injury
Never try to manually stop the generator. Always let it coast
until it stops.
5. Shut off the engine.
4. Disconnect drive shaft (tumbling bar)
power take-off end first, then generator end.
Figure 6
Figure 7
3. Make sure the drive shaft (tumbling bar) is assembled with
its universal joint knuckles “synchronized,” as illustrated in
Figure 7. If knuckles are not synchronized, the bar will chat-
ter when rotating, which will cause the generator output
voltage to flicker.
DANGER: Personal Injury
POWER TAKE-OFF MUST BE DISENGAGED AT THIS TIME.
4. Couple the tractor to the generator with the drive shaft (tum-
bling bar). Couple the tumbling bar to the generator input
shaft first, then to the power take-off shaft. Check align-
ment, tractor, power take-off shaft (tumbling bar), and gen-
erator input shaft should form a straight (or nearly straight)
line, with less than 15° misalignment between the shafts.
Misalignment will cause generator output voltage to flicker.
CAUTION:
Make sure that all tumbling bar lock pins are engaged and
that all safety shields are in place before operating the PTO
generator.
5. Make sure no binding exists in generator or gear box. If
binding is found, locate the cause and correct it before pro-
ceeding.
6. Make sure that the electrical loads to be driven by the gen-
erator will not draw more current than the ratings of the
generator receptacle or cord set which will supply the cur-
rent.
OPERATION
OUTPUT POWER AVAILABLE AND LOAD DETERMINATION
Before using the generator, read and understand the following
information.
Generator output current (amperage) is internally limited by three circuit
breakers. If too much demand is placed on a generator output (if you
try to drive too many motors with it, for example), one of the circuit
breakers will trip, cutting off the output in order to protect the generator.
A 20 Amp push-to-reset circuit breaker protects the 120V duplex
receptacle output circuit. 20 Amps is the total limit for both outputs
of the duplex receptacle. The 480V is equipped with the Anderson
receptacle only.
A 50 Amp toggle circuit breaker protects the 240V receptacle output
circuit. The 480V is equipped with the Anderson receptacle only.
A large two pole (three pole for three phase) switch type main circuit
breaker protects the generator windings and output circuits, including
the load disconnect receptacle outputs. The load disconnect receptacle
is the largest gray receptacle on the generator output panel.
To aid in determining how much load can be applied to the generator,
and how it should be distributed among the generator output
receptacles, the following formulas may be useful. Get load voltages,
current, and wattage from the nameplates on the equipment in the
load.
Load current (in Amps) x Load voltage = Load wattage
Amps x Volts = Watts
Watt/1000 = kW
Load wattage / Load voltage = Load current (in Amps)
Example: 250W, 120V floodlight load: 250W / 120V = 2 Amps
NOTE:
Electric motors require more current to start than to run. Commonly,
the current rating given on a motor nameplate is the full load (running)
current required by the motor, not its starting current, which is a lot
higher. Motor starting current requirements vary greatly, by motor size
and type. Repulsion-induction type motors are the easiest to start,
typically using 1 1/2 to 2 1/2 times as much current to start as to run.
Capacitor type motors usually require 2 to 4 times as much current
to start as to run. Split-phase type motors are the hardest to start,
normally using 5 to 7 times as much current to start as to run.


