background image

williamsjettenders.com

williamsjettenders.com

English

Thank You for  

Choosing a Williams Sportjet

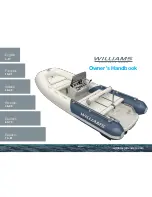
This owner’s handbook has been compiled to help you operate your Sportjet with safety and 

pleasure. It contains details of the boat and equipment fitted, together with information on its 

operation and maintenance. Please read it carefully and familiarise yourself with the boat before 

using it.
The Williams Sportjet uses water jet propulsion. If this is your first boat or you are changing 

to a type of boat you are not familiar with, please ensure that, for your own safety you obtain 

handling and operating experience before assuming command of the boat. Maneuverability 

is restricted while decelerating. Your dealer, national sailing federation or yacht club will be 
pleased to advise you of sea schools, or competent instructors.

The Sportjet is a high performance boat. We recommend that a minimum standard of 

RYA level 2 or ICC (International Certificate of Competency) is attained by the operator 

prior to taking control of this boat. This manual assumes the operator has acquired 

this standard of qualification and possesses knowledge of basic seamanship.

On handover your Williams Sales & Service Centre will guide you through the operating 

functions and safety features of the boat. Remember to complete and submit your 

warranty registration form either by post or online at williamsjettenders.com/warranty_

submission. Make a reference of the boat’s HIN in the box below. Please keep this 

handbook in a secure place and hand it to the new owner if you sell the boat.

    Hull Identification Number (HIN):

The HIN is located on the right hand side of the transom face below the platform step. Record 

it in the box above. 

Safety

Williams Performance Tenders consider the safety of our customers of great importance. We 

recommend people using our products exercise care and common sense, and comply with the 

safety information within the Owner’s Handbook. 
Always obey the safety labels fitted to the tender and replace them if they become unreadable.
Be aware of local laws and restrictions and never use whilst under the influence of alcohol or 

any substance which may affect your judgement. 

This symbol appears on a number of labels fitted to the Tender.  

The symbol draws your attention to the message and refers you to the Owner’s 

Handbook. 

This safety alert symbol appears throughout the Owner’s Handbook and appears on 

various labels fitted to the tender. It means attention, be alert, your safety is involved! 

Please read and abide by the message that follows the safety alert symbol.

DANGER


Indicates a hazardous situation which, if not avoided, will result in death or serious injury. 

WARNING


Indicates a hazardous situation which, if not avoided, could result in death or serious injury.

CAUTION


Indicates a hazardous situation which, if not avoided, could result in minor or moderate injury.

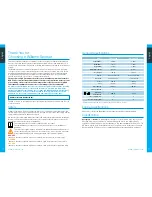
General Specifications

Model

Sportjet 460

Sportjet 520

Length (OA)*

4.60 m

5.20 m

Beam (OA)*

2.01 m

2.01 m

Height (OA)

1.40 m

1.40 m

Draft (fully loaded)

0.42 m

0.42 m

Dry weight

550 kg

595 kg

Engine

Rotax 4-TEC 150

Rotax 4-TEC 200

Top speed

48 mph/77 kph

52 mph/84 kph

Power

150 hp

200 hp

Fuel

Petrol

Petrol

Fuel capacity

100 litres

100 litres

Seating capacity

5

7

Maximum  

load capacity

600 kg

750 kg

Tube compartments

5

5

Design category (CE)

C

C

*Tolerance in length and beam due to variation in tube pressure, allow 1% tolerance.

Engine Specifications

Please refer to the Rotax Engine Operator’s manual for all engine-related information.

Classification

Category C – “inshore”

: Craft designed for voyages in coastal waters, large bays, estuaries, 

lakes and rivers, where conditions up to and including wind force 6 and significant wave 

heights up to and including 2m may be experienced. 

This boat complies with ISO 6185-3. 

The 

CE plate is located in the starboard rear footwell. The CE plate is the certification to European 

Directive 94/25/CE. This boat is also compliant with US Coastguard and ABYC regulations.

English

4

5

+

Summary of Contents for SportJet 460

Page 1: ...williamsjettenders com Owner s Handbook 460 ...

Page 2: ...English 4 17 Français 18 31 Italiano 32 45 Hrvatski 46 59 Deutsch 60 73 Español 74 87 Owner s Handbook williamsjettenders com ...

Page 3: ...the safety information within the Owner s Handbook Always obey the safety labels fitted to the tender and replace them if they become unreadable Be aware of local laws and restrictions and never use whilst under the influence of alcohol or any substance which may affect your judgement This symbol appears on a number of labels fitted to the Tender The symbol draws your attention to the message and ...

Page 4: ... not leave the Sportjet moored for extended periods as this may result in an accumulation of marine growth and a loss of performance Beaching CAUTION DO NOT operate in less than 0 95 m 3 ft of water as debris may enter the jet unit DO NOT drive Sportjet onto beach Stop engine before beaching as damage to pump engine cooling may occur After beaching move boat into deeper water and rock from side to...

Page 5: ...e with temperature Inflate tubes in sequence to 250 mB 3 6 psi Failure to observe this will compromise the sea keeping ability and watertight integrity of the boat Inflation valves are fitted with quarter turn locks to enable rapid deflation CAUTION Tubes must be inflated in the correct sequence to prevent over inflation Set valves to shut and inflate tubes evenly starting at rear right rear left ...

Page 6: ... located next to the jet pump on port side Do not open water tap 3 Start engine and immediately open the water tap 4 Run engine for 20 seconds at fast idle between 4000 and 5000rpm 5 Ensure water flows out of jet pump whilst flushing Otherwise contact your authorized Williams Dealer 6 Close the water tap then stop the engine 7 Apply a coating of XPS lube to exposed pump parts Boat System Arrangeme...

Page 7: ...engine oil level When topping up do not use synthetic oil follow engine manufacturer s recommendations Engine must be at running temperature when checking oil level 3 Check coolant level 4 Flush open loop cooling system 5 Apply a good quality marine grease containing Teflon e g Quicksilver 101 to all control cables both under the helm and at the pump 6 Check bilges for water ingress oil or fuel co...

Page 8: ...of distilled water to propylene glycol provides sufficient frost protection to approx 37 C Engine Oil Change It is important to change the oil Used engine oil contains water unburned fuel and small metal particles When old oil is left in the engine for longer periods corrosion and degradation of bearings within the engine may occur Conserving the Cylinders Unscrew the spark plugs and fill approx 1...

Page 9: ...istration d all components fitted to the boat at the Williams factory or subsequently replaced under warranty shall be free from defects in material and workmanship for a period of 2 years from the date of the original registration The warranty period for commercial use owners will be 4 months from the date of original registration The obligation of Williams under this Limited Warranty is limited ...

Page 10: ...i vous devez remplacer une pièce comportant une étiquette veuillez vous assurer de commander l étiquette fixée à cette pièce en commandant la pièce et l étiquette en même temps Soyez au courant des lois locales et des restrictions et ne jamais utiliser sous l influence de l alcool ou toute autre substance qui peut affecter votre jugement Ce symbole apparaît sur un nombre d étiquettes fixées à l em...

Page 11: ...sur la Plage ATTENTION NE PAS manœuvrer dans moins de 0 60m d eau car du sable des graviers ou des algues pourraient entrer dans la turbine NE PAS accoster sur la plage avec le moteur en marche Coupez le moteur avant d accoster car cela pourrait endommager la turbine et boucher le circuit de refroidissement moteur En repartant poussez le bateau en eau plus profonde et balancez le d un coté à l aut...

Page 12: ... ou en plastique La corrosion des pièces métalliques Des dommages aux pièces internes du moteur Avant Utilisation La pression du tubulaire varie en fonction de la température de l air Gonflez les compartiments du tubulaire à 250mB 3 6psi en suivant l ordre indiqué sur les valves Ne pas respecter cette procédure compromettra la tenue en mer et l étanchéité totale du bateau Les valves de gonflage on...

Page 13: ... l eau circule au niveau de la pompe injecteur lors du rinçage Sinon contactez votre revendeur Williams agréé 6 Fermez le robinet puis arrêtez le moteur 7 Appliquez un enduit lubrifiant XPS sur les composants de la pompe qui sont exposés Voyants d Alarme ATTENTION Risque d endommagement du moteur Dans le cas où un voyant d avertissement ou un avertisseur sonore s active pendant l utilisation ARRÊT...

Page 14: ...eur voir section Verification du Niveau d Huile 3 Vérifiez le niveau de liquide de refroidissement 4 Rincez le circuit de refroidissement ouvert voir section Apres Utilisation Procedure de Rinçage 5 Appliquez une graisse de bonne qualité contenant du Téflon e g Quicksilver 101 sur tous les câbles de commande coté boitier et coté turbine 6 Vérifiez qu il n y ait pas d entrée d eau de fuite d huile ...

Page 15: ...mélange antigel 50 50 pour rincer le circuit de refroidissement ouvert en utilisant l embout de rinçage et un bac de récupération adapté Remplacement de l Huile Moteur Il est important de remplacer l huile L huile moteur usagée contient de l eau du carburant non brulé et de petites particules de métal Quand de l huile ancienne reste dans le moteur pour de longues périodes corrosion et dégradation ...

Page 16: ...tion pendant une période de 3 ans à compter de la date d enregistrement initial c la coque en fibre de verre n aura aucun vice de matériau et de fabrication pendant une période de 2 ans à compter de la date d enregistrement initial d tous les composants installés sur le bateau à l usine Williams ou remplacés par la suite sous garantie n auront aucun vice de matériau et de fabrication pendant une p...

Page 17: ...ute in questo manuale e sulle etichette di sicurezza dei tender È necessario mantenere le etichette in buone condizioni e rimpiazzarle se dovessero diventare illeggibili Inoltre se si desidera sostituire un componente che reca un etichetta è necessario ordinare anche l etichetta attaccata al componente nello stesso ordine del componente Essere a conoscenza delle leggi locali e restrizioni e non us...

Page 18: ...na riducendo le performance del tender Spiaggiare CAUTELA NON navigare in acque meno profonde di 0 95m poiché rifiuti alghe o sabbia potrebbero entrare nella pompa idrogetto NON pilotare il tender fino alla spiaggia Spegnere il motore prima di spiaggiare poiché si potrebbero danneggiare la pompa idrogetto ed il sistema di raffreddamento Dopo aver spiaggiato allontanare il battello fino a raggiunge...

Page 19: ...metallo Danni ai pezzi interni del motore Prima dell Utilizzo La pressione dei tubolari fluttuerà con il variare della temperatura Gonfiare i tubolari in sequenza a 250 mB 3 6 psi La non osservanza di questa norma comprometterà la tenuta al mare e l isolamento dall acqua del tender Sono state installate valvole di gonfi aggio con chiusura ad un quarto di giro per permettere uno sgonfi agio rapido ...

Page 20: ...pa del getto mentre si effettua il risciacquo In caso contrario contattare il proprio concessionario autorizzato Williams 6 Chiudere il rubinetto dell acqua quindi spegnere il motore 7 Applicare uno strato di lubrificante XPS alle parti esposte della pompa Spie Luminose CAUTELA Rischio di danni al motore Nel caso che la spia di allarme o un allarme acustico si attivi durante l uso ARRESTARE immedi...

Page 21: ... acqua dolce per rimuovere eventuali residui di sale 2 Controllare il livello di olio vedi il paragrafo Controllo Livello Olio in questo manuale 3 Controllare il livello del liquido di raffreddamento 4 Risciacquare il sistema di raffreddamento 5 Applicare una buona dose di grasso marino contenete Teflon ad esempi Quicksilver 101 su tutti i cablaggi sia sotto la console che sulla pompa 6 Controllar...

Page 22: ...cchio viene lasciato per lunghi periodi all interno del motore potrebbero verificarsi fenomeni di corrosione e degrado dei cuscinetti e delle bronzine all interno Mantenimento dei Cilindri Svitare le candele e versare approssimativamente 10 ml di olio pulito per motore direttamente dentro ciascun alloggio delle candele Fra girare il motore un paio di volte utilizzando l accensione Avvitare nuovame...

Page 23: ...rrosive f componenti installati da chiunque altro che dal personale di fabbrica William g ogni danno causato da componenti post vendita h imbarcazioni Williams acquistate per uso commerciale o governativo i ogni lavoro eseguito su un imbarcazione Williams da un centro di assistenza non autorizzato o senza previa autorizzazione di Williams j utilizzo per lavori trasporto merci consegne deposito o a...

Page 24: ... naljepnice u dobrom stanju i zamijenite ih ako postanu nečitljive Također ako trebate zamijeniti neki dio na kojemu se nalazi naljepnica pobrinite se da istovremeno sa zamjenskim djelom naručite i odgovarajuću naljepnicu Budite svjesni lokalnim zakonima i ograničenja i nikad ne koristiti dok pod utjecajem alkohola ili bilo koje tvari koja može utjecati na vašu prosudbu Ovaj simbol pojavljuje se n...

Page 25: ...ac predugo vezanog u vodi jer to može doprinjeti nakupljanju algi I školjaka na podvodnom dijelu trupa te time naškoditi plovnim sposobnostima plovila Nasukavanje Na Plažu OPREZ Ne vozite na dubini manjoj od 0 95m jer bi krhotine mogle uči u jet jedinicu NE VOZITE Sportjet po suhome Prije podizanja plovila na plažu ugasite motor Nakon nasukavanja izgurajte plovilo u dublje vode te ga pod gasom okr...

Page 26: ... dijelova motora Prije Upotrebe Pritisak u tubama može varirati s promjenom temperature Napumpajte sve tube u pravom redu na 250mB 3 6psi Ukoliko nisu dovoljno napumpajte to će se odraziti na plovnost plovila kao i na njegovu nepropustivost i čvrstoću Ventili za napuhavanje su pričvršćeni sa četvrt okretnim zatvaračima kako bi onemogučili naglo ispuhivanje Zatvorite ventile i napumpajte tube Provj...

Page 27: ...oš slavinu za vodu 3 Uključiti motor i odmah otvorite slavinu 4 Neka motor radi 20 sekundi u brzom praznom hodu između 4000 i 5000 o min 5 Provjerite da prilikom ispiranja pumpa izbacuje vodu Ako to nije slučaj kontaktirajte ovlaštenog zastupnika za Williams 6 Zatvorite slavinu za vodu i isključite motor 7 Nanesite sloj maziva XPS na izložene dijelove pumpe Raspored Seistema 6 14 3 4 5 10 12 13 11...

Page 28: ...nika plovila 1 Redovito ispirajte gumenjak slatkom vodom kako bi isprali sol 2 Provjerite razinu ulja u motoru vidi poglavlje Provjera Ulja 3 Provjerite nivo hlađenja 4 Isperite otvoreni prsten sistema za hlađenje 5 Koristite kvalitetno mazivo koje sadrži Teflon Quicksilver 101 za podmazivanje kontrolnih kablova i pumpi 6 Provjerite kaljuže zbog prodora vode i kontaminacije ulja ili goriva i čisti...

Page 29: ...inu Zamjena Ulja Motora Bitno je zamijeniti ulje U upotrebljenom ulju su voda neizgoreno gorivo i mali metalni dijelovi Kada je staro ulje u motoru duže vrijeme može doči do oksidacije oštećenja na ležajevima Konzervacija Cilindara Potrebno je skinuti svijećice te uliti 10ml ulja u cilindar Sa starterom okrenite motor nekoliko puta i vratite svijećice u prvobitan položaj Namastite Kablove Namastit...

Page 30: ...e na njenu uporabu na primjer pukotine i poroznost ali ne i promjenu boje izblijedjelost ili ogrebotine u razdoblju od 3 godine od dana provedene registracije c trup od fiberglasa neće pokazivati nedostatke u kvaliteti materijala ili izradi u razdoblju od 2 godine od dana provedene registracije d nijedan dio ugrađen u čamac u Williamsovoj tvornici niti bilo koji dio kasnije zamijenjen u sklopu jam...

Page 31: ... walten lässt und die Sicherheitshinweise in diesem Handbuch und auf den Sicherheitsaufklebern an den Tendern beachtet Die Aufkleber in gutem Zustand halten und ersetzen falls sie unlesbar werden Wenn Sie ein Teil ersetzen müssen an dem ein Aufkleber klebt bestellen Sie bitte das Teil sowie den entsprechenden Aufkleber Seien Sie sich bewusst von örtlichen Gesetzen und Beschränkungen und niemalsunt...

Page 32: ...der ZU CLOSED Position und während des normalen Betriebs auf AUF OPEN stehen Fehler in der Bedienung dieses Ventils können zu schwerwiegenden Beschädigungen des Motors führen Lagerung VORSICHT Lassen Sie Ihren Sportjet nicht für längere Zeit im Wasser liegen da dieses möglicherweise zu einem Leistungsverlust durch Akkumulation von z B Meeresflora führen kann Anlegen Am Strand Ufer VORSICHT Betreib...

Page 33: ...50 ECT 150 ECT 250 ECT 250 ECT Für eine optimale Motorleistung Kraftstoff der Ethanol enthält kann zu Problemen im Kraftstoffsystem und beim Motor führen und Folgendes verursachen Start und Betriebsschwierigkeiten Verschleiß von Gummi oder Kunststoffteilen Korrosion von Metallteilen Schäden an Innenteilen des Motors Vor der Nutzung Der Luftdruck in den Schläuchen des Bootes kann je nach Temperatur...

Page 34: ...ht auf 3 Starten Sie den Motor und den drehen Sie sofort den Wasserhahn auf 4 Lassen Sie den Motor 20 Sekunden lang im schnellen Leerlauf zwischen 4000 und 5000 Umdrehungen pro Minute laufen 5 Stellen Sie sicher dass während dem Spülen Wasser aus der Strahlpumpe fließt Falls dem nicht so ist wenden Sie sich an Ihren Williams Fachhändler 6 Drehen Sie den Wasserhahn zu und stellen Sie dann den Motor...

Page 35: ...n ggf Reinigen 7 Tragen Sie eine geringe Menge Fett weiß oder ähnliches auf die Teleskopstange der Positionslampe auf 8 Kontrollieren Sie den Zustand der Pumpenanoden 9 Ein Druckverlust in den Schläuchen innerhalb von 24 Stunden ist nicht ungewöhnlich Temperatur und Luftdruck können den Schlauchdruck beeinflussen Kontrollieren Sie den Druck in den Schläuchen regelmäßig 10 Für Boote in tropischen U...

Page 36: ...ssen Sie das restliche Seewasser ablaufen ODER spülen Sie das Frostschutzmittel Verhältnis siehe oben mit Hilfe der Spülvorrichtung und einem geeigneten Tank durch den Open Loop Kühlkreislauf Motorölwechsel Es ist wichtig dass das Motoröl gewechselt wird Gebrauchtes Öl enthält sowohl Wasser unverbrannten Kraftstoff als auch kleine Metallpartikel Wenn altes Öl längere Zeit im Motor verbleibt kann e...

Page 37: ...Nähte der Schläuche Aufblasventile und das für die Herstellung des Schlauches verwendete Gewebe für einen Zeitraum von 3 Jahren ab dem Datum der Erstregistrierung frei von Material und Herstellungsfehlern sind b sich das Gewebe des Schlauches für einen Zeitraum von 3 Jahren ab dem Datum der Erstregistrierung nicht so abnutzt dass der Schlauch nicht mehr verwendbar ist d h er wird nicht rissig porö...

Page 38: ... de seguridad de los botes auxiliares Mantenga las etiquetas en buen estado y sustitúyalas cuando sean ilegibles Asimismo si necesita cambiar una pieza que tenga acoplada una etiqueta asegúrese de obtener dicha etiqueta haciendo el pedido de la pieza y la etiqueta al mismo tiempo Estar al tanto de las leyes locales y las restricciones y no utilizar nunca bajo la influencia del alcohol o cualquier ...

Page 39: ...ar una pérdida de rendimiento Embarrancando PRECAUCIÓN NO UTILIZAR en menos de 0 95m de profundidad ya que algas y otras substancias pueden dañar la turbina NO CONDUZCAS hasta la playa Para el motor antes de llegar a la playa ya que puedes dañar la turbina y sistema de refrigeración Después de haber estado en la playa mueve la embarcación a aguas mas profundas y mueve el casco de lado a lado para ...

Page 40: ...uncionamiento Deterioro de las piezas de goma o plástico Corrosión de las partes metálicas Daños a las piezas internas del motor Antes de Usar La presion de aire dentro de los tubos puede variar con las temperaturas de ambiente Hay que inflar los tubos de aire en secuencia hasta 250mB 3 6 psi Si no es así comprometes la habilidad de la embarcación en el agua y la seguridad del barco Las válvulas d...

Page 41: ...e la bomba de chorro mientras realiza el vaciado De lo contrario póngase en contacto con su distribuidor Williams autorizado 6 Cierre la llave del agua y a continuación pare el motor 7 Aplique una capa de aceite XPS sobre las piezas de la bomba que están expuestas Luces de Aviso PRECAUCIÓN Riesgo de daños para el motor Si se activa una luz o timbre de aviso durante el uso PARE el motor inmediatame...

Page 42: ...bo por el propietario 1 Lavar la barca frecuentemente con agua dulce para quitar restos de sal 2 Comprobar nivel de aceite de motor ver sección detallado en esa guía 3 Comprobar nivel de refrigerante 4 Enjuagar el sistema de refrigeración 5 Aplicar lubricación marina que contiene Teflón ej Quicksilver 101 a todos los cables debajo de los instrumentos y en la turbina 6 Inspeccionar la sentina para ...

Page 43: ... el acoplamiento y un contenedor adecuado Cambio de aceite del motor Es importante cambiar el aceite El aceite usado contiene agua combustible sin quemar y elementos de metal Cuando aceite usado se deja mucho tiempo en el motor puede ocurrir corrosión y degradación de los cojinetes del motor Conservación de cilindros Quitar las bujías y llenar con aproximadamente 10ml de aceite limpio en cada rece...

Page 44: ...ilizado en la construcción del tubo estarán libres de defectos de material y trabajo durante un período de 3 años a partir de la fecha del registro original b El tejido del tubo estará libre de deterioro que afecte a su utilidad es decir grietas porosidad pero excluyendo descoloración apagamiento o roces durante un período de 3 años a partir de la fecha del registro original c El casco de fibra de...

Page 45: ... un periodo di 2 anni dalla data di registrazione La Williams Performance Tenders si riserva il diritto di riconoscere eventuali lavori in garanzia previa verifi ca di corretta e costante manutenzione Ogranicena Garancija Ovo plovilo je namijenjeno iskljucivo za privatne svrhe Pokriveno je ogranicenom garancijom na kvarove koji mogu nastati usprkos normalnom koristenju i održavanju u periodu od 2 ...

Reviews: