background image

© Wikora GmbH 

Page 11  

                      Status: 27.04.2015 


                                                                                                                                                                       Errors excepted.        


3.7 Installation of collector temperature sensor 

 
The collector temperature sensor is to be installed at the flow of the system (hot water side).  Put the sensor into the sensor 
pocket as far as it will go. Apply a heat-conductive paste onto the sensor to improve the heat transfer. Screw carefully the cable 
sheet on the sensor pocket.  
The  1  m  cable  is  laid  with  the  pipe  work  through  the  roofing.  The  cable  can  be  extended  in  the  interior  
(2  x  0,75²).  For  the  connection  of  the  temperature  sensor  cable  with  the  controller  the  use  of  an  over  voltage  protection 
(protection against over voltage damages) is recommended. 


If there is a lightning protection system, the collector system is to be integrated professionally. If there is no lightning protection 
system, the solar flow and return are generally to be connected to the equipotential bonding. In every case, the regulations of 
the  local  energy  provider  /  network  operator  should  be  observed  here.  Electrical  and  lightning  protection  work  may  only  be 
carried out by authorized professionals. 

 
3.8 Installation of pipe work 


Install the pipe work: 


on shortest way to minimize losses.  


with a complete high temperature insulation (100% according to EnEv). 


rising to the collector to prevent air cushions. 


3.9 Hydraulic pressure test 


After a successful installation, rinse the entire collector circulation with water!  


Before commissioning, the collector circulation must be checked with a water pressure of 6 bar! 


If the solar heating system is not commissioned immediately after installation, the collector area must be covered! 


Before filling the system with heat transfer fluid, the system must be completely purged!  

 
Open the lower plug at the collector field to purge the system.  
Subsequently,  the  system  is  to  be  filled  with  solar  fluid.  The  liquid  capacity  amounts  to  1,15  Liter for Wikosun 2010 and 2,2 
Liter for Wikosun 2510.  

 
Important:  

Please note that only a solar concentrate released by Wikora may be refilled. Solar concentrate must be prepared according to 
manufacturer’s  specifications  with  clean,  ph-neutral  and  lime-free  water.  Please  use  an  antifreeze  controller  to  ensure  the 
antifreeze  capacity.  If  another  solar  concentrate  is  applied,  the  warranty  expires  automatically.    Moreover,  damages  that  are 
due to an insufficient antifreeze protection are not part of the warranty.  


3.10 Regulation of flow rate (flow regulation) 

 
The set-up of the flow rate is important for an efficient functioning of the system. The lower the flow rate chosen, the higher 
the temperature difference between collector flow and return. 
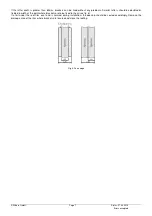
When  setting  the  flow  rate,  it  is  absolutely  essential  to  refer  to  the  instruction  manuals  of  the  pump  groups  /  temperature 
difference controler used (scale). 


                                                                      Fig. 14: Scale 


Summary of Contents for Wikosun 2010

Page 1: ...e covered if the installation instructions are followed Warranty does not cover any damages caused by non observance of this manual The correct functioning is only guaranteed if the installation instr...

Page 2: ...Wikosun 2010 2510 Profile rails aluminum Z clamp Collector support bracket Parallel compression fitting 18mm Compression X fitting 18x18x12 x3 4 FD incl air screw and sensor pocket Insulation on site...

Page 3: ...6 washers ST BFS BL 2 clamps for rolled steel joist 2 screws M8 2 nuts M8 ST BFS ST 2 stair bolts M10 2 ears 6 nuts 2 seals ST BFS T 2 roof hooks profiled sheeting ST BFS W 2 roof hooks corrugated sh...

Page 4: ...s 5 mm 1 Flat section aluminum 40x5 mm l 1710 mm s 5 mm 7 Hex head screws stainless steel M8 x 20 mm 7 Hex nuts stainless steel M8 7 Lock washers M8 Chart 4 Fastening sets flat roof mounting horizont...

Page 5: ...with reference to DIN 1055 100 DIN 1055 4 and DIN 1055 5 Determine the values of local snow loads according to country specific data Determine the values of local wind loads according to country speci...

Page 6: ...mensionally mediated according to the number of collectors The distances between the upper and lower profile rail are as follows see fig 4 On roof mounting vertical 1500 1600 mm WIKOSUN 2010 1800 1900...

Page 7: ...ms Smaller rafters should be doubled or trebled in width at the point where brackets are to be fixed to them see fig 6 If a foil under the roof tiles exist and is harmed during installation the openin...

Page 8: ...al installation 0 5m 200 kg 300 kg 5 10 m 250 kg 350 kg 10 20 m 300 kg 400 kg 20 m Calculation necessary Chart 8 Loading per collector 3 3 1 1 Installation of the mounting frame on mass elements e g c...

Page 9: ...ulated and measured For roof angles smaller than 60 the vertical angle section must be cut 25mm above the hole Install the base of the frame the cross bars and the back bars and connect the angle sect...

Page 10: ...Position the collectors and fix them carefully The collectors are connected with each other by using the corresponding parallel compression fittings Hand tighten the bolts and protect the connecting...

Page 11: ...shions 3 9 Hydraulic pressure test After a successful installation rinse the entire collector circulation with water Before commissioning the collector circulation must be checked with a water pressur...

Page 12: ...450 25 18 9 540 40 22 10 5 630 40 22 12 720 50 22 13 5 810 50 28 15 900 80 Valid for parallel collector connection In the case of series connection of the same collector arrays the flow rate is halve...

Page 13: ...ool Absorber Material Aluminium plate on copper Aluminium plate on copper Absorber coating TINOX ENERGY Alanod Mirotherm TINOX ENERGY Alanod Mirotherm Pressure loss 50 l h 49 Pa collector 54 Pa collec...

Page 14: ...minated Switch on again your solar heating system Please never vent at sunshine or running pump Please do not undertake an additional venting process If the system s working pressure drops later on or...

Page 15: ...no atmospheric oxygen in the system It must be ensured that the circulating pump is suitable for operation with antifreeze agents Before being filled the system should be flushed with water and the ti...

Page 16: ...he local authority in charge Cleaning clean with liquid binding material sand kieselguhr acid binder or universal binder Recycle contaminated material separately Keep the concentrate in a cool and dry...

Page 17: ...hidden defects immediately after emerging In case of hidden defects it is only valid for the warranty exceeding the legal warranty period if the collectors are changed or maintained by non spezialise...

Page 18: ...ick vent valve at collectors Primary pressure exp vessel C Type Cooling function from colour unchanged brown black cloudy Flow rate m System settings Controller setting Consumer 1 e g DHW Consumer 2 e...

Page 19: ...ollector fastening is stable User has been instructed Maintenance contract Operation of pumps checked Temperature sensores indicate realistic values Collector interior is not fogged Collector is clean...

Reviews: