background image

13

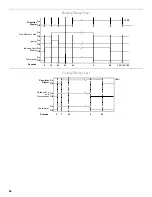
Cooling

1. Thermostat calls for cooling. The compressor and outdoor 

fan are energized.

2. Approximately 7 seconds later, the indoor fan starts.

3. The unit will deliver cooling to the conditioned space until the 

thermostat is satisfied.

4. The compressor and outdoor fan will be de-energized when 

the thermostat opens.

5. The indoor fan continues to run for approximately 60 seconds 

after the thermostat is satisfied. This allows additional cooling 
from the indoor coil to be transferred to the conditioned 
space. Then, the indoor fan stops.

NOTE: A 180-second anti-short cycle is integral to the control 
and prevents recycling of the compressor.

Fan Only

1. Thermostat calls for Fan Only by energizing G.

2. Approximately 7 seconds later, the indoor fan starts.

3. The indoor fan continues to run for approximately 60 seconds 

after G is de-energized.

START-UP, ADJUSTMENTS, 

AND CHECKS

Heating Start-Up

This unit is equipped with an electronic ignition device to 
automatically light the main burners. It also has a power vent 
blower to exhaust combustion products.

On new installations, or if a major component has been replaced, 
the operation of the unit must be checked.

Check unit operation as outlined in the following instructions. If 
any sparking, odors or unusual sounds are encountered, shut off 
electrical power and recheck for wiring errors or obstructions in 
or near the blower motors. Duct covers must be removed before 
operating unit.

Heat Anticipator Setting

Set the heat anticipator on the room thermostat to 0.4 amps to 
obtain the proper number of heating cycles per hour and to 
prevent the room temperature from overshooting the room 
thermostat setting.

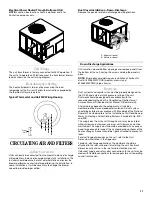
Rollout Protection Control

The rollout protection device opens, cutting power to the gas 
control valve, if the flames from the burners are not properly 
drawn into the heat exchanger. The rollout protection device is 
located on the burner bracket. The reason for elevated 
temperatures at the control should be determined and repaired 
prior to resetting this manual reset control.

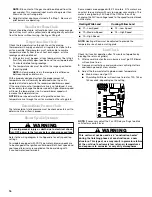
Rollout Protection on Burner Bracket

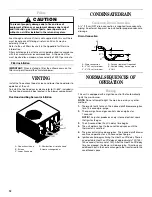
Secondary Limit Control

The secondary limit control is located on the top of the blower 
scroll assembly. This control opens when elevated temperatures 
are sensed. Elevated temperatures at the control are normally 
caused by blower failure. The reason for the opening should be 
determined and repaired prior to resetting.

If the power to the unit is interrupted during the heating cycle, it 
may cause the secondary limit control to trip. Once the blower 
compartment temperature drops below the limit reset 
temperature, the limit will automatically reset.

Secondary Limit Control

Pre-Operation Checks

1. Close the manual gas shutoff valve external to the unit.

2. Turn off the electrical power supply to the unit.

3. Set the room thermostat to its lowest possible setting.

4. Remove the heat exchanger door on the side of the unit by 

removing the screws.

IMPORTANT: This unit is equipped with an ignition device which 
automatically lights the main burner. Do not try to light burner by 
any other method.

5. Move the gas control valve switch to the OFF position. 

NOTE: Do not force the switch to turn.

6. Wait 5 minutes to clear out any gas.

7. Check for a gas odor around the unit, including near the 

ground because some types of gas are heavier than air. 

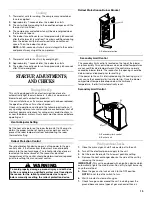
Goodman 94

To avoid property damage, personal injury or death due 
to fire or explosion, a qualified servicer must investigate 
the reason for the rollout protection device to open 
before manually resetting the rollout protection device.

WARNING

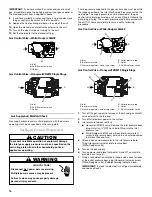
A. Rollout protection

A. Secondary limit control
B. Back of unit

A

A

B

Summary of Contents for WGGE43

Page 1: ...e Specification Sheets referred to in this manual WPIO 357A Tradewinds Distributing Company LLC 14610 Breakers Drive Jacksonville Florida 32258 Whirlpool Gold Model WGGE43 ATTENTION INSTALLATION PERSONNEL Prior to installation thoroughly familiarize yourself with this instruction manual Observe all safety warnings During installation or repair caution is to be observed It is your responsibility to...

Page 2: ...heck 16 External Static Pressure Check 16 Blower Speed Adjustments 16 Limit Check 16 UNIT SHUTDOWN 17 COOLING START UP 17 Compressor Protection Devices 17 Cooling Refrigerant Charging 17 TROUBLESHOOTING 17 Ignition Control Error Codes 17 Abnormal Operation Heating 17 Abnormal Operation Cooling 18 MAINTENANCE 18 Filter Replacement or Cleaning 18 Cabinet Finish Maintenance 18 Clean Outside Coil Qual...

Page 3: ...ury or death do not store combustible materials or use gasoline or other flammable liquids or vapors in the vicinity of this unit Goodman 81 To avoid property damage personal injury or death do not use this furnace if any part of the furnace has been under water Immediately call a qualified service technician to inspect the furnace and to replace any part of the control system and any gas control ...

Page 4: ...ate drainage the unit must be mounted level The flue outlet hood must be at least 12 30 5 cm from any opening through which flue gases could enter a building and at least 36 91 4 cm above any forced air inlet located within 10 ft 3 m The economizer manual fresh air intake motorized fresh air intake and combustion air inlet mounted on the unit are not affected by this restriction Goodman 47 Heating...

Page 5: ...s When the unit is heating the temperature of the return air entering the unit must be between 50 F and 100 F 10ºC and 38ºC GroundLevelInstallationsOnly When the unit is installed on the ground adjacent to the building a level concrete or equal base is recommended Prepare a base that is 3 7 6 cm larger than the package unit footprint and a minimum of 3 7 6 cm thick The base should also be located ...

Page 6: ...nsible for making prompt inspection of damage and for a thorough investigation of each claim The distributor or manufacturer will not accept claims from dealers for transportation damage NOTE When inspecting the unit for transportation damage remove all packaging materials Recycle or dispose of the packaging material according to local codes RIGGING DETAILS IMPORTANT If using the bottom discharge ...

Page 7: ...e following rules apply 1 Use black iron pipe and fittings for the supply piping The use of a flex connector and or copper piping is permitted as long as it is in agreement with local codes 2 Use pipe joint compound on male threads only Pipe joint compound must be resistant to the action of the fuel used 3 Use ground joint unions 4 Install a drip leg to trap dirt and moisture before it can enter t...

Page 8: ...s and pipe sizing is available from most regulator manufacturers and propane gas suppliers Since propane gas will quickly dissolve white lead and most standard commercial compounds special pipe dope must be used Shellac based compounds resistant to the actions of liquefied petroleum gases are satisfactory Propane Gas Installation Typical NOTE 200 psig maximum tank pressure Goodman 90 To prevent pr...

Page 9: ... 217 1 873 1 017 2 127 100 30 5 161 365 679 1 149 1 769 961 2 009 150 45 7 130 293 546 923 1 421 772 1 613 200 61 111 251 467 790 1 216 660 1 381 250 76 2 90 222 414 700 1 078 585 1 224 300 91 4 89 201 378 634 976 530 1 109 350 106 7 82 185 345 584 898 488 1 020 400 121 9 76 172 321 543 836 454 949 Propane Gas Pipe Sizing Chart II Tubing Size O D Type L Nominal Pipe Size Schedule 40 Pipe or Tubing...

Page 10: ...nt device size shown on the unit data plate All line voltage connections must be made through weatherproof fittings All exterior power supply and ground wiring must be in approved weatherproof conduit Low voltage wiring from the unit control panel to the thermostat requires coded cable Electrical Power Directly to Junction Box NOTE Junction box location shown is optional and is for illustration pu...

Page 11: ...0464501PDGK medium chassis and 20464502PDGK large chassis Ductwork Duct systems and register sizes must be properly designed for the C F M and external static pressure rating of the unit Ductwork should be designed in accordance with the recommended methods of Air Conditioning Contractors of America Manual D Residential or Manual Q Commercial All ductwork exposed to the outdoors must include a wea...

Page 12: ...er NOTE Do not attempt to light the main burners by any other method 1 Thermostat calls for heat The induced draft blower energizes for a 15 second pre purge 2 The spark igniter and gas control valve energizes for 7 seconds NOTE The igniter produces a very intense electrical spark that ignites the gas 3 The 30 second Heat Fan On delay time begins 4 The unit delivers heat to the conditioned space u...

Page 13: ...ice opens cutting power to the gas control valve if the flames from the burners are not properly drawn into the heat exchanger The rollout protection device is located on the burner bracket The reason for elevated temperatures at the control should be determined and repaired prior to resetting this manual reset control Rollout Protection on Burner Bracket Secondary Limit Control The secondary limi...

Page 14: ...ff all electrical power to the system 3 Inlet pressure tap connections Honeywell VR8215 valve Remove the inlet pressure boss plug Install an NPT hose barb fitting into the inlet pressure tap White Rodgers 36G22 valve Back inlet pressure test screw inlet pressure boss out one turn counterclockwise not more than one turn 4 Attach a hose and manometer to the inlet pressure barb fitting Honeywell valv...

Page 15: ...ower and gas supply to the system 14 Remove the manometer hose from the hose barb fitting or outlet pressure boss 15 Replace the outlet pressure tap Honeywell VR8215 valve Remove the NPT hose barb fitting from the outlet pressure tap Replace the outlet pressure boss plug and seal with a high quality thread sealer White Rodgers 36G22 valve Turn the outlet pressure test screw in to seal pressure por...

Page 16: ...ts Refer to the wiring diagram in the Appendix to verify speed tap settings For models equipped with PSC type motors blower speeds are to be changed at the ignition control board Both heat speed and cool speed terminals are supplied on the board along with 2 unused motor lead terminals Some models are equipped with X 13 motors X 13 motors are constant torque motors with very low power consumption ...

Page 17: ...ounters an internal fault it will go into a hard lockout and turn off the diagnostic LED If diagnostic LED indicates an internal fault check the power supply to the unit for the proper voltage check all fuses circuit breakers and wiring Disconnect electric power for 5 seconds If LED remains off after restoring power replace control External Lockout An external lockout occurs if the integrated igni...

Page 18: ...ling situations In the event of intermittent power losses or intermittent thermostat operation the ignition control will delay output to the compressor contactor for 3 minutes from the time power is restored Compressor is off a total of 3 minutes The diagnostic LED will flash 6 times to indicate the compressor contactor output is being delayed NOTE Some electronic thermostats also have a built in ...

Page 19: ...at for each tube 5 When all heat exchanger tubes have been cleaned replace the parts in the reverse order in which they were removed 6 To reduce the chances of repeated fouling of the heat exchanger perform the steps listed in Start up Adjustments and Checks MainBurnerFlame QualifiedServicerOnly Flames should be stable soft and blue dust may cause orange tips but must not be yellow The flames must...

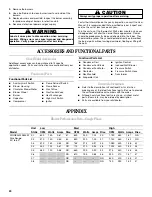
Page 20: ... Although only functional parts are shown all sheet metal parts doors etc may be ordered by description Parts are available from your distributor APPENDIX BlowerPerformanceData SinglePhase Label all wires prior to disconnection when servicing controls Wiring errors can cause improper and dangerous operation Verify proper operation after servicing WARNING Always verify proper operation after servic...

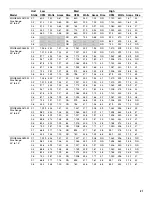
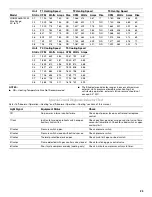
Page 21: ...1 55 1 125 414 1 80 46 1 208 475 2 06 43 0 5 878 318 1 27 59 1 063 398 1 70 49 1 140 453 1 93 45 0 6 811 306 1 29 64 1 004 380 1 66 52 1 081 440 1 90 48 0 7 723 291 1 21 NR 919 368 1 59 56 1 006 425 1 88 NR 0 8 545 259 1 10 NR 796 371 1 46 65 879 403 1 74 NR WGGE4336A070M Rise Range 35º to 65º 0 1 1 029 346 1 51 50 1 337 471 2 08 39 1 462 596 2 64 35 0 2 982 334 1 46 53 1 265 452 2 01 41 1 398 563...

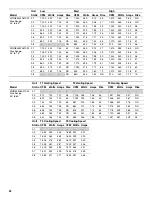
Page 22: ... 0 7 690 255 1 16 NR 945 350 1 60 72 1 010 450 2 18 67 0 8 NR 860 335 1 54 NR 910 430 2 12 75 Unit Low Med High Model Static CFM Watts Amps Rise CFM Watts Amps Rise CFM Watts Amps Rise Unit T1 Heating Speed T2 Heating Speed T3 Heating Speed Model Static CFM Watts Amps Rise CFM Watts Amps Rise CFM Watts Amps Rise WGGE4348A070M Rise Range 35º to 65º 0 1 0 2 914 125 1 07 56 1 105 186 1 56 46 1 397 32...

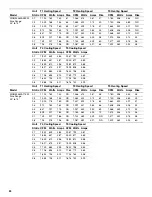
Page 23: ... 0 6 1 400 493 3 95 1 512 566 4 41 0 7 1 341 502 4 00 1 433 578 4 59 0 8 1 289 511 4 11 1 392 591 4 65 Unit T1 Heating Speed T2 Heating Speed T3 Heating Speed Model Static CFM Watts Amps Rise CFM Watts Amps Rise CFM Watts Amps Rise WGGE4348A115M Rise Range 45º to 75º 0 1 0 2 914 125 1 07 NR 1 105 186 1 56 77 1 397 323 2 57 49 0 3 822 134 1 14 NR 1 024 193 1 60 NR 1 346 331 2 67 51 0 4 733 140 1 20...

Page 24: ... 0 6 1 706 693 5 10 1 789 772 5 65 0 7 1 655 703 5 12 1 703 763 5 58 0 8 1 588 705 5 11 1 618 732 5 29 Unit T1 Heating Speed T2 Heating Speed T3 Heating Speed Model Static CFM Watts Amps Rise CFM Watts Amps Rise CFM Watts Amps Rise WGGE4360A115M Rise Range 45º to 75º 0 1 1 125 162 1 44 NR 1 466 315 2 67 58 1 780 496 3 33 48 0 2 1 049 168 1 53 NR 1 384 322 2 74 62 1 730 506 3 89 49 0 3 1 000 178 1 ...

Page 25: ... 0 8 703 218 1 96 NR 1 087 382 3 21 NR 1 422 562 4 23 74 Unit T4 Cooling Speed T5 Cooling Speed Static CFM Watts Amps CFM Watts Amps 0 1 1 942 649 4 83 2 067 792 5 81 0 2 1 883 657 4 87 2 030 811 5 85 0 3 1 859 670 4 96 1 982 814 5 88 0 4 1 827 675 4 97 1 909 808 5 86 0 5 1 749 683 4 99 1 842 798 5 85 0 6 1 706 693 5 10 1 789 772 5 65 0 7 1 655 703 5 12 1 703 763 5 58 0 8 1 588 705 5 11 1 618 732 ...

Page 26: ...rculator Blower On Off On Off On Off On Off On Off Thermostat Gas Control Valve Igniter Induced Draft Blower Seconds 0 15 22 0 29 45 52 120 135 150 Seconds 0 7 30 0 60 Circulator Blower Outdoor Fan and Compressor Thermostat On Off On Off On Off 100 ...

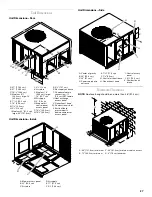
Page 27: ...s supply entrance T Condensate drain connection 1 9 cm NPT female U Heat exchange access panel V Flue exhaust hood W Combustion air inlet X Suction liquid pressure ports behind compressor access panel A Blower access panel B 22 55 9 cm C Air return D Air supply E 11 27 9 cm F 5 14 6 cm V E G H J K M O N S T U X B A C I F F L L R P Q D W A E F B B E D C A Center of gravity B 20 50 8 cm C 24 61 cm D...

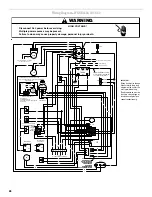
Page 28: ...inal IIC and change heating speed at Heat Terminal IIC White Rodgers Gas Control Valve Honeywell Gas Control Valve alternate Accessory economizer plug on select models adjacent to blower housing in return air compartment BK High Speed BU Medium High Speed Y 4 speed motor only Medium Low Speed R Low Speed For different than factory speed tap change cooling speed at Cool Terminal IIC and change heat...

Page 29: ...tion move the black wire from Terminal 3 to Terminal 2 on transformer Accessory economizer plug on select models adjacent to blower housing in return air compartment ALS Auxillary Limit Switch CAP Capacitor COMP Compressor CM Condenser Motor CC Contactor CH Crankcase Heater EM Evaporator Motor FS Flame Sensor GV Gas Control Valve IIC Integrated Ignition Control IGN Igniter LS Limit Switch PL Plug ...

Page 30: ... L S F Heat Unused 2 L GND Power Supply 208 230 1 60 Crankcase Heater Optional Connected At L1 L2 Y1 Y Y2 PLF T1 T2 T3 T4 T5 CM White Rodgers Gas Control Valve MV GV Honeywell Gas Control Valve alternate MV GV PS LS ALS L1 L2 C T1 T2 C COMP S R VM RS C IIC RCCF FS IGN 3 2 1 4 5 6 1 C 24V 2 TR 3 240 3 4 2 1 VMR L G N 208 EM BU BU BU Crankcase Heater Optional Use copper conductors only Use NEC Class...

Page 31: ...efer to the wiring diagram on the unit for the most up to date wiring Replacement wire must be the same size and type of insulation as original use copper conductor only IMPORTANT PR Y1 G W G W BU Y Y2 C C BU Y Y R R G G W W Thermostat Field Wiring No Economizer 2 Stage Cooling With Economizer R R BK Black BU Blue BR Brown G Green OR Orange PK Pink PR Purple R Red W White Y Yellow Wire Splice Mark...

Page 32: ... 32258 Please include a daytime phone number in your correspondence Or call toll free 1 866 944 7575 WPIO 357A 2010 All rights reserved Registered Trademark TM Trademark of Whirlpool U S A Manufactured under license by Tradewinds Distributing Company LLC Jacksonville Florida Warranty provided by manufacturer All other trademarks are owned by their respective companies 5 10 Printed in U S A ...

Reviews: