background image

8

u

q

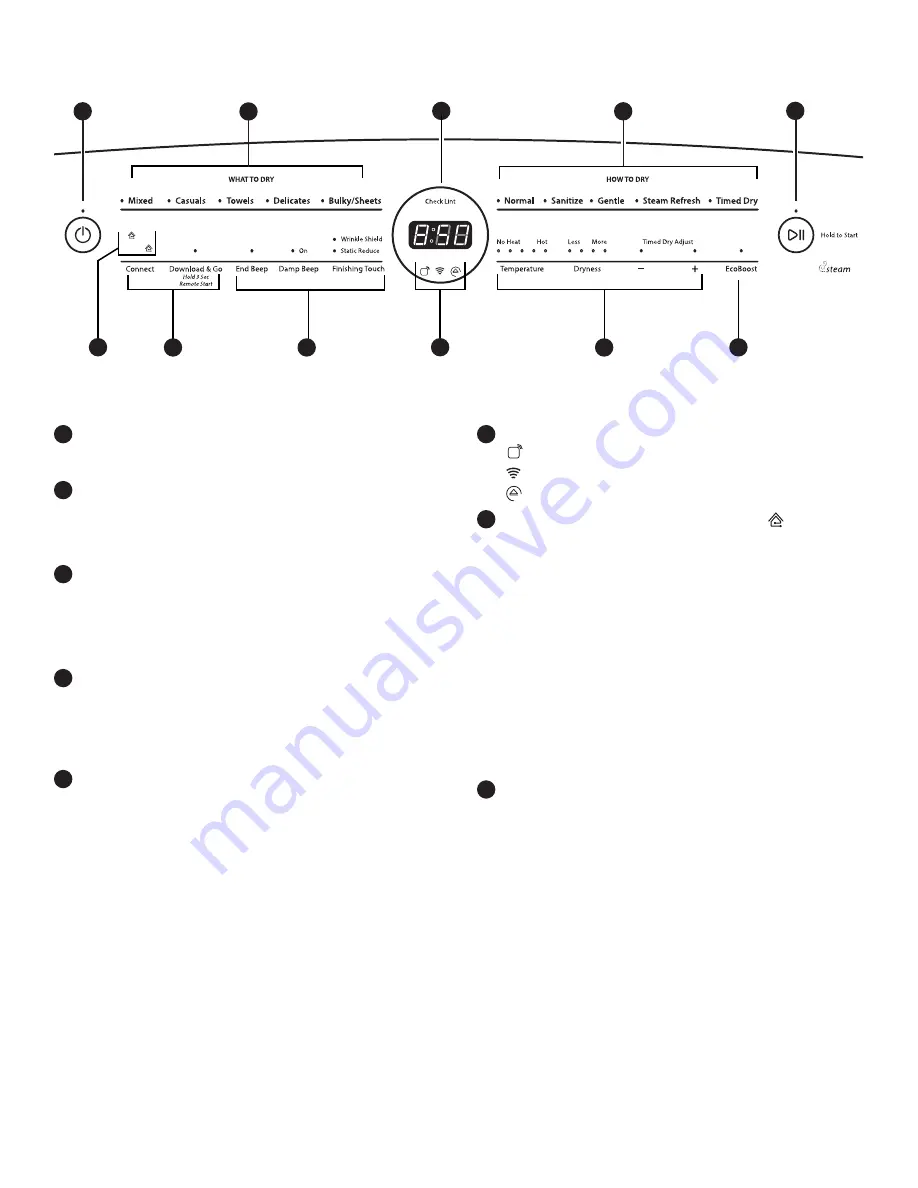
Dryer Overview — Control Panel

POWER BUTTON

Touch to turn the dryer on and off. Touch to stop/cancel  

a cycle at any time.  

WHAT TO DRY/HOW TO DRY

First select a cycle from the “What to Dry” (Automatic 

cycles) and then select the “How to Dry” to get the best 

combination cycle available for the type of items you are 

going to dry. See “Cycle Guide” for cycle details.

START/PAUSE BUTTON

Touch and hold until the LED comes on to start a cycle,  

or touch once while a cycle is in process to pause it.
The LED turns off at the end of a cycle. It will flash when 

in a paused state or when waiting for you to touch Start/

Pause after setting the dryer for Remote Start mode.

LED DISPLAY

When you select a cycle, its default settings will light up 

and the Estimated Time Remaining (for Automatic Cycles) 

will vary depending on “What to Dry” and “How to Dry” 

selections or actual time remaining for Timed Dry cycles 

(for Manual Cycles) will be displayed. 

CONNECT BUTTON

Touch CONNECT during the initial connection of the dryer 

to your home Wi-Fi network. The Wi-Fi status indicator 

(6)


will be lit when the dryer is connected to the network. See 

“Connectivity Setup” section for details. If the dryer is in a 

Smart Delay, touch CONNECT to override the delay and 

begin a dry cycle immediately.

DOWNLOAD & GO™ OPTION

Set a Specialty Cycle or My Cycle in the Whirlpool™ app 

and download it to your dryer. The light above Download 

& Go will illuminate, indicating that the cycle has been 

received. Touch DOWNLOAD & GO to select the cycle for 

use. See “Using Your Dryer — Smart Operation” for details.

REMOTE START

To start a dryer cycle remotely from the Whirlpool™ app, 

touch and hold DOWNLOAD & GO for about 3 seconds. 

The Remote Start status indicator (

6

) and the indicator 

above the Start/Pause button (

3

) will begin blinking. 

Touch and hold START/PAUSE to set the mode. The 

indicator above Start/Pause will go out, and the Remote 

Start indicator will be solidly lit.

NOTE:

 Any interaction with the dryer once a Remote 

Start has been set will cause the mode to cancel. See 

“Using Your Dryer — Smart Operation” for details.

1

2

3

4

CONNECTIVITY STATUS INDICATORS

Remote Start
Wi-Fi
Smart Delay

SMART GRID STATUS INDICATORS (    )

Blue

The BLUE indicator will be lit during times of OFF-PEAK 

energy demand. Dry cycles will begin without delay  

upon touch and hold of the Start/Pause button.

Amber

The AMBER indicator will be lit during times of PEAK 

energy demand. The dryer will go into Smart Delay mode 

upon touch and hold of the Start/Pause button, and the 

Smart Delay indicator 

(6)

 will illuminate. When energy 

demand returns to OFF-PEAK levels, the AMBER indicator 

and Smart Delay indicator will go out, the BLUE indicator 

will illuminate, and the dry cycle will begin.
If Whirlpool™ app service is momentarily unavailable, 

the Smart Grid status indicators will be OFF. Touching 

Connect will cause the BLUE indicator to blink for 2 

seconds and then stay OFF.

MODIFIERS

Use to select available modifiers for your dryer.

Temperature

When using Timed Dry Cycle, you may select a dry 

temperature based on the type of load you are drying. 

Use the warmest setting safe for the garments in the 

load. Follow garment label instructions.

NOTE:

 Automatic Cycles will give you up to  

3 temperatures to adjust and it varies, depending  

on the “What to Dry” or “How to Dry” selections that 

have been made. 

Dryness

You may adjust the Dryness on Automatic Cycles 

(except for the Sanitize cycle), if desired. 

NOTE:

 Dryness is for use with Automatic Cycles only. 

+\- Timed Dry Adjust

Touch “+” or “–” with Timed Dry cycle to increase or 

decrease the length of the cycle. 

NOTE:

 The control panel features a sensitive surface that responds to a light touch of your finger. To ensure your selections are 

registered, touch the control panel with your finger tip, not your fingernail. When selecting a setting or option, simply touch its name.

8

1

6

4

3

5

8

9

2

2

9

7

u

q

u

q

u

q

6

u

q

7

5

Summary of Contents for WGD8700EC

Page 1: ...cuidado en español o para obtener información adicional acerca de su producto visite www whirlpool com Get the app and connect instructions terms of use and privacy policy at www whirlpool com connect If you have any problems or questions call Whirlpool Corporation Connected Appliances at 1 866 333 4591 ...

Page 2: ...ures 7 Control Panel 8 Connectivity Setup 10 Cycle Guide 12 Using Your Dryer Basic Operation 14 Smart Operation 16 Additional Features 17 Dryer Care 18 Troubleshooting Connectivity 20 Dryer Operation 21 Connected Appliance Regulatory Notices FCC and IC Compliance 24 Open Source License Usage 25 Warranty 26 Assistance or Service Back Cover ...

Page 3: ...3 Dryer Safety IMPORTANT When discarding or storing your old clothes dryer remove the door ...

Page 4: ...4 ...

Page 5: ...to follow the Installation Instructions supplied with your dryer for final product check n Clear away items from the front of the dryer Along with heat dryers require good air flow to efficiently dry laundry Proper venting will reduce your drying times and improve your energy savings See Installation Instructions The venting system attached to the dryer plays a big role in good air flow Blocked or...

Page 6: ...cles My Cycle What it does Allows you to browse additional dryer cycles available in the Whirlpool app and download a cycle to the dryer with the Download Go option You can also create and save your own customized cycles What it does for you Takes the guesswork out of selecting the optimal dryer settings for garments and household items that require specialized care Quiet Mode What it does Lets yo...

Page 7: ... on fabric 100 cotton garments with wrinkle free finish may yield better results than those without 100 cotton items may require additional touching up after cycles that use steam n Use of fabric softener sheet is not recommended with cycles that use steam It may cause temporary staining on clothes n Cycles that use steam are not recommended for items that have been starched Wash any starched or n...

Page 8: ...r above Start Pause will go out and the Remote Start indicator will be solidly lit NOTE Any interaction with the dryer once a Remote Start has been set will cause the mode to cancel See Using Your Dryer Smart Operation for details 1 2 3 4 CONNECTIVITY STATUS INDICATORS Remote Start Wi Fi Smart Delay SMART GRID STATUS INDICATORS Blue The BLUE indicator will be lit during times of OFF PEAK energy de...

Page 9: ...completely This option is available on some cycles The Damp Beep signal is selected as a default for the Bulky Sheets cycle as a reminder to manually reposition bulky loads midway through the cycle Wrinkle Shield Option If you will be unable to remove a load immediately touch Wrinkle Shield to add up to 150 minutes of periodic tumbling to help reduce wrinkling NOTE If you open the dryer door prior...

Page 10: ...o 2 minutes If the connection is successful the Wi Fi status indicator will come on and remain lit If Your Dryer Doesn t Connect If your dryer and router fail to connect after 2 minutes the Wi Fi status indicator C will blink rapidly for 2 seconds and then turn off Refer to the Troubleshooting Connectivity section of this Use Care Guide check any connection instructions for your specific router an...

Page 11: ...ication Number SAID case sensitive which can be found on a sticker inside the dryer door My Smart Appliance ID is NOTES Once you ve connected your dryer to your home Wi Fi network it will remain linked even if the power goes out you move the appliance or if you put it in storage for a while If you replace your wireless router or get a different Smart Dryer you will need to repeat this connectivity...

Page 12: ...a R Wool R The Whirlpool Cabrio dryer has a unique user interface to help you select the best cycle you need for your load The What to Dry How to Dry layout guides you to the optimal cycle in two easy steps First determine what items are in the load that you are trying to dry Use that to guide your What to Dry selection Then determine how you want the dryer to dry them by selecting the appropriate...

Page 13: ...R Coats Jackets R Comforters R Fabric Rugs R Fiber Fill Pillows not feather or decorative R Heavy Drapes R Pet Bedding R Sheets R Sleeping Bags R Stuffed Animals R Feather Pillows Air Only R Plastic Shower Curtains R Rubber and Rubber backed rugs and mats R Vinyl Table Cloths R For best fabric care choose the cycle that best fits the load being dried R Recommended Cycle a Alternate Cycle Blank Cyc...

Page 14: ...nt screen and push the lint screen firmly back into place For additional cleaning information see Dryer Care 2 Load the dryer Open the door by pulling on the handle Place laundry in the dryer Add a dryer sheet to wet load if desired Close the door IMPORTANT Do not tightly pack the dryer Items need to tumble freely Tightly packing can lead to poor drying performance and may increase wrinkling and t...

Page 15: ...educe wrinkling 5 Adjust cycle modifiers if desired You may adjust different settings depending on what you are drying and how you are going to dry the item See the Cycle Guide for detailed information NOTE Not all options and modifiers are available with all cycles 6 Select any additional options Add additional options such as Static Reduce Wrinkle Shield and or EcoBoost by touching that option I...

Page 16: ...cle Set a Remote Start u q Remote Start mode allows you to start your dryer remotely from the Whirlpool app After preparing your laundry load and selecting your cycle settings touch and hold the DOWNLOAD GO button for 3 seconds The Remote Start status indicator and the indicator above the Start Pause button will begin blinking Touch and hold START PAUSE to set the mode The indicator above Start Pa...

Page 17: ...r door opening and press down fully into holes Rest the rear support on the dryer back ledge 3 Place wet items on top of the drying rack Allow space around items for air to circulate The drying rack does not move but the drum will rotate be sure to leave adequate clearance between items and the inside of the dryer drum Make sure items do not hang over the edges or between drying rack grille USING ...

Page 18: ...quently if it becomes clogged due to a residue buildup To wash 1 Roll lint off the screen with your fingers 2 Wet both sides of lint screen with hot water 3 Wet a nylon brush with hot water and liquid detergent Scrub lint screen with the brush to remove residue buildup 4 Rinse screen with hot water 5 Thoroughly dry lint screen with a clean towel Reinstall screen in dryer Dryer Care CLEANING THE DR...

Page 19: ... extended period of time you should 1 Unplug dryer or disconnect power 2 Clean lint screen See Cleaning the Lint Screen 3 Turn off the water supply to the dryer This helps to avoid unintended flooding due to a water pressure surge while you are away Moving Care For power supply cord connected dryers 1 Unplug the power supply cord 2 Gas models only Close shut off valve in gas supply line 3 Gas mode...

Page 20: ...r Repeat Wi Fi connect process Verify that the dryer operates correctly except for not being able to connect Call for service Dryer is connected to home Wi Fi router but Whirlpool app or Smart Grid functions do not work Smart Grid features on the dryer may be OFF Check whether either Smart Grid indicator is on continuously Touch CONNECT to turn Smart Grid feature on Connection to the Whirlpool app...

Page 21: ...sn t been used in a while This is normal The thumping sound should diminish after a few minutes of use Rattling or vibrating noise A small object caught between the edges of dryer drum Check the front and rear edges of the drum for small objects Clean out pockets before laundering Dryer isn t properly leveled The dryer may vibrate if not properly installed See the Installation Instructions All fou...

Page 22: ...nding too early see also Changing the Automatic Cycle settings to increase or decrease drying time Lint on load Lint screen is clogged with lint Clean lint screen before each load Stains on load Improper use of fabric softener Add dryer fabric softener sheets at the beginning of the cycle Fabric softener sheets added to a partially dried load can stain your garments Do not use fabric softener shee...

Page 23: ...e from the display and return to the estimated time remaining NOTE This error will only show during the initial installation Try the following Check to see if a household fuse has blown or circuit breaker has tripped Electric dryers use two household fuses or breakers Replace the fuse or reset the circuit breaker Confirm that the power cord is properly installed Refer to the Installation Instructi...

Page 24: ...ettre le fonctionnement Antenna Maximum Permissible Required Type Antenna Gain dBi Impedance OHM Slot 1 76 50 Conformément à la réglementation d Industrie Canada le présent émetteur radio peut fonctionner avec une antenne d un type et d un gain maximal ou inférieur approuvé pour l émetteur par Industrie Canada Dans le but de réduire les risques de brouillage radioélectrique à l intention des autre...

Page 25: ...15 All rights reserved The following statements refer to those portions of the software copyrighted by Swedish Institute of Computer Science Copyright c 2001 2004 Swedish Institute of Computer Science All rights reserved Redistribution and use in source and binary forms with or without modification are permitted provided that the following conditions are met 1 Redistributions of source code must r...

Page 26: ... to use your product 3 Service to correct improper product maintenance or installation installation not in accordance with electrical or plumbing codes or correction of household electrical or plumbing i e house wiring fuses or water inlet hoses 4 Consumable parts i e light bulbs batteries air or water filters preservation solutions etc 5 Defects or damage caused by the use of non genuine Whirlpoo...

Page 27: ...27 Notes ...

Page 28: ...er eXperience Center 1 866 333 4591 www whirlpool com connect Our consultants provide assistance with If you need replacement parts or to order accessories used to build every new WHIRLPOOL appliance To locate FSP replacement parts assistance in your area or accessories Use and maintenance procedures Accessory and repair parts sales Referrals to local dealers repair parts distributors and service ...

Reviews: