


22
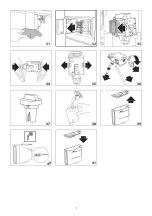
2. Fill a container with the liquid to be heated or frothed and
immerse the hot water/steam spout in the liquid;
3. Select STEAM from the homepage. The correspond-
ing image appears on the display (B), together with a pro-
gress bar which fills gradually as preparation proceeds and
after a few seconds, steam to heat the liquid is delivered
from the hot water/steam spout;
4. When the required temperature or level of froth is reached,
interrupt steam delivery by pressing
;
Always stop steam delivery before extracting the container con-
taining the liquid to avoid burns from splashes.
If “Energy saving” is active, you may have to wait a few seconds
before steam is delivered.
Tips for using steam to froth milk
• When choosing the size of the container, bear in mind that
the liquid doubles or triples in volume.
• For a richer denser froth, use skimmed or partially skimmed
milk at refrigerator temperature (about 5°C).
• For a creamier froth, rotate the container with slow move-
ments in an upward.
• To avoid milk with poor froth or large bubbles, always clean
the spout (C4) as described in the following section.
Cleaning the hot water/steam spout after use
Always clean the hot water/steam spout (C4) after use to avoid
the build-up of milk residues and prevent it from clogging.
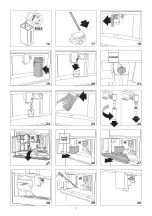
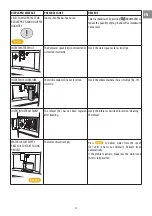
1. Place a container under the hot water/steam spout and de-
liver a little water (see section “Delivering hot water”). Stop
delivery of hot water by pressing
.
2. Wait a few minutes for the hot water/steam spout to cool
down, then extract (fig. 18). Hold the spout with one hand
and with the other, turn the cappuccino maker and pull it
downwards (fig. 24).
3. Also remove the steam connection nozzle by pulling it
downwards (fig. 24).
4. Check the hole in the connection nozzle is not blocked.
5. Wash all parts with warm water.
6. Insert the connection nozzle, then the cappuccino maker
on the spout by pushing it upwards and turning it clockwise
until it is attached.
CUSTOMISING THE BEVERAGES
The aroma (when required) and quantity of the drinks can be
customised.
1. Make sure the profile for which you want to customise the
beverage is active. You can select "MY" beverages for each
of the 6 profiles;
2. From the homepage, press
(B1);
3. To access the customising screen, choose the beverage you
want to customise. The corresponding accessories must be
inserted;
4. (Beverages with coffee only) CHOOSE COFFEE AROMA : Se-
lect the required aroma by pressing
or
and press
;
5. CUSTOMISING COFFEE QUANTITY (OR WATER) STOP TO
SAVE : Preparation begins and the appliance displays the
quantity customising screen in the form of a vertical bar.
The ball alongside the bar represents the current quantity.
6. When the amount reaches the minimum quantity you can
set,
is displayed.
7. When the required quantity in the cup is reached, press
.
8. SAVE NEW SETTINGS? : Press YES or NO .
The appliance confirms if the values have been saved or not (de-
pending on the previous selection). Press
.
The appliance goes back to the homepage.
• Cappuccino and milk-based coffees: the coffee aroma is saved
first, followed by the quantity of first milk, then coffee;
• HOT WATER: the appliance delivers hot water. Press
to save the required quantity.
• Press
to exit programming. The values will not be
saved.
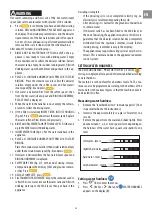
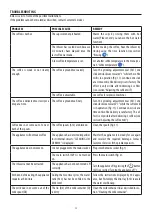
Beverage quantity table
Beverage
Standard
quantity
Programmable
quantity
ESPRESSO
40 ml
20-80 ml
LONG
160 ml
115-250 ml
COFFEE
180 ml
100-240 ml
120 ml
80-180 ml
HOT WATER
250 ml
20-420 ml
MEMORISING YOUR PERSONAL PROFILE
The appliance allows you to memorise 6 different profiles, each
associated with a different icon.
The customised MY beverages AROMA and QUANTITY values are
saved in each profile (see section “Customising the beverages
”). The order in which all the beverages are displayed is
based on the frequency of selection.
To select or enter a profile, press on the profile currently in use
Summary of Contents for W11 CM145
Page 1: ...Instruction for Use ...
Page 2: ...2 ...
Page 4: ...4 x 1 x 1 approx 350mm x 2 560 1 mm x 4 x 4 FIG 3 FIG 5 FIG 4 FIG 6 FIG 7 ...
Page 5: ...5 A4 A1 A14 A13 A18 A3 A2 A5 A6 A8 A10 A7 A9 A16 A21 A15 A12 A A19 A17 A22 A20 A23 ...
Page 7: ...7 1 4 5 7 13 15 2 3 6 8 9 10 12 14 11 ...
Page 8: ...8 16 30 17 18 23 24 25 20 22 28 27 26 21 19 29 ...
Page 9: ...9 34 33 36 38 39 40 35 37 41 31 32 ...
Page 36: ...400011239758 ...