

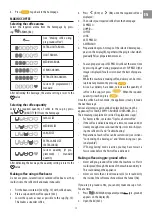


14
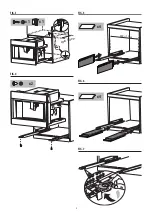
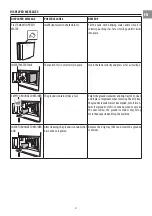
BUILT-IN INSTALLATION
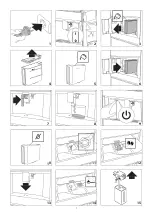
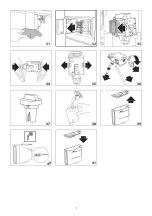
Verify the minimum measurements required for correct instal-
lation of the appliance. The coffee machine must be installed in
a column and the column must be firmly fixed to the wall with
commercially available brackets.
• Kitchen furniture in direct contact with the appliance must
be heat resistant (65°C min).
• To guarantee correct ventilation, leave a gap at the bottom
of the cabinet (see measurements in figure 1).
• Position the rails on the sides of the cabinet as shown in the
figure 2. Fix with the screws provided, then extract them
completely.
Position and fix the lock hook with the four screws provid-
ed, as shown in the figure placing it in the centre of the
cabinet, flush with the front wall.
If the coffee machine is installed over a warmer drawer, use
the top surface of this as a reference to position the rails
(fig. 2A).
In this case, there will be no surface to rest the rails on and
the retaining hook must not be installed.
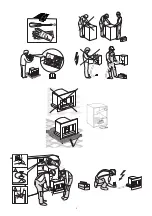
• Fix the power cable with the clip (fig. 3). The power cable
must be long enough to allow the appliance to be extracted
from the cabinet to fill the coffee bean container.
The appliance must be earthed in compliance with legis-
lation.
Electrical connections must be performed by a qualified
electrician following the instructions.
• Position the appliance on the rails, making sure the pins
are correctly inserted in the housings, then fix it with the
screws supplied (fig. 4). If the height of the appliance re-
quires adjusting, use the spacer disks provided.
• If necessary, correct alignment of the appliance by position-
ing the spacers supplied under or at the sides of the support
(fig. 5-6).
• To lift the appliance in the front (max 2 mm), turn the latch
as shown in figure 7.
Summary of Contents for W11 CM145
Page 1: ...Instruction for Use ...
Page 2: ...2 ...
Page 4: ...4 x 1 x 1 approx 350mm x 2 560 1 mm x 4 x 4 FIG 3 FIG 5 FIG 4 FIG 6 FIG 7 ...
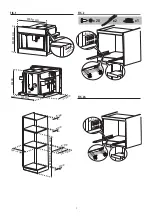
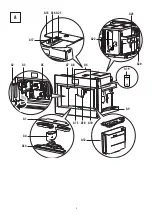
Page 5: ...5 A4 A1 A14 A13 A18 A3 A2 A5 A6 A8 A10 A7 A9 A16 A21 A15 A12 A A19 A17 A22 A20 A23 ...
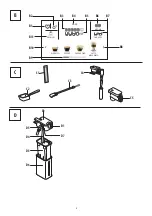
Page 7: ...7 1 4 5 7 13 15 2 3 6 8 9 10 12 14 11 ...
Page 8: ...8 16 30 17 18 23 24 25 20 22 28 27 26 21 19 29 ...
Page 9: ...9 34 33 36 38 39 40 35 37 41 31 32 ...
Page 36: ...400011239758 ...