12
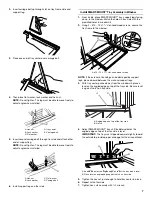
Attach Support Legs
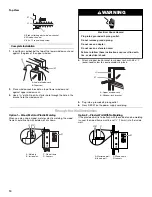
1. Determine the correct slots on the tray side from the type of
exterior construction of the building.
Thin wall construction (vinyl, wood, etc.)
Thick wall construction (brick)
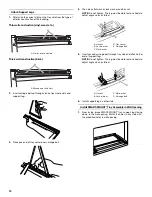
2. Insert carriage bolt up through slot on tray-frame side and
support leg.
3. Place one end of tray center over carriage bolt.
4. Then place flat washer, lock washer and hex nut.
NOTE: Do not tighten. The leg must be able to move freely to
adjust angle when installed.
5. Insert second carriage bolt through tray side and attach other
end of support leg.
NOTE: Do not tighten. The leg must be able to move freely to
adjust angle when installed.
6. Install support leg on other side.
Install SMART-MOUNT
®
Tray Assembly in Wall Opening
1. From inside, place SMART-MOUNT
®
tray, support legs facing
down, in the wall opening. Match the holes in tray side with
the predrilled holes in wall opening.
A. First and second slots
A. Second and third slots
A
A
A. Hex nut
B. Lock washer
C. Flat washer
D. Tray center
E. Carriage bolt
A. Hex nut
B. Lock washer
C. Flat washer
D. Carriage bolt
A
B
C
D
E
A
B
C
D


