14
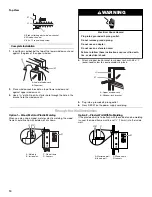
2. If the feet on the bottom of the air conditioner do not rest on
the wood strip, remove the air conditioner and adjust the
SMART-MOUNT
®
tray until feet rest on the wood strip.
3. If top channel does not rest against the top of the wall
opening, remove air conditioner and adjust SMART-MOUNT
®
tray until top channel rests against wall.
IMPORTANT: The tray must slope downward slightly toward
the outside to provide proper drainage for the air conditioner.
4. If the bottom of the air conditioner does not sit against the
bottom of the SMART-MOUNT
®
tray, remove air conditioner
and adjust angle of tray until air conditioner sits against the
bottom of the tray.
IMPORTANT: The tray must slope downward slightly toward
the outside to provide proper drainage for the air conditioner.
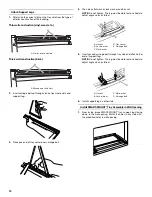
5. Install screws through the top channel to secure the air
conditioner into the wall opening.
Complete Installation
1. Trim and seal around the air conditioner on the inside and the
outside.
NOTE: Allow for removal of the air conditioner at a later time
for routine annual maintenance.
2. Plug into a grounded 3 prong outlet.
3. Press RESET on the power supply cord plug.
A. Air conditioner
B. Feet on bottom of air conditioner
C.
³⁄₄
" (1.9 cm) x 2" (5 cm) wood strip
A. Top of wall opening
B. Top channel
C. Air conditioner
A
B
C
A
B
C
A. Air conditioner sitting on SMART-MOUNT
®
tray
B. SMART-MOUNT
®
tray
A
B
Electrical Shock Hazard
Plug into a grounded 3 prong outlet.
Do not remove ground prong.
Do not use an adapter.
Do not use an extension cord.
Failure to follow these instructions can result in death,
fire, or electrical shock.
WARNING


