background image

15

The


outside


temperature


is


below

 65°

F

 (18°

C

). 

Do


not


try


to


operate


your


air


conditioner


in


the


cooling


mode


when


the


outside


temperature


is


below

 65°

F

 (18°

C

).

The


temperature


of


the


room


you


are


trying


to


cool


is


extremely


hot

Allow


extra


time


for


the


air


conditioner


to


cool


off


a


very


hot


room

.

Windows


or


doors


to


the


outside


are


open

Close


all


windows


and


doors

.

The


Temp


control


is


not


at


a


cool


enough


setting

Adjust


the


Temp


control


to


a


cooler


setting


by


pressing


the


minus


button


to


reduce


the


temperature

Set


the


Fan


Speed


control


to


the


highest


setting

.

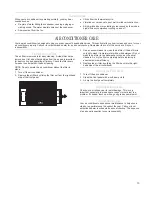
Water


drips


from


cabinet


into


your


house

The


air


conditioner


is


not


properly


leveled

The


air


conditioner


should


slope


slightly


downward


toward


the


outside

Level


the


air


conditioner


to


provide


a


downward


slope


toward


the


outside


to


ensure


proper


drainage

See


the


Installation


Instructions

NOTE

Do


not


drill


a


hole


in


the


bottom


of


the


metal


base


and


condensate


pan

.

ASSISTANCE


OR


SERVICE

Before


calling


for


assistance


or


service

please


check


Troubleshooting

It


may


save


you


the


cost


of


a


service


call

If


you


still


need


help

follow


the


instructions


below

.

When


calling

please


know


the


purchase


date


and


the


complete


model


and


serial


number


of


your


appliance

This


information


will


help


us


to


better


respond


to


your


request

.

If


you


need


replacement


parts

If


you


need


to


order


replacement


parts

we


recommend


that


you


use


only


factory

-

specified


replacement


parts

Factory

-

specified


replacement


parts


will


fit


right


and


work


right


because


they


are


made


with


the


same


precision


used


to


build


every


new


appliance

To


locate


factory

-

specified


replacement


parts


in


your


area

call


your


nearest


designated


service


center

.

Please


record


your


model

'

s


information

.

Whenever


you


call


to


request


service


on


your


appliance

you


need


to


know


your


complete


model


number


and


serial


number

You


can


find


this


information


on


the


model


and


serial


number


label

See

 "

Electrical


Requirements”for


the


location


of


the


model


and


serial


number


label

Please


record


the


model


and


serial


number


information


below

Also

record


the


purchase


date


of


your


appliance


and


the


store

'

s


name

address

and


telephone


number

.

Model


Number

__________________________________________________

Serial


Number

__________________________________________________

Purchase


Date

__________________________________________________

Store


Name

____________________________________________________

Store


Address

__________________________________________________

Store


Phone

____________________________________________________

Keep


this


book


and


the


sales


slip


together


for


future


reference

.

In


the


U

.

S

.

A

.

Call


Customer


Service


toll


free

: 1-877-465-3566 

or


visit


our


website


at


www

.

whirlpool

.

com

.

Our


consultants


provide


assistance


with

:

Features


and


specifications


on


our


appliances

.

Installation


information

.

Use


and


maintenance


procedures

.

Repair


parts


sales

.

Referrals


to


repair


parts


distributors


and


service


companies

Designated


service


technicians


are


trained


to


fulfill


the


product


warranty


and


provid e


after

-

warranty


service

anywhere


in


the


United


States

.

For


further


assistance

If


you


need


further


assistance

you


can


write


with


any


questions


or


concerns


to

:

Hisense


USA


Corp

.

Customer


Service

Suwanee

GA

 30024

Please


include


a


daytime


phone


number


in


your


correspondence

.

7310 McGinnis Ferry Road

Summary of Contents for AW05CR1SRHUE

Page 1: ...mance parts or service call 1 877 465 3566 ACONDICIONADOR DE AIRE PARA HABITACIÓN Manualdeusoycuidado Si tiene preguntas respecto a las características funcionamiento rendimiento partes o servicio técnico llame al 1 877 465 3566 Table of Contents Índice Table des matières 2 1545059 ...

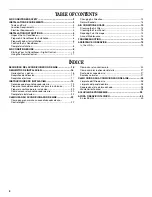
Page 2: ... S A 15 ÍNDICE SEGURIDAD DEL ACONDICIONADOR DE AIRE 16 REQUISITOS DE INSTALACIóN 16 Herramientas y piezas 16 Requisitos de ubicación 17 Requisitos eléctricos 17 INSTRUCCIONES DE INSTALACIóN 19 Desempaque el acondicionador de aire 19 Prepare el acondicionador de aire para la instalación 19 Prepare la ventana para la instalación 20 Cómo colocar el acondicionador de aire 20 Complete la instalación 22...

Page 3: ...e basic precautions SAVE THESE INSTRUCTIONS Unplug air conditioner before servicing Use two or more people to move and install air conditioner Plug into a grounded 3 prong outlet Do not remove ground prong Do not use an adapter Do not use an extension cord You safety and the safety of others are very important Before disposing of the remote control it is necessary to remove the batteries and dispo...

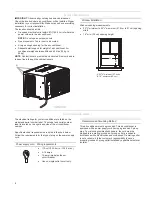
Page 4: ... height Electrical Requirements The electrical ratings for your air conditioner are listed on the model and serial number label The model and serial number label is located on the right hand side of the air conditioner cabinet Specific electrical requirements are listed in the chart below Follow the requirements for the type of plug on the power supply cord Recommended Grounding Method This air co...

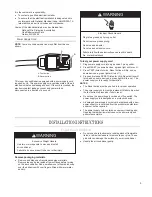
Page 5: ... supply cord must be replaced if it fails to trip when the test button is pressed or fails to reset Do not use the power supply cord as an off on switch The power supply cord is designed as a protective device A damaged power supply cord must be replaced with a new power supply cord obtained from the product manufacturer and must not be repaired The power supply cord contains no user serviceable p...

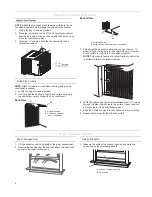
Page 6: ...housing into the channels as far as it will go 6 Repeat above steps for the left hand curtain Attach Adhesive Seal 1 Cut the adhesive seal to the width of the lower window sash 2 Remove the backing from the seal and attach the seal to the bottom of the lower window sash Install L Brackets 1 Measure the width of the window opening and mark the centre line on the outside windowsill A B A Curtain hou...

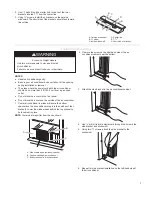
Page 7: ...p into the notches of the L brackets Lower the window sash behind the top channel to hold cabinet in place NOTE Your model may differ from the one shown A Outside windowsill B screw C Inside windowsill D Center line E F Short side of bracket A B C D B E E F A Side curtain against window channel B Window sash behind top channel C Bottom channel in bracket notches WARNING Excessive Weight Hazard Use...

Page 8: ... air conditioner will not operate properly NOTE In the event of a power failure your air conditioner will operate at the previous settings when the power is restored A Top of lower window sash B Foam seal A B Electrical Shock Hazard Plug into a grounded 3 prong outlet Do not remove ground prong Do not use an adapter Do not use an extension cord Failure to follow these instructions can result in de...

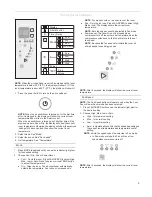
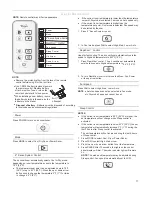
Page 9: ...ted in Fan mode NOTE After 5 seconds the display will show the current room temperature NOTE When the air conditioner is turned on for the first time after it is plugged in the display will show the current room temperature and will run in the Smart control When the air conditioner is turned on at all other times if the settings for 5 seconds and then show the current room temperature 2 Select mod...

Page 10: ... remaining hours before the air conditioner will turn on 3 Press the plus or minus TEMP button to change the delay time from 30 minutes to 24 hours 4 After 5 seconds Timer indicator light will remain on Display will show the current room temperature T o set the Timer to turn on the air conditioner changing the previous settings 1 Turn on air conditioner 2 Adjust the mode to Cool Dry Fan or Power S...

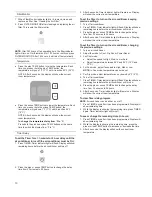
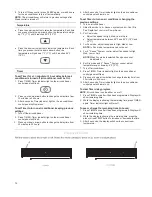
Page 11: ...mperature will automatically increase 2 F 1 C during the first 2 hours after Sleep control is activated The set temperature will not increase during the last 6 hours of Sleep control 1 Press MODE to select Cool Dry or Power Saver 2 Press FAN to select High Med or Low 3 Press the up or down arrow button to set the temperature 4 Press SLEEP After 10 seconds the lights on the control panel display wi...

Page 12: ...imer to turn on air conditioner changing the previous settings 1 Turn on air conditioner 2 Adjust the mode 3 For Cool mode Adjust fan speed to High Med Low or Auto Adjust temperature between 64 F and 90 F 18 C and 32 C 4 For Fan mode adjust fan speed to High Med or Low NOTE In Fan mode temperature cannot be set 5 For adjust fan speed to High Med Low or Auto 6 For Dry mode and adjust temperature up...

Page 13: ...whether it needs cleaning NOTE Do not operate the air conditioner without the filter in place 1 Turn off the air conditioner 2 Remove the air filter by sliding the filter out from the right hand side of the front panel 3 Use a vacuum cleaner to clean the air filter If the air filter is very dirty wash it in warm water with a mild detergent Do not wash the air filter in the dishwasher or use any ch...

Page 14: ...n light will turn on to resume operation NOTE A damaged power supply cord must be replaced with a new power supply cord obtained from the product manufacturer and must not be repaired Air conditioner seems to run too much The current air conditioner replaced an older model The use of more efficient components may cause the air conditioner to run longer than an older model but the total energy cons...

Page 15: ... every new appliance T o locate factory specified replacement parts in your area call your nearest designated service center Please record your model s information Whenever you call to request service on your appliance you need to know your complete model number and serial number Y ou can find this information on the model and serial number label See Electrical Requirements for the location of the...

Page 16: ...o de incendio choque eléctrico o lesiones personales al usar su acondicionador de aire siga estas precauciones básicas CONSERVE ESTAS INSTRUCCIONES Desconecte el acondicionador de aire antes de darle servicio Use dos o más personas para mover e instalar el acondicionador de aire Conecte a un contacto de pared de conexión a tierra de 3 terminales No quite el terminal de conexión a tierra No use un ...

Page 17: ... a 61 2 kg NOTAS No deben obstruirse las rejillas de la carcasa El aire debe circular libremente a través de las rejillas de la carcasa Instalación en la ventana Medidas de la abertura de la ventana Ancho de la abertura 22 3 4 57 8 cm mínimo a 34 1 4 87 cm máximo Altura de la abertura 14 35cm mínimo Requisitoseléctricos La etiqueta de modelo y serie se encuentra en el lado derecho de la carcasa de...

Page 18: ...able de suministro de energía está listo para su funcionamiento NOTAS El botón de reposición debe presionarse para el funcionamiento adecuado El cable de suministro de energía debe ser reemplazado si no se dispara cuando se presione el botón de prueba o cuando falle la reposición No use el cable de suministro de energía como un interruptor de encendido y apagado Un cable de suministro de energía d...

Page 19: ...ato de aire acondicionado alineando los 4 agujeros del canal superior con los 4 agujeros de la parte de arriba del aparato de aire acondicionado 3 Use 4 tornillos 3 8 fije el canal superior al aire acondicionado Instalación de los paneles laterals NOTA Fije los paneles al aire acondicionado antes de colocarlo en la ventana 1 Busque la bolsa de tornillos proporcionada 2 Coloque la parte superior e ...

Page 20: ... acondicionador de aire debe colocarse a no más de 4 pies 122 cm de un tomacorriente de conexión a tierra No bloquee las rejillas que están en el panel delantero No bloquee las rejillas que están en el exterior del acondicionador de aire 1 Centre el acondicionador de aire en la ventana Asegúrese de que las ranuras inferiores del acondicionador de aire caigan en las muescas de los soportes en L Baj...

Page 21: ... que encaje en la ranura de la ventana 2 Use una broca de para taladrar un orificio guía a través del orificio en la cortina lateral y marco de la ventana 3 Introduzca uno de los tornillos de a través de la cortina del lado izquierdo y hacia el marco de la ventana 4 Repita los pasos anteriores para la cortina derecha Vista del marco de la ventana 5 Taladre un orificio guía a través de la muesca de...

Page 22: ...TA En caso de corte de electricidad el acondicionador de aire funcionará con los ajustes previos cuando se reanude la electricidad Cómoponerenmarchasuacondicionadorde aire Control digital NOTA Cuando el acondicionador de aire se fije en el modo FAN Ventilador si la temperatura de la habitación es menor de 32ºF 0ºC la pantalla mostrará LO Si la temperatura de la habitación es mayor de 99ºF 37ºC la ...

Page 23: ...d del ventilador Auto Automática no puede seleccionarse en el modo de Fan Ventilador NOTA Después de 5 segundos la pantalla indicará la temperatura ambiente actual Monitor del filtro 1 Cuando la luz indicadora Filter Monitor Monitor del filtro se ilumine saque limpie y vuelva a colocar el filtro de aire Vea Limpieza del filtro de aire 2 Presione y sostenga FILTER MONITOR Monitor del filtro durante...

Page 24: ...or una vez después de que haya sido programado La pantalla mostrará el tiempo restante 2 Mientras la pantalla muestra el tiempo restante usted puede oprimir el botón de TEMP más o menos para aumentar o disminuir el tiempo 3 Después de 5 segundos la pantalla mostrará la temperatura actual de la habitación Cómousarelcontrolremoto NOTA La apariencia del control remoto puede variar NOTA El control rem...

Page 25: ...n la flecha hacia abajo para disminuir la temperatura Cada vez que presione o sostenga el botón con la flecha hacia abajo la temperatura disminuirá 1 F 1 C hasta llegar a 64 F 18 C El acondicionador de aire ajusta la temperatura automáticamente y fija la velocidad del ventilador en Low Baja durante hasta 8 horas NOTAS Si la temperatura ambiente actual es de 79ºF 26ºC o mayor la temperatura de ajus...

Page 26: ...tiempo restante oprima TIMER Temporizador nuevamente La luz indicadora del Temporizador se apagará Para ver o cambiar el tiempo restante en horas 1 Oprima TIMER Temporizador una vez después de que haya sido programado La pantalla mostrará el tiempo restante 2 Mientras la pantalla muestra el tiempo restante usted puede oprimir el botón con la flecha hacia arriba o hacia abajo para aumentar o dismin...

Page 27: ...d del ventilador esté funcionando Sonidosnormales Cuando el acondicionador de aire está funcionando normalmente usted podrá escuchar sonidos como Gotas de agua que caen sobre el condensador produciendo tintineos o chasquidos Las gotas de agua ayudan a enfriar el condensador El movimiento del aire que sale del ventilador Chasquidos del ciclo del termostato Vibraciones o ruidos debidos a deficiencia...

Page 28: ...o anual para ayudar a asegurar un rendimiento constante de la mejor calidad durante todo el año Llame al distribuidor autorizado de su localidad para hacer una cita para el chequeo anual El precio del chequeo anual es su responsabilidad SOLUCIÓN DE PROBLEMAS Antes de solicitar servicio pruebe las sugerencias que se incluyen a continuación para ver si puede resolver el problema sin ayuda El acondic...

Page 29: ...chas etc en la habitación Use un ventilador para eliminar el calor o la humedad de la habitación Trate de no usar aparatos que generan calor durante las horas más calurosas del día Las rejillas están bloqueadas Instale el acondicionador de aire en un lugar donde las rejillas no estén bloqueadas por cortinas persianas muebles etc La temperatura exterior es inferior a los 65 F 18 C No trate de poner...

Page 30: ... información sobre el número del modelo y el número de serie que se incluye abajo Anote también la fecha de compra del aparato así como el nombre la dirección y el teléfono de la tienda Número de modelo _____________________________________________ Número de serie ________________________________________________ Fecha de compra _______________________________________________ Nombre de la tienda __...

Page 31: ... Registered Trademark Trademark of Whirlpool U S A Manufactured under license by Hisense USA Corp Suwanee GA Marque déposée Marque de commerce de Whirlpool U S A Fabriqué sous licence par Hisense USA Corp Suwanee GA TM TM Warranty provided by manufacturer Garantie fournie par le fabricant ...

Reviews: