background image

GR105

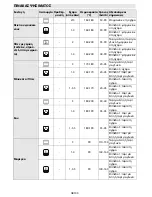
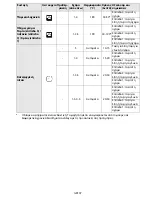
Ψωμί / Πίτσα / 
Φοκάτσια

-

1/2

190-250

15-50

Ταψί για λίπη ή ταψί 
για γλυκά

-

1-4

190-250

20-50

Επίπεδο 4: ταψί στη 
σχάρα
Επίπεδο 1: ταψί για 
λίπη ή ταψί για γλυκά

-

1-3-5

190-250

25-50

Επίπεδο 5: ταψί στη 
σχάρα
Επίπεδο 3: ταψί στη 
σχάρα
Επίπεδο 1: ταψί για 
λίπη ή ταψί για γλυκά

Αλμυρές πίτες 
(χορτόπιτα, κις)

-

2/3

190-200

35-55 Φόρμα κέικ στη σχάρα

-

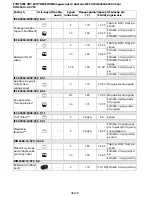
1-4

180-190

45-70

Επίπεδο 4: φόρμα κέικ 
στη σχάρα
Επίπεδο 1: φόρμα κέικ 
στη σχάρα

-

1-3-5

180-190

45-70

Επίπεδο 5: φόρμα κέικ 
στη σχάρα
Επίπεδο 3: φόρμα κέικ 
στη σχάρα
Επίπεδο 1: ταψί για 
λίπη ή ταψί για γλυκά 
+ φόρμα κέικ

Βολοβάν / Αλμυρά 
με φύλλο κρούστας

-

3

190-200

20-30

Ταψί για λίπη ή ταψί 
για γλυκά

-

1-4

180-190

20-40

Επίπεδο 4: ταψί στη 
σχάρα
Επίπεδο 1: ταψί για 
λίπη ή ταψί για γλυκά

-

1-3-5

180-190

20-40

Επίπεδο 5: ταψί στη 
σχάρα
Επίπεδο 3: ταψί στη 
σχάρα
Επίπεδο 1: ταψί για 
λίπη ή ταψί για γλυκά

Λαζάνια / Ζυμαρι-
κά στο φούρνο / 
Κανελόνια / Φλαν

-

3

190-200

45-55 Ταψί στη σχάρα

Αρνί / Μοσχάρι / 
Βοδινό / Χοιρινό 1 
Kg

-

2

180-190

80-120

Ταψί για λίπη ή ταψί 
στη σχάρα

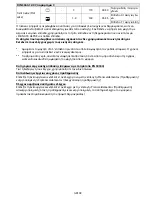
Κοτόπουλο / Κου-
νέλι / Πάπια 1 Kg

-

3

200-220

50-100

Ταψί για λίπη ή ταψί 
στη σχάρα

Γαλοπούλα / Χήνα 
3 Kg

-

2

190-200

80-130

Ταψί για λίπη ή ταψί 
στη σχάρα

Ψάρι στο φούρνο / 
σε λαδόκολλα 
(φιλέτο, ολόκληρο)

-

3

180-200

40-60

Ταψί για λίπη ή ταψί 
στη σχάρα

Συνταγή

Λειτουργία Προθέρ-

μανση

Σχάρα

(από κάτω)

Θερμοκρασία

(°C)

Χρόνος

(λεπτά)

Αξεσουάρ και 
σημειώσεις

Summary of Contents for AKZM 835

Page 1: ...AKZM 835 User and maintenance manual Manual del Usuario y de Mantenimiento Manual do utilizador e de manutenção Manuale d uso e manutenzione Εγχείριδιο χρήσης και συντήρησης IT ...

Page 2: ......

Page 3: ...ucted in its use by those responsible for their safety The accessible parts of the appliance may become very hot during use Young children should be kept away from the appliance and supervised to ensure that they do not play with it During and after use do not touch the heating elements or interior surfaces of the appliance risk of burns Do not allow the appliance to come into contact with cloths ...

Page 4: ...cable replacement type H05 RR F 3 x 1 5 mm2 must be carried out by a qualified electrician Contact an authorized service centre GENERAL RECOMMENDATIONS Before use Remove cardboard protection pieces protective film and adhesive labels from accessories Remove the accessories from the oven and heat it at 200 for about an hour to eliminate the smell and fumes from the insulating materials and protecti...

Page 5: ...urn off the oven and restart it to see if the fault persists The electronic programmer does not work If the display shows the letter followed by a number contact your nearest After sales Service Specify in this case the number that follows the letter Before calling the After Sales Service 1 See if you can solve the problem yourself with the help of the suggestions given in the Troubleshooting guid...

Page 6: ...tribute 350 ml of water evenly on the cellulose cloth A smaller or greater amount of water could compromise proper functioning of the cycle 6 Close the oven door 7 Select the symbol with the functions knob the word STARCLEAN appears on the display 8 Press button to confirm the choice and start the cleaning cycle To prevent steam coming out do not open the door during the cycle 9 At the end of the ...

Page 7: ...s far as it will go A lift it up B and turn it C until it is released D Fig 2 To refit the door 1 Insert the hinges in their seats 2 Open the door fully 3 Lower the two catches 4 Close the door MOVING THE TOP HEATING ELEMENT SOME MODELS ONLY 1 Remove the side accessory holder grilles Fig 3 2 Pull the heating element out a little Fig 4 and lower it Fig 5 3 To reposition the heating element lift it ...

Page 8: ... a screwdriver to prise off the lamp cover Fig 7 4 Replace the lamp see note for lamp type Fig 8 5 Reposition the lamp cover pushing it on firmly until it snaps into place Fig 9 6 Refit the side accessory holder grilles 7 Reconnect the oven to the power supply N B Only use 25 40W 230V type E 14 T300 C incandescent lamps or 20 40W 230 V type G9 T300 C halogen lamps Lamps are available from our Afte...

Page 9: ...ling fan may continue to run for a while When the oven door is opened during cooking the heating elements switch off ACCESSORIES SUPPLIED A WIRE SHELF 2 the wire shelf can be used to grill food or as a support for pans cake tins and other ovenproof cooking receptacles B DRIP TRAY 1 the drip tray is designed to be positioned under the wire shelf in order to collect fat or as an oven tray for cookin...

Page 10: ...TION SELECTOR KNOB On off and function selector knob 2 BROWSE KNOB for browsing the menu and adjusting pre set values N B the two knobs are retractable Press the knobs in the middle and they pop up 3 BUTTON to return to the previous screen 4 BUTTON to select and confirm settings LIST OF FUNCTIONS Turn the Functions knob to any position and the oven switches on the display shows the functions or th...

Page 11: ...isplay If the pre set values are those desired turn the Browse knob to position the cursor at Start and then press otherwise proceed as indicated above to change them SETTING THE TEMPERATURE OUTPUT OF THE GRILL To change the temperature or output of the grill proceed as follows 1 Check that the cursor is positioned next to the temperature value zone 3 press button to select the parameter to be cha...

Page 12: ... which the oven switches off automatically 1 The submenus are available and selectable by turning the Browse knob to position the cursor at COOKING TIME 2 Press button to select the setting 00 00 flashes on the display 3 Change the value by turning the Browse knob to display the desired cooking time 4 Confirm the selected value by pressing button BROWNING At the end of cooking with certain functio...

Page 13: ...ng cooking time can be changed as described in previous paragraphs INDICATION OF THE RESIDUAL HEAT INSIDE THE OVEN IF PRESENT If at the end of cooking or when the oven is switched off the temperature inside the oven is high on some models the display shows the current temperature and the bar indicating cooling in progress Once the oven chamber has cooled down the display shows the current time aga...

Page 14: ... is cooked to your satisfaction If it is not extra time can then be added manually by turning the Browse knob SETTINGS 1 To change some display settings select SETTINGS from the main menu by turning the Functions knob 2 Confirm by pressing the display shows which settings can be changed language volume of acoustic signal display brightness time energy saving function 3 Select the setting to be cha...

Page 15: ...eaning cycle To prevent steam coming out do not open the door during the cycle 9 At the end of the cycle remove the cellulose cloth and eliminate any residual water in the oven 10 Then start cleaning using the sponge provided moistened with hot water cleaning could be compromised if delayed by more than 15 minutes Particularly stubborn grime To eliminate particularly stubborn grime repeat the STAR...

Page 16: ...cakes This function can be used to cook different foods without odours being transferred from one food to another Use the 3rd shelf to cook on one shelf only the 1st and 4th to cook on two shelves and the 1st 3rd and 5th to cook on three shelves The oven does not have to be preheated STARCLEAN To eliminate the dirt created by cooking by means of a low temperature cycle The combined action of the s...

Page 17: ...scuits liquid cake mixtures muffins first courses and bakery products This function gently cooks all food quickly it can also be used to reheat cooked food Follow the instructions on the food packaging The oven does not have to be preheated MAXI COOKING To cook large joints of meat above 2 5 kg Use the 1st or 2nd shelf depending on the size of the joint The oven does not have to be preheated It is...

Page 18: ... tray on wire shelf Shelf 1 drip tray or baking tray 1 3 5 180 190 35 45 Shelf 5 oven tray on wire shelf Shelf 3 oven tray on wire shelf Shelf 1 drip tray or baking tray Meringues 3 90 110 150 drip tray or baking tray 1 4 90 140 160 Shelf 4 oven tray on wire shelf Shelf 1 drip tray or baking tray 1 3 5 90 140 160 Shelf 5 oven tray on wire shelf Shelf 3 oven tray on wire shelf Shelf 1 drip tray or ...

Page 19: ...elf 4 wire shelf turn food halfway through cooking Shelf 3 drip tray with water Sausages Kebabs Spare ribs Ham burgers 5 Medium High 15 30 Shelf 5 wire shelf turn food halfway through cooking Shelf 4 drip tray with water Roast chicken 1 1 3 Kg 2 Medium 55 70 Shelf 2 wire tray turn food two thirds of the way through cooking Shelf 1 drip tray with water 2 High 60 80 Shelf 2 turnspit if present Shelf...

Page 20: ...vel 1 1 3 5 190 40 120 Level 5 pan on rack Level 3 pan on rack Level 1 drip tray or pan on rack Frozen pizza 3 Auto 10 15 Drip tray baking tray or wire shelf 1 4 Auto 15 20 Shelf 4 oven tray on wire shelf Shelf 1 drip tray or baking tray 1 3 5 Auto 20 30 Shelf 5 oven tray on wire shelf Shelf 3 drip tray or baking tray Shelf 1 oven tray on wire shelf 1 3 4 5 Auto 20 30 Shelf 5 oven tray on wire she...

Page 21: ...tivated the oven control intentionally creates an oscillation of the temperature profile Recipe Function Pre heating Shelf from bottom Temp C Time min Accessories and notes IEC 60350 2009 03 8 4 1 Shortbread 3 170 15 30 Drip tray baking tray 1 4 160 20 35 Shelf 4 baking tray Shelf 1 drip tray IEC 60350 2009 03 8 4 2 Small cakes 3 170 25 35 Drip tray baking tray 1 4 160 30 40 Shelf 4 baking tray Sh...

Page 22: ...moist fillings cheesecake or fruit pies use the CONVECTION BAKE function If the base of the cake is soggy lower the shelf and sprinkle the bottom of the cake with breadcrumbs or biscuit crumbs before adding the filling Meat Use any kind of oven tray or pyrex dish suited to the size of the piece of meat being cooked For roast joints it is best to add some stock to the bottom of the pan basting the ...

Page 23: ...a ponerlo en funcionamiento salvo que hayan recibido instrucciones de uso del aparato de una persona responsable de su seguridad Las partes accesibles pueden recalentarse mucho durante el uso Los niños deben mantenerse a distancia y vigilados para que no jueguen con el aparato Durante y después del uso no tocar las resistencias ni las superficies internas del aparato ya que pueden causar quemadura...

Page 24: ... red La placa de datos se encuentra en el borde frontal del horno visible con la puerta del horno abierta La sustitución del cable de alimentación tipo H05 RR F 3 x 1 5 mm2 debe llevarla a cabo un electricista profesional Ponerse en contacto con un centro de asistencia técnica autorizado RECOMENDACIONES GENERALES Antes del uso Quitar las protecciones de cartón la película protectora y las etiqueta...

Page 25: ... horno para comprobar si se ha solucionado el problema El programador electrónico no funciona Si la pantalla muestra la letra seguida de un número póngase en contacto con el Servicio de asistencia más cercano Indique el número que aparece después de la letra Antes de contactar con el Servicio de Asistencia 1 Intente resolver el problema consultando el apartado Guía para la solución de problemas 2 ...

Page 26: ...350 ml de agua uniformemente sobre el paño de celulosa No utilizar cantidades de agua inferiores o superiores ya que se puede perjudicar el funcionamiento del ciclo 6 Cerrar la puerta del horno 7 Poner el selector de funciones en el símbolo aparece STARCLEAN en pantalla 8 Pulsar la tecla para confirmar la selección y dar inicio al ciclo de limpieza No abrir la puerta durante el ciclo para evitar l...

Page 27: ...al máximo A levántela B y gírela C hasta liberarla D Fig 2 Para montar la puerta 1 Introduzca las bisagras en sus posiciones 2 Abra la puerta por completo 3 Baje las dos palancas de bloqueo 4 Cierre la puerta DESPLAZAMIENTO DE LA RESISTENCIA SUPERIOR SÓLO EN ALGUNOS MODELOS 1 Extraiga las rejillas laterales de soporte de accesorios Fig 3 2 Tire de la resistencia ligeramente hacia fuera Fig 4 y báj...

Page 28: ...n destornillador hasta sacar la tapa Fig 7 4 Sustituya la bombilla consulte la nota sobre el tipo de bombilla Fig 8 5 Vuelva a poner la tapa y empuje contra la pared para engancharla bien Fig 9 6 Monte las rejillas laterales de soporte de los accesorios 7 Vuelva a conectar el horno a la red eléctrica NOTA Utilice sólo bombillas incandescentes de 25 40W 230V tipo E 14 T300 C o bombillas halógenas d...

Page 29: ...le que el ventilador de refrigeración siga funcionando durante un determinado lapso de tiempo Al abrir la puerta durante la cocción las resistencias se desactivan ACCESORIOS INCLUIDOS DE SERIE A PARRILLA 2 se utiliza para cocinar alimentos o como apoyo para fuentes moldes de tartas y otros recipientes de cocción B GRASERA 1 Colocada debajo de la parrilla sirve para recoger la grasa como bandeja se...

Page 30: ...e las funciones 2 MANDO DE DESPLAZAMIENTO navegación por el menú configuración de valores NOTA los dos selectores son abatibles Ejercer presión en el centro para extraerlos de su alojamiento 3 TECLA para volver a la pantalla anterior 4 TECLA para seleccionar y confirmar los ajustes LISTA DE FUNCIONES Al situar el selector de funciones en cualquier posición el horno se activa y en la pantalla apare...

Page 31: ...a hora girando el selector Navegación 5 Pulsar para confirmar el ajuste SELECCIÓN DE LAS FUNCIONES DE COCCIÓN 1 Si el horno está apagado girar el selector Funciones aparecen en pantalla las funciones de cocción y los submenús NOTA si desea más información sobre la lista y la descripción de las funciones consulte la tabla específica página 34 y página 35 2 Dentro del submenú explorar las posibilida...

Page 32: ...ra confirmar la opción seleccionada PRECALENTADO RÁPIDO Si desea precalentar rápidamente el horno 1 Seleccionar la función de precalentado rápido girando el selector Funciones 2 Confirme con la tecla los ajustes aparecen en la pantalla 3 Si la temperatura propuesta es adecuada girar el selector Navegación hasta poner el cursor en Inicio y luego pulsar la tecla Para modificarla seguir las indicacio...

Page 33: ...eado 4 Pulse la tecla para confirmar el valor seleccionado 5 Girar el selector Navegación hasta poner el cursor en INICIO y pulsar la tecla 6 En la pantalla aparece el nivel recomendado para colocar los alimentos Ejecutar la operación y pulsar la tecla para iniciar la cocción El horno iniciará la cocción al cumplirse el tiempo de espera calculado para que la cocción termine a la hora programada po...

Page 34: ...o indicativo de cocción 6 Introducir los alimentos y girar el selector Navegación hasta poner el cursor en Inicio y pulsar la tecla 7 En la pantalla aparece el nivel recomendado para colocar los alimentos Ejecutar la operación y pulsar la tecla para iniciar la cocción Para retardar la cocción consulte el parágrafo específico NOTA algunos alimentos se han de girar o mezclar a mitad de la cocción el...

Page 35: ...l paño de celulosa No utilizar cantidades de agua inferiores o superiores ya que se puede perjudicar el funcionamiento del ciclo 6 Cerrar la puerta del horno IMPORTANTE No abrir la puerta durante el ciclo para evitar la salida del vapor 7 Poner el selector de funciones en el símbolo aparece STARCLEAN en pantalla 8 Pulsar la tecla para confirmar la selección y dar inicio al ciclo de limpieza No abr...

Page 36: ...ratura de cocción por ejemplo pescado verduras dulces La función permite cocinar sin transmitir olores de un alimento a otro Utilizar el 3 nivel para cocinar en un solo nivel el 1 y el 4 para cocinar en dos niveles y el 1 el 3 y el 5 para cocinar en tres niveles No es necesario precalentar el horno STARCLEAN Para eliminar la suciedad generada por la cocción con un ciclo a baja temperatura La acció...

Page 37: ... frigorífico galletas preparados líquidos para tartas muffins primeros platos y productos tipo pan Esta función permite cocinar cualquier alimento de manera rápida y delicada también se puede utilizar para calentar alimentos ya cocinados Seguir las instrucciones contenidas en el envase de los alimentos No es necesario precalentar el horno MAXI COCCIÓN Para cocinar piezas de carne de gran tamaño má...

Page 38: ...1 4 160 170 20 45 Nivel 4 parrilla Nivel 1 grasera o bandeja pastelera 1 3 5 160 170 20 45 Nivel 5 bandeja sobre parrilla Nivel 3 bandeja sobre parrilla Nivel 1 grasera o bandeja pastelera Petisús 3 180 200 30 40 Grasera o bandeja pastelera 1 4 180 190 35 45 Nivel 4 bandeja sobre parrilla Nivel 1 grasera o bandeja pastelera 1 3 5 180 190 35 45 Nivel 5 bandeja sobre parrilla Nivel 3 bandeja sobre p...

Page 39: ...ja pastelera 1 4 180 190 20 40 Nivel 4 bandeja sobre parrilla Nivel 1 grasera o bandeja pastelera 1 3 5 180 190 20 40 Nivel 5 bandeja sobre parrilla Nivel 3 bandeja sobre parrilla Nivel 1 grasera o bandeja pastelera Lasaña pasta al horno canelones budines 3 190 200 45 55 Bandeja sobre parrilla Cordero ternera buey cerdo 1 kg 2 180 190 80 120 Grasera o bandeja sobre parrilla Pollo conejo pato 1 kg ...

Page 40: ...ra o bandeja sobre parrilla invierta el alimento a dos tercios de la cocción si es necesario Patatas asadas 3 Medio 45 55 Grasera o bandeja pastelera invierta el alimento a dos tercios de la cocción si es necesario Verduras gratina das 3 Alto 10 15 Bandeja sobre parrilla Lasañas y carnes 1 4 200 50 100 Nivel 4 bandeja sobre parrilla Nivel 1 grasera o bandeja sobre parrilla Carnes y patatas 1 4 200...

Page 41: ...obre parrilla Nivel 1 grasera o bandeja pastelera 1 3 5 Automático 20 30 Nivel 5 bandeja sobre parrilla Nivel 3 grasera o bandeja pastelera Nivel 1 bandeja sobre parrilla 1 3 4 5 Automático 20 30 Nivel 5 bandeja sobre parrilla Nivel 4 grasera o bandeja pastelera Nivel 3 grasera o bandeja pastelera Nivel 1 bandeja sobre parrilla Receta Función Pre calentado Nivel desde la base Temp C Tiempo min Acc...

Page 42: ...eja pastelera 1 4 160 20 35 Nivel 4 bandeja pastelera Nivel 1 grasera IEC 60350 2009 03 8 4 2 Pasteles Small cakes 3 170 25 35 Grasera bandeja pastelera 1 4 160 30 40 Nivel 4 bandeja pastelera Nivel 1 grasera 1 3 5 160 35 45 Nivel 5 bandeja sobre parrilla Nivel 3 bandeja pastelera Nivel 1 grasera IEC 60350 2009 03 8 5 1 Bizcocho sin grasa Fatless sponge cake 2 170 30 40 Molde sobre parrilla IEC 60...

Page 43: ... tiempo de calentamiento Seleccionar la función y realizar la prueba sólo con la opción Precalentado activada Sí precalentado Prueba de precisión del control Seleccionar la función y realizar la prueba sólo con la opción Precalentado desactivada con el precalentado activo el control del horno crea una oscilación del perfil de temperatura ...

Page 44: ...yor suavidad Para tartas con relleno húmedo tartas de queso o de frutas utilice la función HORNO DE CONVECCIÓN Si la base del bizcocho o tarta es excesivamente jugoso baje el nivel y extienda pan rallado o galletas trituradas en la base antes de añadir el relleno Carnes Utilice cualquier tipo de bandeja de horno o fuente Pyrex adecuado al tamaño de la pieza de carne que va a cocinar En el caso de ...

Page 45: ...lta de experiência e de conhecimentos sobre o aparelho a menos que sejam vigiadas ou que tenham recebido instruções relativas à utilização do aparelho por parte da pessoa responsável pela sua segurança As partes acessíveis do forno podem vir a ficar quentes durante a utilização do mesmo As crianças pequenas devem ser mantidas afastadas do aparelho a fim de garantir que não brincam com o mesmo Dura...

Page 46: ...o não obstrua a abertura mínima existente entre o tampo e a extremidade superior do forno LIGAR O FORNO À REDE ELÉCTRICA Verifique se a tensão eléctrica especificada na chapa de características do aparelho corresponde à tensão da rede eléctrica A chapa de características está situada na extremidade frontal do forno visível com a porta aberta A substituição do cabo eléctrico tipo H05 RR F 3 x 1 5 m...

Page 47: ...léctrica e se o forno está ligado electricamente Desligue e volte a ligar o forno para verificar se a avaria ficou resolvida A porta não abre Desligue e volte a ligar o forno para verificar se a avaria ficou resolvida O programador electrónico não funciona Se o visor apresentar a letra seguida de um número contacte o Serviço Pós Venda mais próximo Especifique neste caso o número que segue a letra ...

Page 48: ...lulose 350 ml de água Uma quantidade inferior ou superior pode prejudicar o bom funcionamento do ciclo 6 Feche a porta do forno 7 Seleccione com o botão de funções o símbolo a indicação STARCLEAN surge no visor 8 Prima a tecla para confirmar a escolha e iniciar o ciclo de limpeza Não abra a porta durante o funcionamento do ciclo para evitar a saída do vapor 9 Quando o ciclo terminar abra a porta r...

Page 49: ... para a frente Fig 1 3 Feche a porta o mais possível A levante a porta B e rode a C até ficar solta D Fig 2 Para reinstalar a porta 1 Insira as dobradiças nos respectivos suportes 2 Abra a porta na totalidade 3 Baixe os dois travões 4 Feche a porta DESLOCAÇÃO DA RESISTÊNCIA SUPERIOR APENAS EM ALGUNS MODELOS 1 Retire as grelhas do suporte lateral para acessórios Fig 3 2 Puxe a resistência ligeirame...

Page 50: ... cobertura da lâmpada Fig 7 4 Substitua a lâmpada consulte a nota para ver o tipo de lâmpada Fig 8 5 Volte a colocar a cobertura da lâmpada e empurre a contra a parede para que encaixe correctamente Fig 9 6 Volte a colocar as grelhas do suporte lateral para acessórios 7 Ligue o forno novamente à corrente eléctrica NOTA Utilize apenas lâmpadas incandescentes de 25 40 W 230 V tipo E 14 T300 C ou lâm...

Page 51: ...depois de desligar o forno a ventoinha de refrigeração poderá continuar a funcionar durante algum tempo Abrir a porta durante a cozedura desactiva as resistências ACESSÓRIOS INCLUÍDOS A GRELHA 2 usar para cozinhar alimentos ou como suporte para panelas tartes e qualquer outro recipiente apropriado para forno B PINGADEIRA 1 deve ser colocada debaixo da grelha para recolher gordura ou pode ser utili...

Page 52: ...AVEGAÇÃO navegação no menu regulação dos valores predefinidos NOTA Os dois botões são retrácteis Prima o centro do respectivo botão para o extrair da sua posição 3 TECLA para regressar ao ecrã anterior 4 TECLA para seleccionar e confirmar as definições LISTA DE FUNÇÕES Para activar o forno rode o botão Funções para uma posição qualquer o visor exibe as funções ou os submenus associados Os submenus...

Page 53: ...vegação 5 Confirme a definição premindo SELECCIONAR FUNÇÕES DE COZEDURA 1 Se o forno estiver desligado rode o manípulo Funções no visor são exibidas as funções de cozedura ou os respectivos submenus NOTA para a lista e descrição das funções consulte a tabela específica na página 56 e na página 57 2 No interior do submenu explore as diferentes possibilidades disponíveis rodando o botão Navegação a ...

Page 54: ...Sim 4 Confirme a escolha premindo a tecla PRÉ AQUECIMENTO RÁPIDO Quando quiser pré aquecer rapidamente o forno deverá proceder como se segue 1 Seleccione a função pré aquecimento rápido rodando o botão Funções 2 Confirme com a tecla as definições surgem no visor 3 Se a temperatura proposta corresponde à pretendida rode o botão Navegação até colocar o cursor em correspondência com Iniciar e em segu...

Page 55: ... valor pré seleccionado com a tecla 5 Rode o botão Navegação até colocar o cursor em correspondência com INÍCIO e em seguida prima a tecla 6 O visor sugere em qual nível introduzir o alimento Realize a operação e prima a tecla para dar início à cozedura O forno iniciará a cozedura após um tempo de espera calculado de forma a terminar a cozedura à hora pré definida por exemplo caso se deva cozer um...

Page 56: ...po indicativo de cozedura 6 Introduza o alimento e rode o botão Navegação até que o cursor se encontre em correspondência com Iniciar e em seguida prima a tecla 7 O visor sugere em qual nível introduzir o alimento Realize a operação e prima a tecla para dar início à cozedura Para atrasar a cozedura consulte o parágrafo respectivo NOTA Alguns alimentos devem ser girados ou misturados a meio da coze...

Page 57: ... inferior ou superior pode prejudicar o bom funcionamento do ciclo 6 Feche a porta do forno IMPORTANTE Não abra a porta durante o funcionamento do ciclo para evitar a saída do vapor 7 Seleccione com o botão de funções o símbolo a indicação STARCLEAN surge no visor 8 Prima a tecla para confirmar a escolha e iniciar o ciclo de limpeza Não abra a porta durante o funcionamento do ciclo para evitar a s...

Page 58: ... a mesma temperatura de cozedura ex peixe legumes sobremesas A função permite cozinhar sem transmitir odores de uns alimentos para os outros Utilize o 3 nível para cozinhar numa única calha o 1 e 4 para cozinhar em duas calhas e o 1 3 5 para cozinhar em três calhas Não é necessário pré aquecer o forno STARCLEAN Para eliminar a sujidade criada durante a cozedura através de um ciclo de baixa tempera...

Page 59: ...o balcão frigorífico biscoitos preparações líquidas para tartes muffins gratinados e produtos tipo pão A função cozinha todos os alimentos de modo rápido e delicado pode ser utilizada também para aquecer alimentos já cozinhados seguir as indicações da embalagem Não é necessário pré aquecer o forno MAXI COZEDURA Para cozer carne de grandes dimensões superior a 2 5 kg Utilize o 1 ou 2 nível com base...

Page 60: ... 20 45 Nível 4 grelha Nível 1 pingadeira ou tabuleiro para bolos 1 3 5 160 170 20 45 Nível 5 forma para assar na grelha Nível 3 forma para assar na grelha Nível 1 pingadeira ou tabuleiro para bolos Éclairs 3 180 200 30 40 Pingadeira ou tabuleiro para bolos 1 4 180 190 35 45 Nível 4 forma para assar na grelha Nível 1 pingadeira ou tabuleiro para bolos 1 3 5 180 190 35 45 Nível 5 forma para assar na...

Page 61: ...adeira ou tabuleiro para bolos 1 4 180 190 20 40 Nível 4 forma para assar na grelha Nível 1 pingadeira ou tabuleiro para bolos 1 3 5 180 190 20 40 Nível 5 forma para assar na grelha Nível 3 forma para assar na grelha Nível 1 pingadeira ou tabuleiro para bolos Lasanha Massa no forno Cannelloni Desenformados 3 190 200 45 55 Tabuleiro de assar na grelha Borrego vitela vaca porco 1kg 2 180 190 80 120 ...

Page 62: ...sar na grelha vire o alimento a dois terços da cozedura se necessário Batatas assadas 3 Médio 45 55 Pingadeira ou tabuleiro para bolos vire o alimento a dois terços da cozedura se necessário Gratinado de legu mes 3 Alto 10 15 Tabuleiro de assar na grelha Lasanha e Carnes 1 4 200 50 100 Nível 4 forma para assar na grelha Nível 1 pingadeira ou forma para assar na grelha Carnes e Batatas 1 4 200 45 1...

Page 63: ...a Nível 1 pingadeira ou tabuleiro para bolos 1 3 5 Auto 20 30 Nível 5 forma para assar na grelha Nível 3 pingadeira ou tabuleiro para bolos Nível 1 forma para assar na grelha 1 3 4 5 Auto 20 30 Nível 5 forma para assar na grelha Nível 4 pingadeira ou tabuleiro para bolos Nível 3 pingadeira ou tabuleiro para bolos Nível 1 forma para assar na grelha Receita Função Préaque cimento Nível a partir de b...

Page 64: ...ível 1 pingadeira IEC 60350 2009 03 8 4 2 Pequenos doces Small cakes 3 170 25 35 Pingadeira tabuleiro para bolos 1 4 160 30 40 Nível 4 tabuleiro para bolos Nível 1 pingadeira 1 3 5 160 35 45 Nível 5 forma para assar na grelha Nível 3 tabuleiro para bolos Nível 1 pingadeira IEC 60350 2009 03 8 5 1 Pão de ló sem gordura Fatless sponge cake 2 170 30 40 Forma para assar na grelha IEC 60350 2009 03 8 5...

Page 65: ...imento Seleccionar a função e realizar o teste apenas com a opção Pré aquecimento activada Se pré aquecimento Teste de precisão do controlo Seleccionar a função e realizar o teste apenas com a opção Pré aquecimento desactivada quando a opção pré aquecimento está activada o controlo do forno cria intencionalmente uma oscilação do perfil da temperatura ...

Page 66: ...pois poderá impedir o crescimento uniforme do bolo nas extremidades Se o bolo afundar durante a cozedura defina uma temperatura mais baixa na cozedura seguinte eventualmente reduzindo a quantidade de líquidos na mistura e efectuando uma mistura mais cuidadosa No caso de doces com recheios húmidos cheese cake ou tartes de frutas utilize a função COZEDURA CONVECÇÃO Se a base do bolo ficar mal cozida...

Page 67: ...ingir dois terços do tempo de cozedura Função fermentação É sempre melhor cobrir a massa com um pano húmido antes de a colocar no forno O tempo de fermentação com esta função é reduzido em cerca de um terço em comparação com uma fermentação à temperatura ambiente 20 25 C O tempo de fermentação para uma fornada de 1 kg de massa para pizza é de cerca de uma hora ...

Page 68: ...iche sensoriali o mentali o con mancanza di esperienza o conoscenza a meno che non abbiano avuto istruzioni riguardanti l uso dell apparecchio da parte di persone responsabili della loro sicurezza Le parti accessibili possono diventare molto calde durante l uso I bambini devono essere mantenuti a distanza e sorvegliati affinchè non giochino con l apparecchio Durante e dopo l uso non toccare gli el...

Page 69: ...retto funzionamento del prodotto non ostruire l apertura minima tra piano di lavoro e il lato superiore del forno CONNESSIONE ALLA RETE ELETTRICA Controllare che la tensione indicata sulla targhetta matricola del prodotto sia la stessa della rete elettrica Essa si trova sul bordo anteriore del forno visibile quando la porta è aperta Eventuali sostituzioni del cavo di alimentazione tipo H05 RR F 3 ...

Page 70: ... forno sia connesso elettricamente Spegnere e riaccendere il forno per accertare che l inconveniente sia stato ovviato La porta è bloccata Spegnere e riaccendere il forno per accertare che l inconveniente sia stato ovviato Il programmatore elettronico non funziona Se sul display viene visualizzata una seguita da un numero contattare il Servizio Assistenza più vicino Specificare in tal caso il nume...

Page 71: ...acqua Una quantità inferiore o superiore può pregiudicare il buon funzionamento del ciclo 6 Chiudere la porta del forno 7 Selezionare con la manopola funzioni il simbolo la parola STARCLEAN appare sul display 8 Premere il tasto per confermare la scelta ed avviare il ciclo di pulizia Non aprire la porta durante il funzionamento del ciclo per evitare la fuoriuscita del vapore 9 A ciclo completato ap...

Page 72: ...porta fino al bloccaggio A sollevarla B e ruotarla C fino allo sganciamento della stessa D Fig 2 Per riposizionare la porta 1 Inserire le cerniere nelle apposite sedi 2 Aprire completamente la porta 3 Abbassare le due levette di arresto 4 Chiudere la porta SPOSTAMENTO DELLA RESISTENZA SUPERIORE SOLO PER ALCUNI MODELLI 1 Rimuovere le griglie porta accessori laterali Fig 3 2 Estrarre leggermente la ...

Page 73: ...ino a rimuovere il coprilampada Fig 7 4 Sostituire la lampada per il tipo vedere nota Fig 8 5 Riposizionare il coprilampada e spingerlo contro la parete per agganciarlo correttamente Fig 9 6 Rimontare le griglie porta accessori laterali 7 Ricollegare il forno alla rete elettrica NOTA Usare solo lampade ad incandescenza da 25 40W 230V tipo E 14 T300 C o lampade alogene da 20 40W 230 V tipo G9 T300 ...

Page 74: ...i raffreddamento può continuare a funzionare per un certo intervallo di tempo Aprendo la porta durante la cottura gli elementi riscaldanti si disattivano ACCESSORI IN DOTAZIONE A GRIGLIA 2 da usare per la cottura di cibi o come supporto per pentole tortiere o qualunque recipiente adatto alla cottura in forno B LECCARDA 1 da usare posizionata sotto la griglia per raccogliere grasso o come piastra p...

Page 75: ... navigazione nel menù regolazione valori preimpostati NOTA le due manopole sono a scomparsa Fare pressione al centro delle stesse per estrarle dalla loro sede 3 TASTO per tornare alla schermata precedente 4 TASTO per selezionare e confermare le impostazioni ELENCO FUNZIONI Ruotando la manopola Funzioni in una posizione qualsiasi il forno si attiva il display visualizza le funzioni o i sottomenù as...

Page 76: ...ostare l ora ruotando la manopola Navigazione 5 Confermare l impostazione premendo SELEZIONE DELLE FUNZIONI DI COTTURA 1 Se il forno è spento ruotare la manopola Funzioni sul display vengono visualizzate le funzioni di cottura o i relativi sottomenù NOTA per l elenco e la descrizione delle funzioni fare riferimento alla specifica tabella a pag 79 e a pag 80 2 All interno del sottomenù esplorare le...

Page 77: ...la manopola Navigazione sul display appare Sì 4 Confermare la scelta effettuata premendo il tasto PRERISCALDAMENTO RAPIDO Qualora si volesse preriscaldare rapidamente il forno è necessario procedere come segue 1 Selezionare la funzione preriscaldamento rapido ruotando la manopola Funzioni 2 Confermare con il tasto le impostazioni appaiono sul display 3 Se la temperatura proposta corrisponde a quel...

Page 78: ... lampeggia 3 Posticipare l ora di fine cottura ruotando la manopola Navigazione fino a raggiungere il valore desiderato 4 Confermare il valore prescelto premendo il tasto 5 Ruotare la manopola Navigazione fino a posizionare il cursore in corrispondenza di AVVIO e poi premere il tasto 6 Il display suggerisce a quale livello inserire la pietanza Eseguire l operazione e premere il tasto per avviare l...

Page 79: ...derata ruotando la manopola Navigazione 5 Confermare premendo il tasto il display mostra il tempo indicativo di cottura 6 Inserire la pietanza e ruotare la manopola Navigazione fino a posizionare il cursore in corrispondenza di Avvio e poi premere il tasto 7 Il display suggerisce a quale livello inserire la pietanza Eseguire l operazione e premere il tasto per avviare la cottura Per ritardare la c...

Page 80: ...quantità inferiore o superiore può pregiudicare il buon funzionamento del ciclo 6 Chiudere la porta del forno IMPORTANTE non aprire la porta durante il funzionamento del ciclo per evitare la fuoriuscita del vapore 7 Selezionare con la manopola funzioni il simbolo la parola STARCLEAN appare sul display 8 Premere il tasto per confermare la scelta ed avviare il ciclo di pulizia Non aprire la porta du...

Page 81: ...rsi che richiedono medesima temperatura di cottura es pesce verdure dolci La funzione permette di cuocere senza trasmissione di odori da un alimento all altro Utilizzare il 3 livello per cotture su singolo ripiano il 1 e 4 per cotture su due ripiani e 1 3 5 per cotture su tre ripiani Non occorre preriscaldare il forno STARCLEAN Per eliminare lo sporco generato dalla cottura tramite un ciclo a bass...

Page 82: ...frigo biscotti preparati liquidi per torte muffin primi piatti e prodotti tipo pane La funzione cuoce tutte le pietanze in modo veloce e delicato può essere utilizzata anche per riscaldare cibi già cucinati Seguire le indicazioni riportate sulla confezione Non occorre preriscaldare il forno MAXI COOKING Per cuocere carni di grosse dimensioni superiori ai 2 5 kg Utilizzare il 1 o il 2 livello in ba...

Page 83: ...70 20 45 Liv 5 teglia su griglia Liv 3 teglia su griglia Liv 1 leccarda o piastra dolci Bignè 3 180 200 30 40 Leccarda o piastra dolci 1 4 180 190 35 45 Liv 4 teglia su griglia Liv 1 leccarda o piastra dolci 1 3 5 180 190 35 45 Liv 5 teglia su griglia Liv 3 teglia su griglia Liv 1 leccarda o piastra dolci Meringhe 3 90 110 150 Leccarda o piastra dolci 1 4 90 140 160 Liv 4 teglia su griglia Liv 1 l...

Page 84: ...0 Leccarda o teglia su griglia Pesce al forno al car toccio filetto intero 3 180 200 40 60 Leccarda o teglia su griglia Verdure ripiene pomodori zuc chine melanzane 2 170 190 30 60 Teglia su griglia Pane tostato 5 Alto 3 6 Griglia Filetti tranci di pesce 4 Medio 20 30 Liv 4 griglia girare il cibo a metà cottura Liv 3 leccarda con acqua Salsicce Spiedini Costine Hamburger 5 Medio Alto 15 30 Liv 5 g...

Page 85: ...0 30 50 Liv 4 teglia su griglia Liv 1 leccarda o teglia su griglia Pasto completo Crostata Liv 5 Lasagna Liv 3 Carne Liv 1 1 3 5 190 40 120 Liv 5 teglia su griglia Liv 3 teglia su griglia Liv 1 leccarda o teglia su griglia Pizze surgelate 3 Auto 10 15 Leccarda piastra dolci o griglia 1 4 Auto 15 20 Liv 4 teglia su griglia Liv 1 leccarda o piastra dolci 1 3 5 Auto 20 30 Liv 5 teglia su griglia Liv ...

Page 86: ...n Accessori e note IEC 60350 2009 03 8 4 1 Biscotti di pastafrolla Shortbread 3 170 15 30 Leccarda piastra dolci 1 4 160 20 35 Liv 4 piastra dolci Liv 1 leccarda IEC 60350 2009 03 8 4 2 Piccoli dolci Small cakes 3 170 25 35 Leccarda piastra dolci 1 4 160 30 40 Liv 4 piastra dolci Liv 1 leccarda 1 3 5 160 35 45 Liv 5 teglia su griglia Liv 3 piastra dolci Liv 1 leccarda IEC 60350 2009 03 8 5 1 Pan d...

Page 87: ... l opzione Preriscaldamento attivato Si preriscaldamento Test di Accuratezza del controllo Selezionare la funzione e effetuare il test solo con l opzione Preriscaldamento disattivato quando il preriscaldamento è attivo il controlo del forno crea intenzionalmente un oscillazione del profilo di temperatura ...

Page 88: ...utta richiedono la funzione VENTILATO Se il fondo della torta risulta troppo umido abbassare il livello del ripiano e cospargere la base del dolce di pan grattato o biscotti sbriciolati prima di aggiungere il ripieno Carni Utilizzare qualunque tipo di teglia o pirofila adatta alle dimensioni della carne da cuocere Nel caso di arrosti aggiungere preferibilmente del brodo sul fondo della pentola inu...

Page 89: ...περιλαμβανομένων παιδιών με μειωμένες σωματικές αισθητηριακές ή διανοητικές ικανότητες ή με έλλειψη εμπειρίας και γνώσεων εκτός εάν έχουν λάβει οδηγίες σχετικά με τη χρήση της συσκευής από άτομα υπεύθυνα για την ασφάλειά τους Τα προσβάσιμα μέρη μπορεί να υπερθερμανθούν κατά τη διάρκεια της χρήσης Τα μικρά παιδιά πρέπει να μένουν μακριά από τη συσκευή και να εποπτεύονται ώστε να εξασφαλίζεται ότι δ...

Page 90: ...νο στο περίβλημα και αφαιρέστε προσεκτικά όλα τα ροκανίδια και τα πριονίδια Βεβαιωθείτε ότι η επιφάνεια στήριξης του φούρνου είναι επίπεδη Μετά την εγκατάσταση δεν θα πρέπει να υπάρχει πλέον πρόσβαση στο κάτω μέρος του φούρνου Για τη σωστή λειτουργία της συσκευής μην αποφράσσετε το ελάχιστο κενό ανάμεσα στην επιφάνεια εργασίας και το επάνω άκρο του φούρνου ΗΛΕΚΤΡΙΚΗ ΣΥΝΔΕΣΗ Βεβαιωθείτεότιηηλεκτρικ...

Page 91: ...όμηση ενέργειας Προθερμάνετε τον φούρνο μόνο εάν καθορίζεται στον πίνακα μαγειρέματος ή στη συνταγή σας Χρησιμοποιήστε φόρμες με σκουρόχρωμο βερνίκι ή εμαγιέ επειδή απορροφούν πολύ καλύτερα τη θερμότητα Αυτός ο φούρνος που προορίζεται για να έρχεται σε επαφή με τρόφιμα συμμορφώνεται με τον Ευρωπαϊκό Κανονισμό αρ 1935 2004 και έχει σχεδιαστεί κατασκευαστεί και πωλείται σύμφωνα με τις απαιτήσεις ασφ...

Page 92: ...ών με τη συσκευή καθαρίστε αμέσως με ένα υγρό πανί Καθαρίστε τις επιφάνειες με ένα υγρό πανί Εάν υπάρχουν πολλές ακαθαρσίες προσθέστε στο νερό λίγες σταγόνες ουδέτερου απορρυπαντικού Σκουπίστε με ένα στεγνό πανί Εσωτερικές επιφάνειες φούρνου Κύκλος καθαρισμού STARCLEAN ΣΗΜΑΝΤΙΚΟ Μη χρησιμοποιείτε διαβρωτικά ή λειαντικά καθαριστικά Μη χρησιμοποιείτε διαφορετικά λειαντικά σφουγγάρια μεταλλικές ξύστρ...

Page 93: ... επίμονες ακαθαρσίες Για να απομακρύνετε ιδιαίτερα επίμονες ακαθαρσίες επαναλάβετε τον κύκλο STARCLEAN και προσθέστε λίγες σταγόνες ουδέτερου απορρυπαντικού κατά την αφαίρεση των ακαθαρσιών Καθαρισμός εσωτερικού τζαμιού Η εσωτερική επιφάνεια του τζαμιού της πόρτας έχει ειδική επίστρωση για εύκολο καθαρισμό Για να διατηρηθεί το τζάμι σε άριστη κατάσταση μετά από κάθε κύκλο καθαρισμού STARCLEAN καθα...

Page 94: ...ίστε την πόρτα ΜΕΤΑΚΙΝΗΣΗ ΤΗΣ ΕΠΑΝΩ ΑΝΤΙΣΤΑΣΗΣ ΜΟΝΟ ΣΕ ΟΡΙΣΜΕΝΑ ΜΟΝΤΕΛΑ 1 Αφαιρέστε τις πλαϊνές σχάρες συγκράτησης εξαρτημάτων Εικ 3 2 Τραβήξτε την αντίσταση ελαφρώς προς τα έξω Εικ 4 και χαμηλώστε την Εικ 5 3 Για να τοποθετήσετε ξανά την αντίσταση σηκώστε την επάνω ενώ την τραβάτε λίγο προς το μέρος σας και βεβαιωθείτε ότι ακουμπάει επάνω στις πλαϊνές στηρίξεις ΣΥΝΤΗΡΗΣΗ ΠΡΟΕΙΔΟΠΟΙΗΣΗ Χρησιμοποιή...

Page 95: ...άλετε το κάλυμμα του λαμπτήρα Εικ 7 4 Αντικαταστήστε τον λαμπτήρα δείτε τη σημείωση για τον τύπο λαμπτήρα Εικ 8 5 Τοποθετήστε ξανά το κάλυμμα του λαμπτήρα ενώ το πιέζετε σταθερά μέχρι να ασφαλίσει στη θέση του Εικ 9 6 Τοποθετήστε ξανά τις πλαϊνές σχάρες συγκράτησης εξαρτημάτων 7 Συνδέστε ξανά το φούρνο στην ηλεκτρική τροφοδοσία ΣΗΜΕΙΩΣΗ Να χρησιμοποιείτε μόνο λαμπτήρες πυράκτωσης 25 40W 230V τύπου...

Page 96: ...μιστήρας ψύξης μπορεί να συνεχίσει να λειτουργεί για λίγο Όταν ανοίξετε την πόρτα κατά τη διάρκεια του ψησίματος οι αντιστάσεις απενεργοποιούνται ΠΑΡΕΧΟΜΕΝΑ ΕΞΑΡΤΗΜΑΤΑ A ΣΧΑΡΑ 2 πρέπει να χρησιμοποιείται για το ψήσιμο φαγητών ή ως στήριγμα για κατσαρόλες φόρμες κέικ και άλλα σκεύη κατάλληλα για ψήσιμο στο φούρνο B ΤΑΨΙ ΓΙΑ ΛΙΠΗ 1 πρέπει να χρησιμοποιείται για τη συλλογή του λίπους όταν τοποθετείτα...

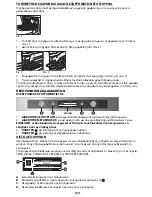
Page 97: ...ΕΤΑΚΙΝΗΣΗΣ για μετακίνηση στο μενού και ρύθμιση προκαθορισμένων τιμών ΣΗΜΕΙΩΣΗ οι δύο διακόπτες είναι χωνευτοί Πατήστε τους διακόπτες στο κέντρο ώστε να εξαχθούν από την υποδοχή τους 3 ΠΛΗΚΤΡΟ για επιστροφή στην προηγούμενη οθόνη 4 ΠΛΗΚΤΡΟ για επιλογή και επιβεβαίωση των ρυθμίσεων ΛΙΣΤΑ ΛΕΙΤΟΥΡΓΙΩΝ Περιστρέφοντας το διακόπτη λειτουργιών σε μια οποιαδήποτε θέση μπορείτε να ενεργοποιήσετε το φούρνο ...

Page 98: ...θόνη αναβοσβήνει η ένδειξη 12 00 4 Ρυθμίστε την ώρα περιστρέφοντας το διακόπτη μετακίνησης 5 Επιβεβαιώστε τη ρύθμιση πατώντας το ΕΠΙΛΟΓΗ ΛΕΙΤΟΥΡΓΙΩΝ ΨΗΣΙΜΑΤΟΣ 1 Εάν ο φούρνος είναι απενεργοποιημένος περιστρέψτε το διακόπτη λειτουργιών στην οθόνη θα εμφανιστούν οι λειτουργίες ψησίματος ή τα σχετικά υπομενού ΣΗΜΕΙΩΣΗ γιατηλίστακαιτηνπεριγραφήτωνλειτουργιών ανατρέξτεστοσχετικόπίνακαστη σελίδα 102 και...

Page 99: ...ντας το διακόπτη μετακίνησης στην οθόνη εμφανίζεται η ρύθμιση Sì Ναι 4 Επιβεβαιώστε την επιλογή πατώντας το πλήκτρο ΤΑΧΕΙΑ ΠΡΟΘΕΡΜΑΝΣΗ Εάν θέλετε να προθερμάνετε γρήγορα το φούρνο πρέπει να ακολουθήσετε την παρακάτω διαδικασία 1 Επιλέξτε τη λειτουργία ταχείας προθέρμανσης περιστρέφοντας το διακόπτη λειτουργιών 2 Επιβεβαιώστε με το πλήκτρο στην οθόνη εμφανίζονται οι ρυθμίσεις 3 Εάνησυνιστώμενηθερμο...

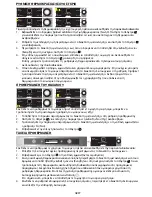
Page 100: ...του φούρνου ακολουθήστε την παρακάτω διαδικασία 1 Τοποθετήστε το δρομέα στην ένδειξηώραςτέλουςψησίματος περιστρέφοντας το διακόπτη μετακίνησης 2 Πατήστε το πλήκτρο για επιλογή της παραμέτρου η ώρα τέλους ψησίματος αναβοσβήνει 3 Παρατείνετετηνώρατέλουςψησίματοςπεριστρέφονταςτοδιακόπτη μετακίνησης έωςότουεμφανιστεί η επιθυμητή τιμή 4 Επιβεβαιώστε την προεπιλεγμένη τιμή πατώντας το πλήκτρο 5 Περιστρέ...

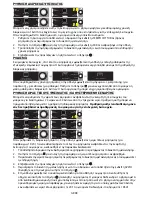
Page 101: ... μπορείτε να παρατείνετε το χρονικό διάστημα ακολουθώντας την παραπάνω διαδικασία ή να απενεργοποιήσετε το χρονοδιακόπτη πατώντας το πλήκτρο στην οθόνη εμφανίζεται η τρέχουσα ώρα ΣΥΝΤΑΓΕΣ Χάρη στην τεχνολογία Sesto senso μπορείτε να χρησιμοποιήσετε 30 ήδη προκαθορισμένες συνταγές με την ιδανική λειτουργία και θερμοκρασία ψησίματος Ακολουθήστε τη συνταγή μόνο σεό τι αφορά τα συστατικά και τη μέθοδο...

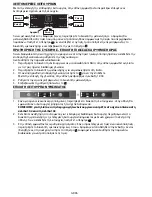
Page 102: ...ιας είναι ενεργοποιημένη η οθόνη σβήνει μετά από μερικά δευτερόλεπτα Ωστόσο εάν η λειτουργία δεν είναι ενεργοποιημένη μειώνεται απλώς η φωτεινότητα της οθόνης μετά από λίγα δευτερόλεπτα ΚΥΚΛΟΣ ΚΑΘΑΡΙΣΜΟΥ STARCLEAN Για να διατηρηθεί ο φούρνος σε βέλτιστη κατάσταση εκτελείτε τον κύκλο καθαρισμού STARCLEAN μετά από κάθε χρήση Ο κύκλος διαρκεί 35 λεπτά συμπεριλαμβανομένης μιας φάσης ψύξης και πρέπει ν...

Page 103: ...κλειδώματος των πλήκτρων και των διακοπτών στον πίνακα ελέγχου Για να ενεργοποιήσετε τη λειτουργία πατήστε ταυτόχρονα τα πλήκτρα και για τουλάχιστον 3 δευτερόλεπτα Όταν έχει ενεργοποιηθεί τα πλήκτρα δεν μπορούν να χρησιμοποιηθούν και στην οθόνη εμφανίζεται ένα μήνυμα προειδοποίησης και το εικονίδιο Η λειτουργία αυτή μπορεί να ενεργοποιηθεί επίσης κατά τη διάρκεια του ψησίματος Για να την απενεργοπ...

Page 104: ...οθερμάνετε το φούρνο Κατά τη διάρκεια του ψησίματος η πόρτα του φούρνου πρέπει να παραμένει κλει στή Με τη λειτουργία αυτή μπορείτε να χρησιμοποιήσετε τη σούβλα εάν διατίθεται EΞΑΝΑΓΚ ΑΕΡΑΣ Για να ψήσετε ταυτόχρονα διαφορετικά φαγητά τα οποία χρειάζονται την ίδια θερμοκρασία ψησίματος π χ ψάρι λαχανικά γλυκά σε πολλά επίπεδα τρία το μέγιστο Με τη λειτουργία αυτή μπορείτε να ψήσετε διαφορετικά φαγη...

Page 105: ...ρής ζύμης Για επι τευχθεί καλύτερο φούσκωμα η λειτουργία δεν ενεργοποιεί ται εάν η θερμοκρασία στο θάλαμο του φούρνου είναι πάνω από τους 40 C Τοποθετείτε τη ζύμη στο 2 επίπεδο Δεν χρειάζεται να προθερμάνετε το φούρνο EΥΚOΛΙΑ Για να ψήσετε ήδη έτοιμα φαγητά που διατηρούνται σε θερ μοκρασία δωματίου ή σε ψυγείο μπισκότα υγρό μείγμα για κέικ μάφιν ορεκτικά και αρτοσκευάσματα Με τη λειτουρ γία αυτή ό...

Page 106: ... για λίπη ή ταψί για γλυκά 1 4 160 170 20 45 Επίπεδο 4 σχάρα Επίπεδο 1 ταψί για λίπη ή ταψί για γλυκά 1 3 5 160 170 20 45 Επίπεδο 5 ταψί στη σχάρα Επίπεδο 3 ταψί στη σχάρα Επίπεδο 1 ταψί για λίπη ή ταψί για γλυκά Σου 3 180 200 30 40 Ταψί για λίπη ή ταψί για γλυκά 1 4 180 190 35 45 Επίπεδο 4 ταψί στη σχάρα Επίπεδο 1 ταψί για λίπη ή ταψί για γλυκά 1 3 5 180 190 35 45 Επίπεδο 5 ταψί στη σχάρα Επίπεδο...

Page 107: ... Αλμυρά με φύλλο κρούστας 3 190 200 20 30 Ταψί για λίπη ή ταψί για γλυκά 1 4 180 190 20 40 Επίπεδο 4 ταψί στη σχάρα Επίπεδο 1 ταψί για λίπη ή ταψί για γλυκά 1 3 5 180 190 20 40 Επίπεδο 5 ταψί στη σχάρα Επίπεδο 3 ταψί στη σχάρα Επίπεδο 1 ταψί για λίπη ή ταψί για γλυκά Λαζάνια Ζυμαρι κά στο φούρνο Κανελόνια Φλαν 3 190 200 45 55 Ταψί στη σχάρα Αρνί Μοσχάρι Βοδινό Χοιρινό 1 Kg 2 180 190 80 120 Ταψί γι...

Page 108: ... σούβλα εάν υπάρχει Επίπεδο 1 ταψί για λίπη με νερό Ροστ μπιφ μισο ψημένο 1 Kg 3 Μεσαία 35 45 Ταψί στη σχάρα γυρί στε το φαγητό στα δύο τρίτα του ψησίματος εάν χρειάζεται Μπούτι αρνιού Κότσι 3 Μεσαία 60 90 Ταψί για λίπη ή ταψί στη σχάρα γυρίστε το φαγητό στα δύο τρίτα του ψησίματος εάν χρειάζεται Ψητές πατάτες 3 Μεσαία 45 55 Ταψί για λίπη ή για γλυκά γυρίστε το φαγητό στα δύο τρίτα του ψησίματος ε...

Page 109: ...3 ταψί στη σχάρα Επίπεδο 1 ταψί για λίπη ή ταψί στη σχάρα Κατεψυγμένη πίτσα 3 Αυτόματα 10 15 Ταψί για λίπη ταψί για γλυκά ή σχάρα 1 4 Αυτόματα 15 20 Επίπεδο 4 ταψί στη σχάρα Επίπεδο 1 ταψί για λίπη ή ταψί για γλυκά 1 3 5 Αυτόματα 20 30 Επίπεδο 5 ταψί στη σχάρα Επίπεδο 3 ταψί για λίπη ή ταψί για γλυκά Επίπεδο 1 ταψί στη σχάρα 1 3 4 5 Αυτόματα 20 30 Επίπεδο 5 ταψί στη σχάρα Επίπεδο 4 ταψί για λίπη ή...

Page 110: ...3 ταψί για γλυ κά Επίπεδο 1 ταψί για λίπη IEC 60350 2009 03 8 5 1 Αφράτο κέικ χωρίς λίπη Fatless sponge cake 2 170 30 40 Φόρμα κέικ στη σχάρα IEC 60350 2009 03 8 5 2 Δύο μηλόπιτες Two apple pies 2 3 185 70 90 Φόρμα κέικ στη σχάρα 1 4 175 75 95 Επίπεδο 4 φόρμα κέικ στη σχάρα Επίπεδο 1 φόρμα κέικ στη σχάρα IEC 60350 2009 03 9 1 1 Τοστ Toast 5 Υψηλή 3 6 Σχάρα IEC 60350 2009 03 9 2 1 Μπιφτέκια Burgers...

Page 111: ...όσταση 3 4 cm από το μπροστινό άκρο της σχάρας ώστε να διευκολυνθεί η αφαίρεση του φαγητού από το φούρνο Κατηγορία ενεργειακής απόδοσης σύμφωνα με το πρότυπο EN 50304 Για τη διεξαγωγή του ελέγχου χρησιμοποιήστε τον ειδικό πίνακα Κατανάλωση ενέργειας και χρόνος προθέρμανσης Επιλέξτε τη λειτουργία και εκτελέστε τον έλεγχο μόνο με την επιλογή Preriscaldamento Προθέρμανση ενεργοποιημένη Si preriscalda...

Page 112: ...ερα από ένα επίπεδα επιλέξτε τη λειτουργία εξαναγκασμένου αέρα και τοποθετήστε εναλλάξ τις φόρμες κέικ ώστε να διευκολυνθεί η κυκλοφορία του αέρα Για να διαπιστώσετε εάν έχει ψηθεί ένα κέικ που πρέπει να φουσκώσει τοποθετήστε μια ξύλινη οδοντογλυφίδα στο πιο φουσκωμένο σημείο του κέικ Εάν η οδοντογλυφίδα είναι καθαρή το κέικ είναι έτοιμο Εάν χρησιμοποιείτε αντικολλητικές φόρμες κέικ μη βουτυρώνετε...

Page 113: ...α ταψί για λίπη με μισό λίτρο νερού στο πρώτο επίπεδο Η σούβλα έχει πλαστική λαβή η οποία θα πρέπει να αφαιρεθεί πριν από την έναρξη του ψησίματος Χρησιμοποιήστε τη λαβή στο τέλος του ψησίματος για την αποφυγή εγκαυμάτων κατά την αφαίρεση του φαγητού από το φούρνο Πίτσα Λαδώστε ελαφρώς τα ταψιά ώστε η πίτσα να έχει τραγανή βάση Απλώστε τη μοτσαρέλα πάνω στην πίτσα στα δύο τρίτα του χρόνου ψησίματο...

Page 114: ...GR112 ...

Page 115: ......

Page 116: ...Whirlpool is a registered trademark of Whirlpool USA Printed in Italy 02 2012 5019 310 01425 PT IT GB ES GR ...

Reviews: