

1
2
3
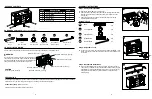
2a. In case of uneven floors, floor levelers are provided at the bottom of the
vanity. If necessary, adjust floor levelers by hand to correct tilting and/or
level doors.
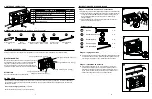
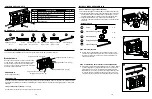
1a. Insert wood dowel (EE) into vanity feet (D).
1b. Attach vanity foot (D) to the vanity base (B) by inserting the bolts (BB)
through lock washers (CC) and flat washers (DD). Tighten with hex
wrench (FF).
1c. Attach suppot leg (E) to bottom of vanity base (B) and screw the
pre-assembled bolt into place.
ASSEMBLY InSTRUCTIOnS
Step 2: Adjustable Level
Step 1: Vanity Feet Installation
SAFETY InFORMATIOn
Please read and understand this entire manual before attempting to assemble or install the product.
WARnInG
CAUTIOn
Do not stand on vanity. Use vanity on level ground. Base
vanity supports a maximum weight of 200 lbs. Exceeding
maximum weight limit will compromise the integrity of the
vanity structure and could cause the vanity to fail.
Maximum load 200 lb. (90.7 kg)
Maximum load 10 lb. (4.5 kg)
Maximum load 30 lb. (13.6 kg)
Maximum load 30 lb. (13.6 kg)
Maximum load 30 lb. (13.6 kg)
Maximum load 30 lb. (13.6 kg)
Do not hang from the vanity.
PREPARATIOn
Before beginning assembly of product, make sure all parts are present. Compare parts with package contents list and hardware
contents list. If any part is missing or damaged, do not attempt to assemble the product.
Estimated Assembly Time:
15 minutes
Tools Required (not included): Silicone compound.
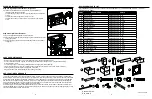
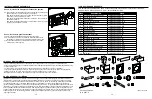
PACKAGE COnTEnTS
HARDWARE COnTEnTS
(not shown actual size)
AA
BB
CC
DD
EE
FF
Touch-up Pen
Qty. 1
Bolt
Qty. 8+1 extra
Lock Washer
Qty. 8+1 extra
Flat Washer
Qty. 8+1 extra
Wood Dowel
Qty. 8+1 extra
Hex Wrench
Qty. 1
PART
DESCRIPTIOn
QUAnTITY
A
Vanity Top (preassembled)
1
B
Vanity Base
1
C
Backsplash
1
D
Vanity Feet
4
E
Support Leg
1
3
2
Silicone
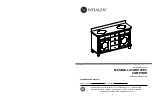
3a. To mount the backsplash (C) to the wall, apply a thin bead of silicone
compound (not included) to the unpolished back side and bottom of the
backsplash (C). Position backsplash (C) as shown onto vanity top (A)
and against the wall. Clean any excess silicone compound before
allowing to dry.
Step 3: Backsplash Installation
E
D
D
D
E
D
D
D
BB
CC
DD
DD
EE
CC
Hardware Used
Bolt
Lock Washer
Flat Washer
Wood Dowel
Hex Wrench
x 8
x 8
x 8
x 8
x 1
BB
CC
DD
EE
EE
C
A
B
B
C
A