background image

Showing off 

23

Showing off 

22

To display 

BoB2

TM

 and the handset as one unit, they first need to be attached to each other.  The handset will then get 

its charge from the 

BoB2

TM

 USB port on the left hand side.  This USB port is a dedicated charge port and not used 

for anything other than charging the handset.  You will not need the power adapter that came with your handset so 
keep this in a safe place.  

1.   Lay the modem and the handset charger face down (on a protective cloth - to prevent scratches). Slide out the 

upper and lower connection points on the back left hand side of the charger, this will expose the USB charger 
point and location pins (figure 1).

2.  Leaving the handset charger and 

BoB2

TM

 facing down, slide them together so you can locate the handset USB 

charger into 

BoB2

TM

 as shown below (you may notice lower slider does not move all the way across – this is normal) 

(figure 2). 

3.   Now take the large stand that was supplied in the modem box and pass the cables in the format below.  The 

example below shows the power cable, the ADSL phone cable and an ethernet LAN cable (figure 3).

4.  Next align the stand over the top of the handset and 

BoB2

TM

(figure 4).

5.  Make sure all the pins on the stand are sitting inside the holes on the handset and 

BoB2

TM

 and apply a small 

amount of downward pressure, whilst at the same time push the stand upward toward the top edge of the 
modem.  You will hear a small click as the pins interlock (figure 5).
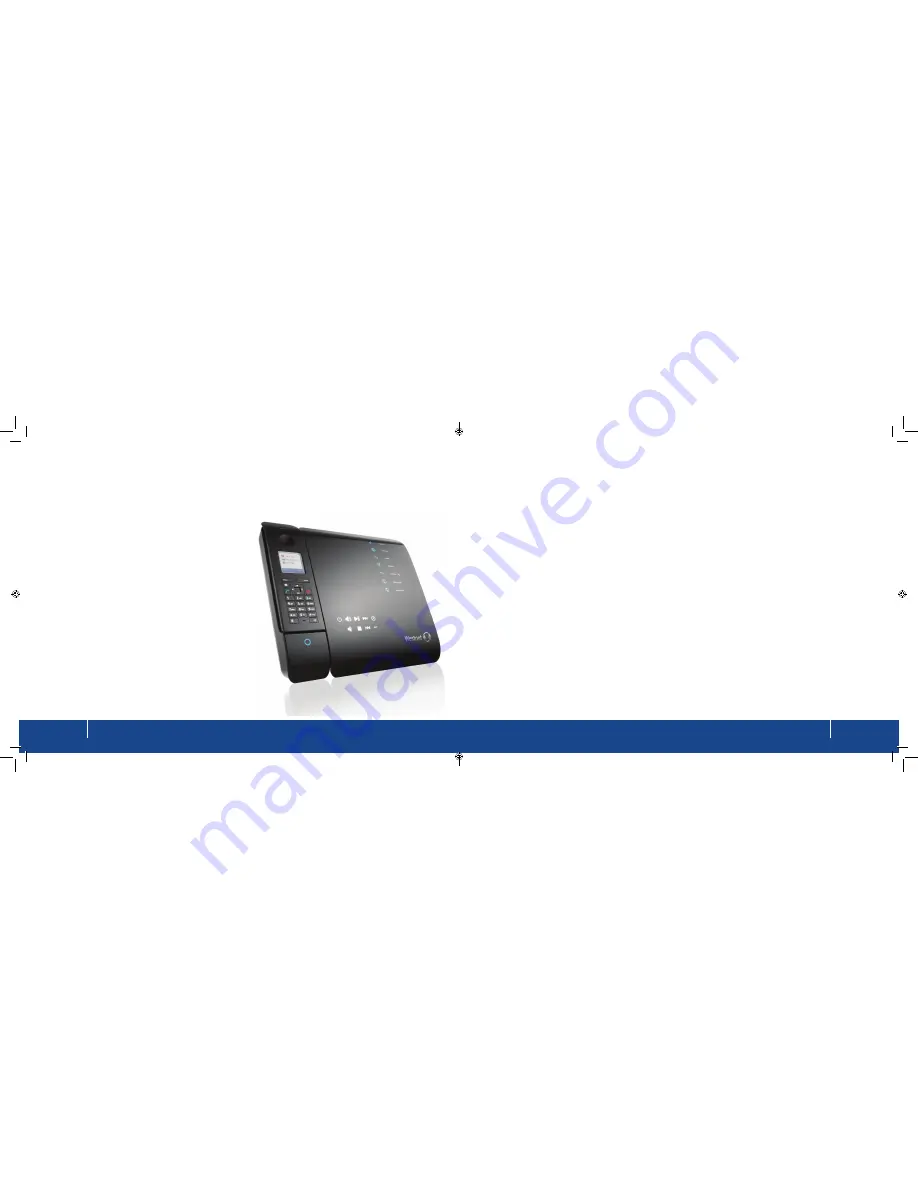
Showing off 

BoB2

TM

BoB2

TM

 is sleek and stylish so we don’t blame you for wanting to 

show him off. There are a few different ways to display 

BoB2

TM

 and 

the 

BoB2

TM

 handset.

1. 

BoB2

TM

 connected to 

BoB2

TM

 handset and 

standing up right using the supplied stand in the 
modem box.

2.  Showing off 

BoB2

TM

 on his own and the handset 

stood upright with its own stand that was 
supplied in the handset box.

3.  BoB2

TM

 and the 

BoB2

TM

 handset stand together.

Things are better when we’re together

The easiest way to set up the modem and handset 
in this configuration is to first follow the steps in the 
quick install guide and get online. Then you can turn 
off 

BoB2

TM

 and follow these steps to attach the stand, 

keep all the cables you are using in a convenient 
place as you will need these in the steps detailed on 
the next page.

Summary of Contents for BoB2

Page 1: ...User Manual ...

Page 2: ...e it needs to get you online You ll be able to connect your computer using an ethernet cable or through a wireless connection In addition to this manual BoB2 TM comes with a Quick Install Guide a step by step guide to get BoB2 TM plugged in and working and a Wireless Setup Guide instructions on setting up your wireless connection Once you ve followed the steps in the Quick Install Guide Westnet wi...

Page 3: ...e connection The DHCP server will assign IP addresses to each computer automatically so there is no need for a complicated setup DMZ Host Support DMZ Host Support allows a networked computer to be fully exposed to the Internet This function is used when Network Address Translation NAT and firewall security prevent an Internet application from functioning correctly NAT IP Address Sharing BoB2 TM em...

Page 4: ...k Support for VPN Pass Through If you connect to your office network from home using a VPN connection BoB2 TM will allow your VPN equipped computer to pass through to your office network BoB2 TM supports one VPN session at any one time BoB2 TM supports three of the most commonly used VPN protocols PPTP L2TP and IPSec Computer Filter Rule For added security you can set up a list of MAC addresses un...

Page 5: ...the port the light will blink rapidly On Your computer is connected Off Your computer is not connected Blinking information transmission 4 Wireless Status light The Wireless status light shows you when BoB2 TM s wireless is enabled On Wireless enabled Off Wireless is disabled 5 Storage 3G light When a USB mass storage device is connected to BoB2 TM this light will illuminate to inform you the atta...

Page 6: ... address bar type http 10 1 1 1 image 2 Make sure your computer is connected to BoB2 TM either wirelessly or with an ethernet cable first 2 Once you ve arrived at the homepage type in the default password admin 3 From here you can get a snap shot of the setup access his more advanced features or set up your ADSL username and password Connecting to the Internet manually 1 Log into BoB2 TM by enteri...

Page 7: ...is box will say no until we release this option What does the information on the home page mean On BoB2 TM s home page you ll see nine points listed The following information explains what these points mean 1 The connection with my ISP is active You will either see yes or no in this box If yes is displayed this means you have an active ADSL line running and BoB2 TM is connected correctly and talki...

Page 8: ... also see three tabs labelled Diagnostics Security Log and ASDL Status Here s a run down on their function Diagnostics When you click on the Diagnostics tab you will be prompted for a password Unless you ve changed your BoB2 TM password type in the default password which is admin The page displayed allows you to test BoB2 TM s Internet connection For example if you type in www westnet com au and c...

Page 9: ...een and browse for the firmware file you just saved Click open followed by upgrade firmware to start the process 7 Your firmware upgrade may take several minutes Enabling remote management Remote management means you can access and manage BoB2 TM from a computer that is in a remote location for example your office To do this 1 Click on Advanced settings which you ll find in the menu list across th...

Page 10: ...ouch pad on BoB2 TM s answer machine Setup a file server The file server function on BoB2 TM allows you to plug in an external USB drive into the USB port located on the right hand side You can then share the content on the hard drive with all the computers connected to your home or office network 1 Login to BoB2 TM by launching a new web page and typing http 10 1 1 1 into the address bar Use the ...

Page 11: ... let you know you have new messages The display also shows the total number of messages saved on the answering machine On the handset With the batteries in place your BoB2 TM handset screen will begin flashing Please register Press on the right side of the control key it s the one that looks like a square to display the main menu Scroll down using the control key to Settings and press OK using the...

Page 12: ...e the ADSL phone cable and an ethernet LAN cable figure 3 4 Next align the stand over the top of the handset and BoB2 TM figure 4 5 Make sure all the pins on the stand are sitting inside the holes on the handset and BoB2 TM and apply a small amount of downward pressure whilst at the same time push the stand upward toward the top edge of the modem You will hear a small click as the pins interlock f...

Page 13: ...he handset stand Just drop in the handset when it needs to be charged The charger cradle will now stand upright allowing the BoB2 TM handset to sit tall and pretty BoB2TM and his handset stand tall BoB2 TM comes with a stand that allows you to sit him up on a desk or table The image below shows you how to attach the stand and where BoB2 TM s cables need to go When attaching the stand remember to l...

Page 14: ...o a setup page Once you re in the setup section of your modem re enter your username and password and check that other login details are correct Visit the connecting to the Internet manually section in this manual After you ve saved the details wait a couple of minutes and check to see if the internet light is on solid If it is the Internet should work This article is here to help you if your ADSL...

Page 15: ...often you may close the window but the program continues to run it will usually show up as an icon in your system tray on the bottom right of your screen Your modem is connected to the Internet but still has no dataflow It may be that your modem shows a connection but you can t browse websites check email or do anything else successfully It s possible your computer isn t communicating properly You...

Page 16: ... line on 1300 786 068 to report a possible fault Don t forget to let them know what you ve already tried Outage Check Westnet s network status page or call us on 1300 786 068 to find out if we have an outage that may be affecting you Network congestion Congestion is not a common issue with wireless connections as a full wireless signal has more bandwidth available than that which your internet con...

Page 17: ...Westnet Support 1300 786 068 support westnet com au Westnet Business Support 1300 786 006 business westnet com au wnum072011v001 ...

Reviews: