background image

i-Rec B104 

Installing & Connecting


36 

2003. 06. 30 (v 1.4) 

WEBGATE Inc.


8.2.3.2. Connecting 


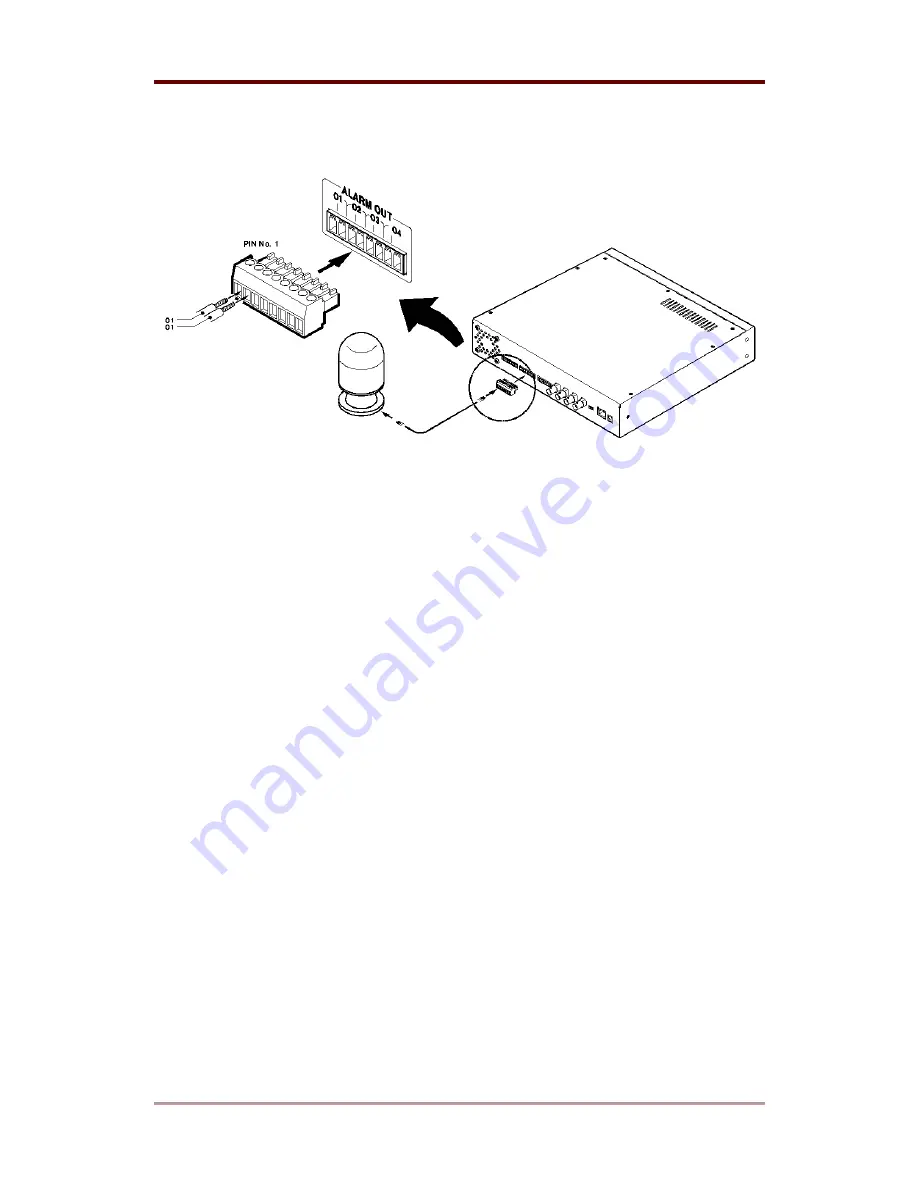
The above figure shows how to connect a warning light to i-Rec B104. For connecting wire, 

please refer to manual of related warning light and “Trimming wire” part of this manual. Insert 

the wire and spin the screw of terminal block with flathead “-“shaped driver. 


8.2.3.3. Setting 

Access i-Rec B104 with CamViewer program and configure alarm output. 


Summary of Contents for i-Rec B104

Page 1: ...i Rec B104 Installation Guide v 1 4...

Page 2: ...cause harmful interference to radio communications However there is no guarantee that interference will not occur in a particular installation If this equipment does cause harmful interference to rad...

Page 3: ...ing i Rec B104 directly to an AC current may cause electrical damage to i Rec B104 4 Be cautious of handling i Rec B104 Physical shocks may harm the product 5 i Rec B104 is made with a metal case When...

Page 4: ...lling CamViewer II 13 5 1 1 Installation of Software 13 5 1 2 Uninstalling 14 5 2 Connecting to i Rec B104 15 5 3 Setting IP address 16 5 4 Setting Camera Input Channel 17 5 5 Checking Images of i Rec...

Page 5: ...ance Setup Switch for Video Input 39 8 5 Video Input 39 APPENDIX 40 1 Frequently Asked Question FAQ 41 1 1 About i Rec B104 s Feature 41 1 2 About i Rec B104 Installing 43 2 Utilizing IP Addresses on...

Page 6: ...only needs designated power supply and network connection in order to operate Monitoring through Network RS 232 RS 485 RS422 port support for PTZ control Embedded Linux OS for excellent stability and...

Page 7: ...d Accessories Unpack and check all items 1 i Rec B104 1 2 DC POWER SUPPLY 1 110V 220V 3 AC POWER CORD 1 4 CD ROM INCLUDING CAMVIEWER AND OPERATING INSTRUCTIONS 1 5 ETHERNET CABLE 1 RED UTP CATEGORY 5...

Page 8: ...i Rec B104 Introduction 8 2003 06 30 v 1 4 WEBGATE Inc 7 INSTALLATION GUIDE 1 8 TERMINAL BLOCK 3 8PIN x 2 7PIN x 1 9 HDD MOBILE RACK KEY 1 10 SCREW 4...

Page 9: ...uction i Rec B104 WEBGATE Inc 2003 06 30 v 1 4 9 3 Product Views and Description 1 HDD mobile rack 2 Alarm output 3 Sensor input 4 Serial port 5 Video input 6 Impedance control switch 7 Ethernet 8 DC...

Page 10: ...4 and administrator s PC uses fixed or private IP address 2 Computers and B104 are connected directly or to local network 4 1 Connecting cameras to i Rec B104 1 Connect i Rec B104 to camera s with BNC...

Page 11: ...lease refer to the following figures 4 2 1 Connecting i Rec B104 to PC directly 1 Connect i Rec B104 to client s PC with crossover cable Red Ethernet cable 2 After supplying power to AC adapter connec...

Page 12: ...B104 Note 1 To prevent damage to B104 connect power cable only after connecting Ethernet cable 2 Ethernet cable should be pushed and connected If not noise may occur 3 Check the LED of B104 after supp...

Page 13: ...er to CamViewer II User Guide 5 1 Installing CamViewer II 5 1 1 Installation of Software 1 Insert Setup CD ROM into CD ROM drive of administrator s PC 2 Copy the CamViewer II x x x Setup exe file onto...

Page 14: ...not preferred Click the Install button after selecting a directory to install 6 Click the Close button after CamViewer II Setup Program is installed successfully 5 1 2 Uninstalling 1 Click Windows St...

Page 15: ...e IP address of the selected i Rec B104 will appear in the Change IP box 5 Type new IP address into the Change IP and Click Change IP button The default password of i Rec B104 is admin which can be ch...

Page 16: ...Gateway Address into Ethernet menu 3 Click Apply button Note 1 Be careful on typing values into this menu Without correct network address nobody will be able to connect to i Rec B104 2 Refer to the U...

Page 17: ...annel Enable menu 3 Set Camera Configuration for the selected channel Camera Type NTSC or PAL Camera Color Color or Black White 4 Click Apply button Note 1 If channel is selected but the related camer...

Page 18: ...v 1 4 WEBGATE Inc 5 5Checking Images of i Rec B104 1 Click the related ICON and run the Monitor program 2 Click the Cam Selection button 3 Select B104 folder 4 Select i Rec B104 to view images 5 Clic...

Page 19: ...Installing Connecting i Rec B104 WEBGATE Inc 2003 06 30 v 1 4 19 7 Enter User Name and Password as admin admin 8 Click Login button to view images of connected channel...

Page 20: ...L040J L 2 40GB 4G120J6 120GB 6L060J L 3 60GB DiamondMax Plus D740X 7200rpm 6L080J L 4 80GB DiamondMax D540X 5400rpm 2 To record at maximum 30 fps use 7200rpm HDD Maximum speed of 5400 rpm HDD is less...

Page 21: ...21 2 Insert the key into the key hole of HDD rack and turn it counter clock wise to release 3 Pull the handle of HDD rack and remove the HDD case completely from i Rec B104 rack 4 Release the hook an...

Page 22: ...ata and power cables to HDD and screw down the HDD to rack Then close the cover HDD needs to be fixed tightly with screws so that vibration does not damage hard drive Note When inserting HDD into tray...

Page 23: ...03 06 30 v 1 4 23 6 Pull handle down and push the HDD case into the rack completely 7 Insert the key and turn it clock wise to re lock the rack 8 Check whether the newly installed HDD operates normall...

Page 24: ...to record images into HDD 7 1Setting HDD 1 Click the HDD tab 2 Check the HDD Enable combo box and click HDD Format button 3 When the HDD format is complete click Apply button Note Auto Deletion is fo...

Page 25: ...7 2 Setting Time 1 Click the System tab 2 Configure the place time and date according to the configuration where the i Rec B104 is installed 3 Click Apply button Note The B104 can be synchronized to t...

Page 26: ...7 3 Setting Recording Schedule 1 Click Schedule tab 2 Please click Setup button in the Record Schedule box to configure recording schedule of the channel to which camera is connected 3 Set up the reco...

Page 27: ...Installing Connecting i Rec B104 WEBGATE Inc 2003 06 30 v 1 4 27 4 Click Apply button after configuring each channel...

Page 28: ...layback program by clicking the Cam Viewer II Playback ICON on the PC Desktop 2 Click the button for camera selection on the lower right of the screen 3 Select the B104 folder 4 Select the i Rec B104...

Page 29: ...nstalling Connecting i Rec B104 WEBGATE Inc 2003 06 30 v 1 4 29 7 Input admin and admin in the log in input box of User Name and Password 8 Click Login button and view the images recorded in i Rec B10...

Page 30: ...inal block follow the instructions below Note the different types of wire that can be used 1 Compress the wire with the appointed blade terminal Use an insulator against electric shock 2 Stranded Wire...

Page 31: ...otocol Ch Max Distance Max Driver Receiver Remarks RS 232C 1 About 15 m 1 Driver 1 Receiver Full Duplex RS 422 1 About 1 2 Km 1 Driver 1 Receiver Full Duplex RS 485 1 About 1 2 Km 32 Driver 32 Receive...

Page 32: ...ss i Rec B104 with CamViewer program and configure RS232C port suitably after connecting to external device 8 1 4 Connecting setting RS 485 port RS 485 is used for controlling PTZ RS 485 is suitable f...

Page 33: ...necting 8 1 4 3 Setting Access i Rec B104 with CamViewer program and configure RS485 port suitably after connecting with external device 8 1 5 Connecting setting RS 422 port 8 1 5 1 Diagram Note Some...

Page 34: ...wer program and configure RS422 port suitably after connecting to external device Note The supported PTZ Manufacturer Model Manufacturer Model Philips Auto Dome LG GAC PT2 Philips TC8560X 4 Sony EVi D...

Page 35: ...put type Dry contact Spec Connecting type Connecting the trimmed wire to terminal block DC MAX 250V 100mA Rating AC MAX 250V 100mA Peak to Peak 8 2 2 Alarm output port view 8 2 3 Connecting Setting 8...

Page 36: ...to connect a warning light to i Rec B104 For connecting wire please refer to manual of related warning light and Trimming wire part of this manual Insert the wire and spin the screw of terminal block...

Page 37: ...ormal Close type Supported sensor Dry contact Spec Connecting Connecting the trimmed wire to terminal block Available input pulse range Min 500ms Performance Output current Typical DC 12mA 8 3 2 Senso...

Page 38: ...d driver 8 3 3 3 Setting Access i Rec B104 with CamViewer program and configure sensor input 8 3 4 Connecting sensors for 1 0 or below main version PCB of i Rec B104 Previous versions of model s senso...

Page 39: ...utput is connected to several inputs e g CCTV monitor i Rec as below the impedance of one input should be 75 ohm The impedance will be set as 75ohm by selecting 75ohm If you select Hi z the impedance...

Page 40: ...i Rec B104 Appendix 40 2003 06 30 v 1 4 WEBGATE Inc APPENDIX APPENDIX...

Page 41: ...that i Rec B104 captures still pictures JPEG the standard algorithm in image compression is also based on still image i Rec B104 records and transmits frames rapidly so as to make still images move as...

Page 42: ...also depends on user PC s performance and network line capacity i Rec B104 can transmit as well as record at the same time If i Rec B104 records images from 4 channels and transmits live images from...

Page 43: ...fore it is required to be equipped with weatherproof case if i Rec B104 is installed outdoor When the network has one fixed IP address and several private IP addresses can i Rec B104 be connected in t...

Page 44: ...ance If the port is blocked on the network user should configure the ports manually If a unique port is available under firewall administrator may unify and fix the port as one This is set when Firewa...

Page 45: ...to i Rec B104 through its port in the rear i Rec B104 has three pairs of pins RS 232 and RS 485 RS 422 i Rec B104 contains some protocols Please refer to Note The supported PTZ Page 34 Administrator...

Page 46: ...ruction and Network class 1 IP construction xxx 0 255 2 Network class A class A network that contains IP addresses from 0 to 127 at room X1 Network ID X1 Host ID X2 X3 X4 There is a total number of 12...

Page 47: ...outer that is connecting Internet and local network Remote users can access local network over Internet through the gateway router Generally the second number is assigned as Gateway address Broadcast...

Page 48: ...ddresses xxx xxx xxx 130 xxx xxx xxx 254 3 To use as three sub networks 1 4 1 4 1 2 Sub Network ID xxx xxx xxx 0 Gateway Address xxx xxx xxx 1 Subnet Mask 255 255 255 192 Broadcast Address xxx xxx xxx...

Page 49: ...xxx 64 Gateway Address xxx xxx xxx 65 Subnet Mask 255 255 255 192 Broadcast Address xxx xxx xxx 127 IP Addresses xxx xxx xxx 66 xxx xxx xxx 126 Sub Network ID xxx xxx xxx 128 Gateway Address xxx xxx x...

Page 50: ...ixed IP address on PC The following shows how to set the fixed IP address on PC with Microsoft s Windows98 1 After selecting Network Neighborhood of desktop press the right button of mouse and select...

Page 51: ...Appendix i Rec B104 WEBGATE Inc 2003 06 30 v 1 4 51 3 Enter Gateway as following and press the Add button 4 Enter IP address and Subnet Mask as following...

Page 52: ...B104 Appendix 52 2003 06 30 v 1 4 WEBGATE Inc 4 CRS Help 4 1 When using ADSL When you can t access B104 connected to ADSL check the followings 1 Configure each values at xDSL PPPoE and CRS of Network...

Page 53: ...s IP address or not For example if B104 s IP address is 211 53 133 181 Figure 1 and PC s IP address is 211 53 133 73 Figure 2 connection will be failed If network address part of IP address is same l...

Page 54: ...EBGATE Inc 3 In this case you have only to change network address part of B104 s IP address after accessing B104 through local network For example you have to change 211 53 133 181 into 211 53 0 181 4...

Page 55: ...L 1 Stop connecting ADSL When connecting to local network again B104 can t be connected as followings The following example shows when Group ID is set as webgate Figure 1 When connecting B104 that is...

Page 56: ...1 4 WEBGATE Inc 2 In this case delete the current Group ID webgate of CRS If same camera is also registered in My Cameras both of them should be deleted When deleting all in both menus the B104 shows...

Page 57: ...dix i Rec B104 WEBGATE Inc 2003 06 30 v 1 4 57 3 User can register the B104 of Local Area Cameras to My Cameras directory by dragging At this time you should change its IP within the related local net...

Page 58: ...i Rec B104 Appendix 58 2003 06 30 v 1 4 WEBGATE Inc 4 3 When using Cable modem Check if DHCP Enable is selected You should not select xDSL PPPoE...

Page 59: ...ch may result in inappropriate operation or operation failure If you failed in upgrading i Rec B104 firmware or i Rec B104 does not operate properly after successful upgrading process contact WGI dist...

Page 60: ...on 3 If you click Starting Upgrade button the process will be operated automatically Then wait until a Kernel Root Upgrade is complete Now rebooting you Camera message appears Be cautious not to disco...

Page 61: ...104 Installation Guide v1 4 PDF i Rec B104 Installation Guide CamViewer II User s Guide v1 4 PDF CamViewer II User s Guide Preparatory step To read manuals within CD ROM DISC adobe acrobat 5 0 or abov...

Page 62: ...90x60 NTSC 720x576 720x288 360x288 180x144 90x72 PAL IMAGE COMPRESSION RATE 10 1 200 1 FRAME RATE Max up to 30fps IMAGE TRANSFER RATE Max 30fps NTSC on 360x243 25fps PAL on 360x288 Network BROWSER Cam...

Page 63: ...IMAGE ROTATION 0 180 PTZ CONTROL RS232 RS485 RS422 DIGITAL OUTPUT 4Ch MAX DC or AC Peak 250V 100mA SENSOR INPUT 4Ch TYPICAL 12mA in using Dry Contact Others POWER SUPPLIED ADAPTOR Input AC 100 240V 5...

Page 64: ...i Rec B104 Appendix 64 2003 06 30 v 1 4 WEBGATE Inc Mechanical DIMENSION 306mm X 298 mm X 67mm WEIGHT 3160g without HDD...

Page 65: ...689 6 Geumjeong dong Gunpo si Gyeonggi do Korea 435 862 Tel 82 31 428 9300 Fax 82 31 428 3955 Sales webgateinc com www webgateinc com WEBGATE Inc USA 465 Halstead St Suite 110 Pasadena California 9110...

Reviews: